Cirkit Designer Logo
Cirkit Designer
Your all-in-one circuit design IDE
Home / 
Component Documentation

How to Use ATX Power Supply: Examples, Pinouts, and Specs

Image of ATX Power Supply
Cirkit Designer LogoDesign with ATX Power Supply in Cirkit Designer

Introduction

The ATX Power Supply is a robust and versatile power supply unit (PSU) designed to deliver power to computer components in personal computers and workstations. It adheres to the ATX form factor standard, which is a configuration for PC power supply units set by Intel. The ATX 500W model is capable of providing up to 500 watts of power, making it suitable for a wide range of applications, from basic office systems to more demanding gaming rigs.

Explore Projects Built with ATX Power Supply

Use Cirkit Designer to design, explore, and prototype these projects online. Some projects support real-time simulation. Click "Open Project" to start designing instantly!
12V UPS System with Dual 18650 Li-ion Battery Backup and Voltage Regulation
Image of Power supply: A project utilizing ATX Power Supply in a practical application
This circuit is designed to provide an uninterruptible power supply (UPS) system with a 12V DC output. It includes a 12V 5A power supply connected to an AC source through a toggle switch, which charges a pair of 18650 Li-ion batteries via a voltage regulator (XL4016). The UPS module ensures a continuous power supply to the load by switching between the power supply and the battery bank.
Cirkit Designer LogoOpen Project in Cirkit Designer
Dual 5V Power Supply Distribution Circuit with Toggle Switch Control
Image of rfdriver: A project utilizing ATX Power Supply in a practical application
This circuit consists of two 5V 5A power supplies connected to an AC wall plug point, providing DC output through a 12-way connector. The ground connections from both power supplies are interconnected and also connected to the ground pins of two toggle switches. The DC outputs from the power supplies are separately connected to different pins on the 12-way connector, with each power supply output being switchable via one of the toggle switches.
Cirkit Designer LogoOpen Project in Cirkit Designer
AC to DC Power Supply with 7-Segment Voltage Display
Image of BEE PBL: A project utilizing ATX Power Supply in a practical application
This circuit is a regulated power supply that converts 220V AC to a lower, stable DC voltage. It includes a step-down transformer, bridge rectifier, voltage regulator, and filtering capacitors. A 7-segment display indicates the output voltage, which can be adjusted using a potentiometer.
Cirkit Designer LogoOpen Project in Cirkit Designer
AC to DC Power Supply with Voltage Regulation and LED Indicator
Image of Copy of 8 volt AC to DC convertor (1): A project utilizing ATX Power Supply in a practical application
This circuit is a basic AC to DC power supply with voltage regulation. It includes a transformer to step down the AC voltage, a bridge rectifier made of 1N4007 diodes to convert AC to DC, an electrolytic capacitor for smoothing, and a voltage regulator to provide a stable DC output. An LED with a current-limiting resistor indicates the presence of the output voltage.
Cirkit Designer LogoOpen Project in Cirkit Designer

Explore Projects Built with ATX Power Supply

Use Cirkit Designer to design, explore, and prototype these projects online. Some projects support real-time simulation. Click "Open Project" to start designing instantly!
Image of Power supply: A project utilizing ATX Power Supply in a practical application
12V UPS System with Dual 18650 Li-ion Battery Backup and Voltage Regulation
This circuit is designed to provide an uninterruptible power supply (UPS) system with a 12V DC output. It includes a 12V 5A power supply connected to an AC source through a toggle switch, which charges a pair of 18650 Li-ion batteries via a voltage regulator (XL4016). The UPS module ensures a continuous power supply to the load by switching between the power supply and the battery bank.
Cirkit Designer LogoOpen Project in Cirkit Designer
Image of rfdriver: A project utilizing ATX Power Supply in a practical application
Dual 5V Power Supply Distribution Circuit with Toggle Switch Control
This circuit consists of two 5V 5A power supplies connected to an AC wall plug point, providing DC output through a 12-way connector. The ground connections from both power supplies are interconnected and also connected to the ground pins of two toggle switches. The DC outputs from the power supplies are separately connected to different pins on the 12-way connector, with each power supply output being switchable via one of the toggle switches.
Cirkit Designer LogoOpen Project in Cirkit Designer
Image of BEE PBL: A project utilizing ATX Power Supply in a practical application
AC to DC Power Supply with 7-Segment Voltage Display
This circuit is a regulated power supply that converts 220V AC to a lower, stable DC voltage. It includes a step-down transformer, bridge rectifier, voltage regulator, and filtering capacitors. A 7-segment display indicates the output voltage, which can be adjusted using a potentiometer.
Cirkit Designer LogoOpen Project in Cirkit Designer
Image of Copy of 8 volt AC to DC convertor (1): A project utilizing ATX Power Supply in a practical application
AC to DC Power Supply with Voltage Regulation and LED Indicator
This circuit is a basic AC to DC power supply with voltage regulation. It includes a transformer to step down the AC voltage, a bridge rectifier made of 1N4007 diodes to convert AC to DC, an electrolytic capacitor for smoothing, and a voltage regulator to provide a stable DC output. An LED with a current-limiting resistor indicates the presence of the output voltage.
Cirkit Designer LogoOpen Project in Cirkit Designer

Common Applications and Use Cases

  • Personal desktop computers
  • Workstations
  • Gaming systems
  • Small servers
  • DIY electronics projects requiring higher power

Technical Specifications

Key Technical Details

  • Power Output: 500W
  • Input Voltage: 100-240V AC
  • Frequency: 50-60Hz
  • Efficiency: Typically 80% at typical load
  • Cooling: 120mm fan
  • Dimensions: Standard ATX (150mm x 86mm x 140mm)

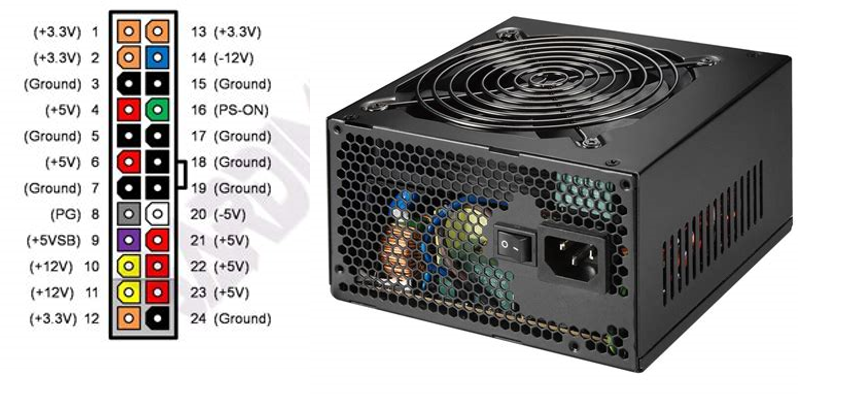
Pin Configuration and Descriptions

Pin Number Color Signal Name Description
1 Orange +3.3V Power Good signal
2 Red +5V Used by older components
3 Yellow +12V Main power for drives, fans, and other components
4 Blue -12V Legacy use, some serial ports
5 Black GND Ground
6 Green PS_ON# Power Supply On (active low)
7 Gray PWR_OK Power OK signal
8 Purple +5VSB Standby voltage for features like Wake-on-LAN

Note: This table represents a subset of the ATX 24-pin main power connector. For full pinout, refer to the manufacturer's datasheet.

Usage Instructions

How to Use the Component in a Circuit

  1. Safety First: Ensure the power supply is turned off and unplugged from the wall outlet before making any connections.
  2. Motherboard Connection: Connect the 24-pin ATX power connector to the motherboard. Ensure it is securely seated.
  3. Component Connections: Connect the 4-pin (or 8-pin) CPU power connector, SATA, Molex, or PCIe power connectors to the respective components such as hard drives, graphics cards, and optical drives.
  4. Power On: Once all connections are made, plug the power supply into the wall outlet and use the switch on the back to turn it on.

Important Considerations and Best Practices

  • Load Balancing: Ensure that the load is balanced across the different rails (+3.3V, +5V, +12V) to maintain stability.
  • Cable Management: Proper cable management helps improve airflow and cooling within the case.
  • Upgrades: When upgrading components, check the power requirements to ensure the PSU can handle the new load.
  • Ventilation: Ensure the PSU fan is not obstructed and there is adequate ventilation around the unit.

Troubleshooting and FAQs

Common Issues

  • System Won't Power On: Check the PS_ON# pin; it should be shorted to ground to turn on the PSU.
  • Insufficient Power: If the system is unstable or shutting down under load, the PSU may be insufficient for the system's power needs.
  • Overheating: If the PSU fan is not spinning or the unit is too hot, it may lead to shutdowns or damage.

Solutions and Tips for Troubleshooting

  • Power On Test: You can test the PSU by shorting the PS_ON# pin to ground using a paperclip. If the fan spins, the PSU is likely functional.
  • Check Connections: Ensure all cables are securely connected and that there are no loose wires.
  • Dust and Debris: Regularly clean the PSU and its surroundings to prevent dust buildup.

FAQs

Q: Can I use this PSU with a 220V outlet? A: Yes, the ATX 500W PSU supports a voltage range of 100-240V AC.

Q: What does the 'Power Good' signal do? A: The 'Power Good' signal is sent to the motherboard to indicate that the PSU is ready to supply stable power.

Q: How do I know if my PSU is underpowered for my system? A: Calculate the total power consumption of all components and compare it to the PSU's output. If it's close to or exceeds 500W, consider a higher wattage PSU.

For further assistance, please refer to the manufacturer's support resources or contact technical support.


Note: This documentation is for informational purposes only. Always consult the manufacturer's official documentation and follow safety guidelines when working with electronic components.