How to Use Hot End: Examples, Pinouts, and Specs
Introduction
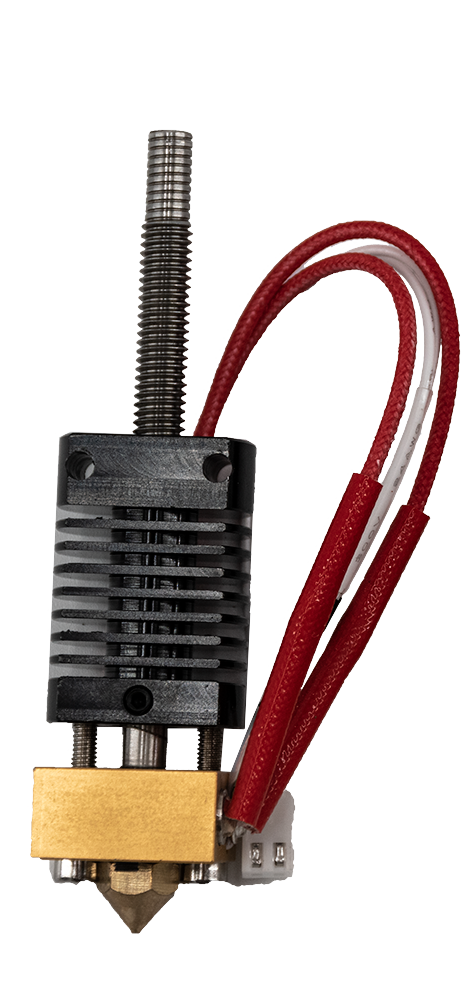
The hot end is a critical component in 3D printing technology, specifically in Fused Deposition Modeling (FDM) printers. It is responsible for heating and melting the filament, which is then extruded through a nozzle to form the layers of a 3D printed object. The hot end's performance is crucial for the quality of the print, as it affects the flow and adhesion of the melted filament.
Explore Projects Built with Hot End


Explore Projects Built with Hot End
Common Applications and Use Cases
- 3D printing of various objects in materials such as PLA, ABS, PETG, and more.
- Prototyping and manufacturing in industries like aerospace, automotive, and healthcare.
- Educational purposes in schools, universities, and maker spaces.
Technical Specifications
Key Technical Details
- Operating Temperature Range: Typically 180°C to 260°C for standard filaments; may vary for specialty filaments.
- Voltage Rating: Commonly 12V or 24V, depending on the printer model.
- Current Rating: Varies with the heater cartridge, typically around 2A to 5A.
- Power Rating: Usually between 30W to 40W for standard hot ends.
Pin Configuration and Descriptions
| Pin Number | Description | Notes |
|---|---|---|
| 1 | Heater Cartridge (+) | Power input for the heating element |
| 2 | Heater Cartridge (-) | Return path for heating element power |
| 3 | Thermistor/Temp Sensor (+) | Signal line for temperature sensor |
| 4 | Thermistor/Temp Sensor (-) | Return path for temperature sensor signal |
Usage Instructions
How to Use the Hot End in a Circuit
- Power Supply Connection: Connect the heater cartridge pins to a suitable power supply, ensuring the voltage matches the hot end's specifications.
- Temperature Sensor Connection: Attach the temperature sensor pins to the 3D printer's control board, ensuring proper polarity.
- Control Board Configuration: Configure the 3D printer's firmware to recognize the hot end's temperature sensor and heater cartridge.
Important Considerations and Best Practices
- Temperature Monitoring: Always monitor the hot end's temperature to prevent overheating and potential damage.
- Thermal Runaway Protection: Ensure the printer's firmware has thermal runaway protection enabled for safety.
- Nozzle Cleaning: Keep the nozzle clean to prevent clogs and ensure consistent extrusion.
- Proper Mounting: Secure the hot end to the printer's extruder assembly to minimize vibrations and misalignment.
Troubleshooting and FAQs
Common Issues Users Might Face
- Clogging: Filament not extruding properly due to a clogged nozzle.
- Thermal Runaway: Printer stops heating due to a detected anomaly in temperature readings.
- Inconsistent Heating: Fluctuating temperatures leading to poor print quality.
Solutions and Tips for Troubleshooting
- Clogging: Disassemble the nozzle and clean it thoroughly. Consider using a needle or specialized tool to remove the blockage.
- Thermal Runaway: Check the wiring and connections of the temperature sensor and heater cartridge. Replace faulty components if necessary.
- Inconsistent Heating: Ensure that the temperature sensor is properly secured and making good contact with the hot end.
FAQs
Q: How often should I replace the nozzle? A: Replace the nozzle when you notice a consistent decline in print quality or if it becomes clogged beyond cleaning.
Q: Can I use any filament with my hot end? A: Use filaments that are compatible with the temperature range of your hot end. Check the filament specifications before use.
Q: What should I do if the hot end is not heating up? A: Verify the power supply and connections. If everything is correct, the heater cartridge might need replacement.
Example Code for Arduino UNO
The following is an example code snippet for controlling a hot end with an Arduino UNO. This code assumes the use of a relay module to switch the heater cartridge and a thermistor for temperature sensing.
#include <Thermistor.h>

// Pin assignments
const int relayPin = 2; // Relay module connected to digital pin 2
const int thermistorPin = A0; // Thermistor connected to analog pin A0

// Thermistor setup (values may vary based on the thermistor type)
Thermistor thermistor(thermistorPin);

void setup() {
  pinMode(relayPin, OUTPUT);
  Serial.begin(9600);
}

void loop() {
  int temperature = thermistor.getTemperature();
  Serial.print("Current Temperature: ");
  Serial.print(temperature);
  Serial.println(" C");

  // Simple control: turn on the hot end if below target temperature
  int targetTemperature = 200; // Set your target temperature here
  if (temperature < targetTemperature) {
    digitalWrite(relayPin, HIGH); // Turn on the hot end
  } else {
    digitalWrite(relayPin, LOW); // Turn off the hot end
  }

  delay(1000); // Wait for 1 second before reading the temperature again
}
Note: This code is for demonstration purposes only and should be integrated into a full 3D printer firmware for practical use. Always ensure safety features are implemented and tested.