How to Use GLEDOPTO WLED Controller: Examples, Pinouts, and Specs
Introduction
The GLEDOPTO WLED Controller (GL-C-016WL-D) is a versatile smart LED controller designed to provide seamless control over LED lighting systems. It enables users to customize lighting effects, including color changes, dimming, and scheduling, through Wi-Fi connectivity. This controller is compatible with popular smart home ecosystems and mobile apps, making it an excellent choice for modern lighting solutions.
Explore Projects Built with GLEDOPTO WLED Controller


Explore Projects Built with GLEDOPTO WLED Controller
Common Applications and Use Cases
- Smart home lighting systems
- Decorative RGB/RGBW LED installations
- Ambient lighting for residential and commercial spaces
- Integration with voice assistants like Amazon Alexa and Google Assistant
- Customizable lighting for events and parties
Technical Specifications
Key Technical Details
| Parameter | Specification |
|---|---|
| Manufacturer | GLEDOPTO |
| Part ID | GL-C-016WL-D |
| Input Voltage | 12V - 24V DC |
| Maximum Output Current | 5A per channel |
| Maximum Output Power | 144W (12V) / 288W (24V) |
| Channels | 4 (RGBW) |
| Connectivity | Wi-Fi (2.4 GHz) |
| Protocol Support | WLED, MQTT, HTTP API |
| Dimensions | 85mm x 45mm x 22mm |
| Operating Temperature | -20°C to 50°C |
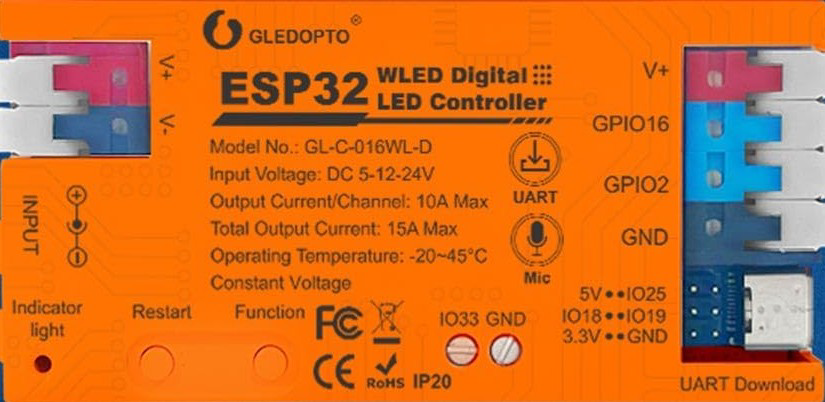
Pin Configuration and Descriptions
| Pin Name | Description |
|---|---|
| V+ | Positive voltage input (12V or 24V DC) |
| R | Red channel output |
| G | Green channel output |
| B | Blue channel output |
| W | White channel output |
| GND | Ground connection |
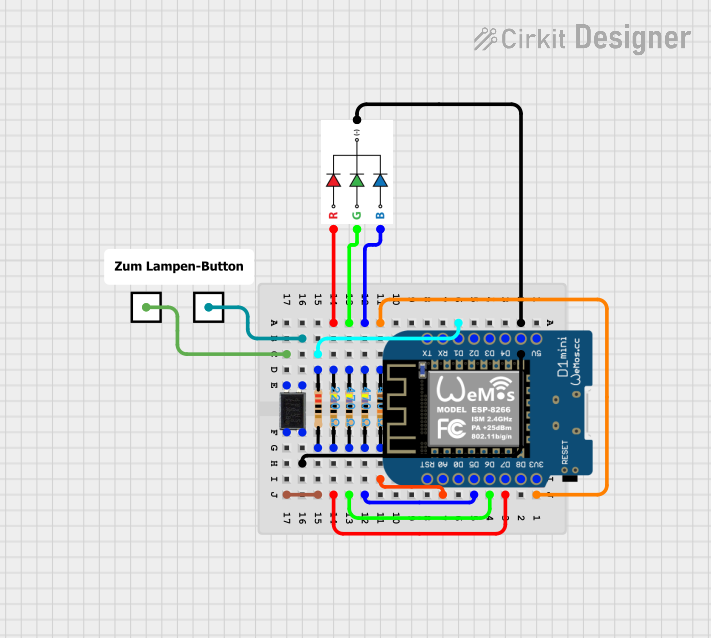
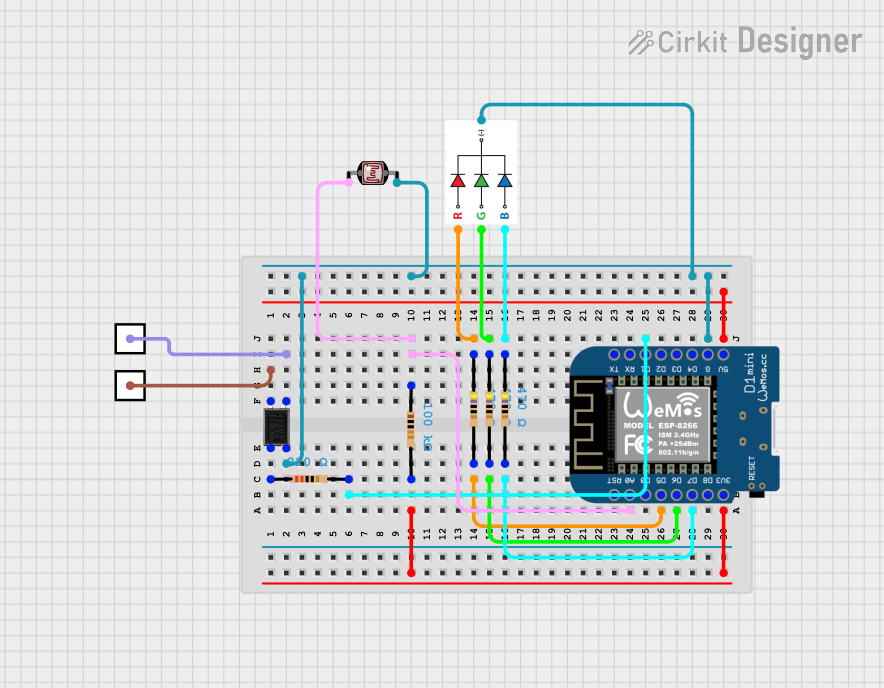
Usage Instructions
How to Use the Component in a Circuit
- Power Supply: Connect a 12V or 24V DC power supply to the
V+andGNDpins of the controller. Ensure the power supply matches the voltage requirements of your LED strip. - LED Strip Connection: Connect the RGBW LED strip to the
R,G,B, andWoutput pins. If using an RGB-only strip, leave theWpin unconnected. - Wi-Fi Setup:
- Power on the controller and connect to its default Wi-Fi network (SSID:
GLEDOPTO-XXXX). - Open the WLED app or a web browser and navigate to the controller's IP address (default:
192.168.4.1). - Configure the controller to connect to your home Wi-Fi network.
- Power on the controller and connect to its default Wi-Fi network (SSID:
- Control: Use the WLED app, MQTT, or HTTP API to control the lighting effects, colors, and brightness.
Important Considerations and Best Practices
- Voltage Compatibility: Ensure the input voltage matches the LED strip's requirements (12V or 24V). Using the wrong voltage can damage the controller or LEDs.
- Current Limitations: Do not exceed the maximum current rating of 5A per channel. Use an appropriate power supply to handle the total power consumption.
- Heat Management: Install the controller in a well-ventilated area to prevent overheating, especially when operating at high power levels.
- Firmware Updates: Regularly check for firmware updates to ensure compatibility with the latest features and smart home integrations.
Example Code for Arduino UNO Integration
The GLEDOPTO WLED Controller can be controlled via HTTP requests. Below is an example of how to send commands using an Arduino UNO with an ESP8266 Wi-Fi module:
#include <ESP8266WiFi.h>
#include <ESP8266HTTPClient.h>

// Wi-Fi credentials
const char* ssid = "YourWiFiSSID";       // Replace with your Wi-Fi SSID
const char* password = "YourWiFiPassword"; // Replace with your Wi-Fi password

// WLED Controller IP address
const char* wledIP = "192.168.1.100";    // Replace with your controller's IP

void setup() {
  Serial.begin(115200);
  WiFi.begin(ssid, password);

  // Wait for Wi-Fi connection
  while (WiFi.status() != WL_CONNECTED) {
    delay(1000);
    Serial.println("Connecting to Wi-Fi...");
  }
  Serial.println("Connected to Wi-Fi");
}

void loop() {
  if (WiFi.status() == WL_CONNECTED) {
    HTTPClient http;

    // Example: Set LED color to red
    String url = String("http://") + wledIP + "/win&RGB=FF0000";

    http.begin(url); // Initialize HTTP request
    int httpCode = http.GET(); // Send GET request

    if (httpCode > 0) {
      Serial.println("Command sent successfully");
    } else {
      Serial.println("Error sending command");
    }

    http.end(); // Close connection
  }

  delay(5000); // Wait 5 seconds before sending the next command
}
Troubleshooting and FAQs
Common Issues and Solutions
Controller Not Connecting to Wi-Fi:
- Ensure the Wi-Fi network is 2.4 GHz, as the controller does not support 5 GHz networks.
- Double-check the SSID and password entered during setup.
- Reset the controller by powering it off and on, then reattempt the setup process.
LEDs Not Lighting Up:
- Verify the power supply voltage and current ratings match the LED strip's requirements.
- Check all connections to ensure they are secure and correctly wired.
- Test the LED strip with a different controller to rule out hardware issues.
Flickering or Inconsistent Colors:
- Ensure the power supply can handle the total power consumption of the LED strip.
- Use shorter cable lengths between the controller and LED strip to reduce voltage drop.
- Avoid exceeding the maximum current rating of 5A per channel.
Unable to Control via App:
- Confirm the controller is connected to the same Wi-Fi network as your mobile device.
- Restart the WLED app and ensure it is updated to the latest version.
- Check the controller's IP address and ensure it is reachable.
FAQs
Can I use this controller with non-RGBW LED strips? Yes, you can use it with RGB or single-color LED strips. Leave unused output pins unconnected.
Does the controller support voice assistants? Yes, it is compatible with Amazon Alexa and Google Assistant when integrated with WLED.
How do I reset the controller to factory settings? Press and hold the reset button (if available) for 10 seconds, or refer to the WLED documentation for software reset instructions.
Can I control multiple controllers simultaneously? Yes, you can control multiple controllers using the WLED app or by sending HTTP/MQTT commands to each device's IP address.