How to Use ESP32C3: Examples, Pinouts, and Specs
Introduction
The ESP32C3 by XIAO is a low-power, dual-mode Wi-Fi and Bluetooth System-on-Chip (SoC) designed specifically for Internet of Things (IoT) applications. It is built around a 32-bit RISC-V microcontroller and integrates both Wi-Fi and Bluetooth Low Energy (BLE) capabilities. This compact and versatile chip supports a wide range of peripherals, making it an excellent choice for smart devices, wearables, home automation, and other wireless connectivity applications.
Explore Projects Built with ESP32C3


Explore Projects Built with ESP32C3
Common Applications
- Smart home devices (e.g., smart plugs, lights, and thermostats)
- Wearable technology
- Industrial IoT systems
- Wireless sensors and actuators
- Remote monitoring and control systems
- Low-power Bluetooth and Wi-Fi-enabled devices
Technical Specifications
Key Technical Details
| Parameter | Specification |
|---|---|
| Microcontroller Core | 32-bit RISC-V |
| Clock Speed | Up to 160 MHz |
| Flash Memory | 4 MB (varies by module) |
| RAM | 400 KB SRAM |
| Wi-Fi | IEEE 802.11 b/g/n (2.4 GHz) |
| Bluetooth | Bluetooth 5.0 LE |
| Operating Voltage | 3.3V |
| GPIO Pins | Up to 22 configurable GPIOs |
| Communication Interfaces | UART, SPI, I2C, I2S, PWM, ADC |
| ADC Resolution | 12-bit |
| Power Consumption | Ultra-low power in deep sleep mode (~5 µA) |
| Operating Temperature | -40°C to +85°C |
| Package | QFN32 |
Pin Configuration and Descriptions
| Pin Number | Pin Name | Description |
|---|---|---|
| 1 | VDD | Power supply (3.3V) |
| 2 | GND | Ground |
| 3 | GPIO0 | General-purpose I/O, boot mode selection |
| 4 | GPIO1 | General-purpose I/O, UART TX |
| 5 | GPIO2 | General-purpose I/O, UART RX |
| 6 | GPIO3 | General-purpose I/O, ADC input |
| 7 | GPIO4 | General-purpose I/O, PWM output |
| 8 | GPIO5 | General-purpose I/O, SPI CLK |
| 9 | GPIO6 | General-purpose I/O, SPI MOSI |
| 10 | GPIO7 | General-purpose I/O, SPI MISO |
| 11 | EN | Chip enable (active high) |
| 12 | RST | Reset pin |
Note: The exact pinout may vary depending on the specific module or development board used. Always refer to the manufacturer's datasheet for precise details.
Usage Instructions
How to Use the ESP32C3 in a Circuit
- Power Supply: Connect the VDD pin to a stable 3.3V power source and GND to ground.
- Boot Mode: To enter bootloader mode for programming, pull GPIO0 low during reset.
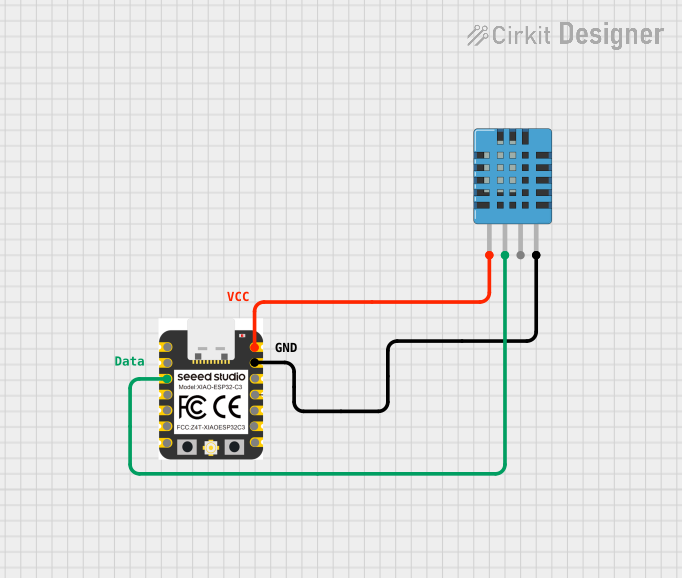
- Peripherals: Use the GPIO pins for interfacing with sensors, actuators, or other devices. Configure the pins as input or output in your firmware.
- Communication: Utilize UART, SPI, or I2C for communication with external devices. For example:
- UART for serial communication with a PC or other microcontrollers.
- SPI for high-speed communication with sensors or displays.
- I2C for connecting multiple devices on a shared bus.
- Programming: Use the Arduino IDE, ESP-IDF, or other supported environments to write and upload firmware.
Important Considerations and Best Practices
- Voltage Levels: Ensure all connected peripherals operate at 3.3V logic levels to avoid damaging the ESP32C3.
- Power Supply: Use a low-noise, stable power source to prevent erratic behavior.
- Antenna Placement: For optimal Wi-Fi and Bluetooth performance, ensure the antenna area is free from obstructions and metallic objects.
- Deep Sleep Mode: Use the deep sleep mode to minimize power consumption in battery-powered applications.
- Firmware Updates: Regularly update the firmware to benefit from the latest features and security patches.
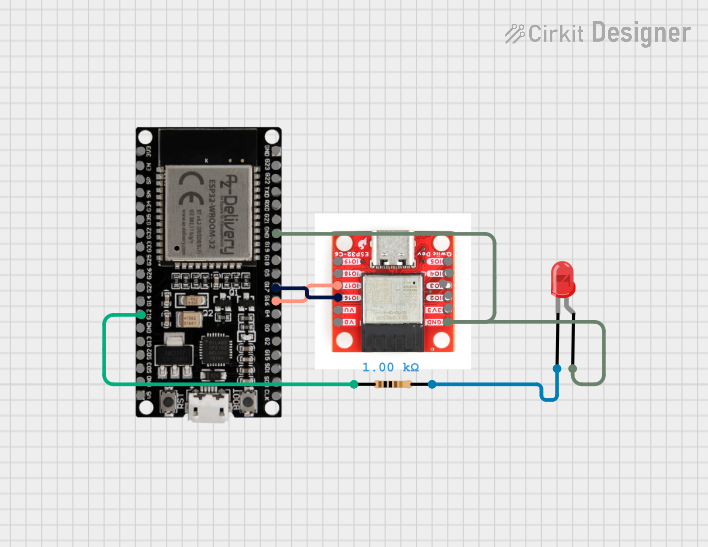
Example: Connecting ESP32C3 to an Arduino UNO
Below is an example of using the ESP32C3 with the Arduino IDE to blink an LED connected to GPIO4:
// Define the GPIO pin for the LED
#define LED_PIN 4

void setup() {
  // Initialize the LED pin as an output
  pinMode(LED_PIN, OUTPUT);
}

void loop() {
  // Turn the LED on
  digitalWrite(LED_PIN, HIGH);
  delay(1000); // Wait for 1 second

  // Turn the LED off
  digitalWrite(LED_PIN, LOW);
  delay(1000); // Wait for 1 second
}
Tip: Install the ESP32 board package in the Arduino IDE before uploading the code. Go to File > Preferences, add the ESP32 board URL to the "Additional Board Manager URLs," and install the ESP32 package via the Board Manager.
Troubleshooting and FAQs
Common Issues and Solutions
ESP32C3 Not Detected by PC
- Cause: Missing USB-to-serial driver.
- Solution: Install the appropriate driver for the USB-to-serial chip used on your ESP32C3 module (e.g., CH340 or CP2102).
Wi-Fi Connection Fails
- Cause: Incorrect SSID or password.
- Solution: Double-check the Wi-Fi credentials in your code. Ensure the router is within range.
Bluetooth Device Not Discoverable
- Cause: Bluetooth not initialized in firmware.
- Solution: Verify that the Bluetooth stack is properly configured and initialized in your code.
High Power Consumption
- Cause: Device not entering deep sleep mode.
- Solution: Use the
esp_deep_sleep_start()function to enable deep sleep in your firmware.
GPIO Pin Not Responding
- Cause: Pin configured incorrectly or used by another peripheral.
- Solution: Check the pin configuration in your code and ensure it is not reserved for other functions.
FAQs
Q: Can the ESP32C3 operate on 5V?
A: No, the ESP32C3 operates at 3.3V. Use a level shifter if interfacing with 5V devices.Q: How do I reset the ESP32C3?
A: Press the reset button on the development board or pull the RST pin low momentarily.Q: Is the ESP32C3 compatible with the ESP-IDF?
A: Yes, the ESP32C3 is fully supported by the ESP-IDF development framework.Q: Can I use the ESP32C3 for battery-powered applications?
A: Yes, the ESP32C3 is optimized for low-power operation and supports deep sleep mode for extended battery life.