How to Use Tube Socket 9Pin: Examples, Pinouts, and Specs
Introduction
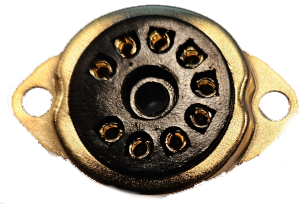
The Tube Socket 9Pin (PCP9-F), manufactured by GD-Parts, is a high-quality socket designed to securely hold and connect 9-pin vacuum tubes in electronic circuits. It provides both electrical connections and mechanical support, ensuring reliable operation in audio amplifiers, radio equipment, and other vacuum tube-based devices. This socket is compatible with popular 9-pin vacuum tubes such as the ECC83, 12AX7, and EL84.
Explore Projects Built with Tube Socket 9Pin


Explore Projects Built with Tube Socket 9Pin
Common Applications and Use Cases
- Audio Amplifiers: Used in high-fidelity tube amplifiers for audio signal processing.
- Radio Equipment: Provides connections for vacuum tubes in vintage and modern radio systems.
- Guitar Amplifiers: Essential for tube-based guitar amplifiers to achieve warm, analog sound.
- DIY Electronics Projects: Ideal for hobbyists building custom tube-based circuits.
Technical Specifications
The following table outlines the key technical details of the Tube Socket 9Pin (PCP9-F):
| Parameter | Specification |
|---|---|
| Manufacturer | GD-Parts |
| Part ID | PCP9-F |
| Number of Pins | 9 |
| Material | Ceramic base with gold-plated contacts |
| Mounting Type | Chassis mount |
| Pin Diameter | 1.02 mm |
| Pin Spacing | 2.54 mm (standard 9-pin configuration) |
| Operating Temperature | -40°C to +125°C |
| Dimensions | 30 mm (diameter) x 15 mm (height) |
Pin Configuration and Descriptions
The Tube Socket 9Pin follows the standard 9-pin vacuum tube configuration. The pinout is as follows:
| Pin Number | Description |
|---|---|
| 1 | Plate (Anode) |
| 2 | Grid 1 (Control Grid) |
| 3 | Cathode |
| 4 | Heater (Filament) |
| 5 | Heater (Filament) |
| 6 | Plate (Anode) |
| 7 | Grid 2 (Screen Grid) |
| 8 | Cathode |
| 9 | Grid 3 (Suppressor Grid) or NC |
Usage Instructions
How to Use the Component in a Circuit
- Mounting the Socket: Secure the Tube Socket 9Pin to the chassis of your device using screws or rivets. Ensure the socket is firmly attached to prevent movement during operation.
- Connecting the Pins: Solder wires to the gold-plated pins according to the circuit design. Refer to the pin configuration table to ensure proper connections.
- Inserting the Vacuum Tube: Align the tube's pins with the socket and gently press it into place. Avoid excessive force to prevent damage to the tube or socket.
- Testing the Circuit: After assembly, power on the circuit and verify that the vacuum tube operates as expected.
Important Considerations and Best Practices
- Avoid Overheating: When soldering wires to the socket pins, use a soldering iron with a temperature-controlled tip to avoid overheating the ceramic base.
- Ensure Proper Ventilation: Vacuum tubes generate heat during operation. Ensure adequate ventilation around the socket to prevent overheating.
- Check Compatibility: Verify that the vacuum tube is compatible with the 9-pin socket and the circuit design.
- Handle with Care: Both the socket and vacuum tube are delicate components. Handle them carefully to avoid physical damage.
Example: Connecting to an Arduino UNO
While the Tube Socket 9Pin is not directly compatible with digital microcontrollers like the Arduino UNO, it can be used in conjunction with an analog circuit to process signals. For example, you can use the socket to hold a 12AX7 vacuum tube in a preamplifier circuit, which can then interface with the Arduino for signal analysis.
// Example: Reading the output of a tube preamplifier with Arduino UNO
// Note: The tube preamplifier circuit must be built separately and connected
// to the Arduino's analog input pin.

const int analogPin = A0; // Analog pin connected to the preamplifier output

void setup() {
  Serial.begin(9600); // Initialize serial communication
}

void loop() {
  int sensorValue = analogRead(analogPin); // Read the analog signal
  float voltage = sensorValue * (5.0 / 1023.0); // Convert to voltage
  Serial.print("Voltage: ");
  Serial.println(voltage); // Print the voltage to the Serial Monitor
  delay(100); // Delay for stability
}
Troubleshooting and FAQs
Common Issues Users Might Face
- Loose Connections: If the vacuum tube is not making proper contact with the socket, check for bent pins or debris in the socket.
- Overheating: Excessive heat may indicate poor ventilation or incorrect circuit design. Ensure proper airflow and verify the circuit.
- Intermittent Operation: This can be caused by poor solder joints or loose mounting. Inspect and re-solder connections if necessary.
Solutions and Tips for Troubleshooting
- Inspect the Socket: Check for physical damage, such as cracks in the ceramic base or bent pins.
- Test Continuity: Use a multimeter to verify electrical continuity between the socket pins and the circuit.
- Clean the Contacts: If the socket contacts are dirty or oxidized, clean them gently with a contact cleaner or isopropyl alcohol.
- Verify Tube Compatibility: Ensure the vacuum tube is compatible with the 9-pin socket and the circuit design.
By following this documentation, users can effectively integrate the Tube Socket 9Pin (PCP9-F) into their electronic projects, ensuring reliable and efficient operation.