Cirkit Designer Logo
Cirkit Designer
Your all-in-one circuit design IDE
Home / 
Component Documentation

How to Use Adafruit 14-segment LED Alphanumeric Backpack Yellow: Examples, Pinouts, and Specs

Image of Adafruit 14-segment LED Alphanumeric Backpack Yellow
Cirkit Designer LogoDesign with Adafruit 14-segment LED Alphanumeric Backpack Yellow in Cirkit Designer

Introduction

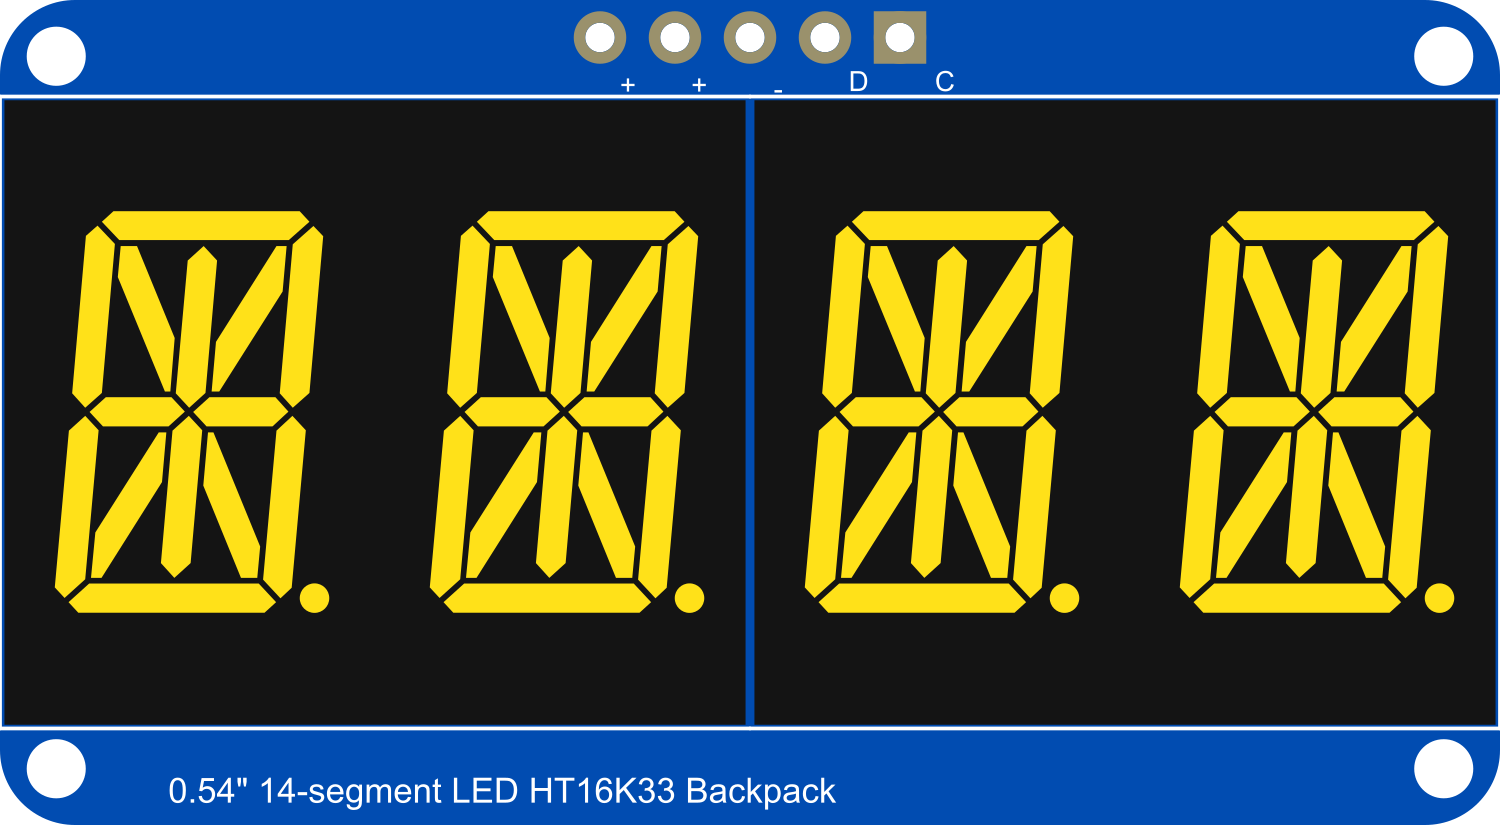
The Adafruit 14-Segment LED Alphanumeric Backpack with yellow LEDs is a versatile and visually appealing display module. This component is designed to show numbers, letters, and some special characters by illuminating specific combinations of its 14 segments. It is commonly used in digital clocks, counters, and any application requiring alphanumeric displays without the complexity of a full graphical screen.

Explore Projects Built with Adafruit 14-segment LED Alphanumeric Backpack Yellow

Use Cirkit Designer to design, explore, and prototype these projects online. Some projects support real-time simulation. Click "Open Project" to start designing instantly!
Arduino UNO Controlled LED and 7-Segment Display Circuit
Image of Beunen aan water: A project utilizing Adafruit 14-segment LED Alphanumeric Backpack Yellow in a practical application
This circuit features an Arduino UNO controlling multiple blue LEDs and a 4-digit 7-segment display. The LEDs are configured with current-limiting resistors, and the display is interfaced with the Arduino for potential numeric or character output. The provided code for the Arduino is a template without specific functionality.
Cirkit Designer LogoOpen Project in Cirkit Designer
Arduino UNO Controlled NeoPixel Ring Light Show
Image of 6 Ring Series: A project utilizing Adafruit 14-segment LED Alphanumeric Backpack Yellow in a practical application
This circuit consists of an Arduino UNO microcontroller connected to six Adafruit 12 NeoPixel Rings, each with 12 LEDs, for a total of 72 LEDs. The Arduino controls the LEDs to display a yellow color with varying brightness, creating a pulsating effect.
Cirkit Designer LogoOpen Project in Cirkit Designer
Arduino UNO Controlled Dual Seven Segment Display with Pushbutton Interaction and AHT10 Temperature Sensor
Image of enel290: A project utilizing Adafruit 14-segment LED Alphanumeric Backpack Yellow in a practical application
This circuit features an Arduino UNO microcontroller connected to two seven-segment displays, a pushbutton, a red LED with a 330-ohm resistor, and an AHT10 temperature and humidity sensor. The Arduino controls the segments of the displays via its digital pins and reads the pushbutton state. The LED is used as an indicator, and the AHT10 sensor interfaces with the Arduino over I2C to provide environmental data.
Cirkit Designer LogoOpen Project in Cirkit Designer
Arduino Nano Controlled Joystick and Rotary Encoder Interface with OLED Display and Multi-Color LED Feedback
Image of Blinking LED  with joystick: A project utilizing Adafruit 14-segment LED Alphanumeric Backpack Yellow in a practical application
This circuit features an Arduino Nano interfaced with a joystick module, a rotary encoder, an OLED display, and multiple LEDs with current-limiting resistors. The joystick controls the selection of LED colors and toggles a blinking mode, while the rotary encoder adjusts the brightness of the LEDs and toggles their on/off state. The OLED display provides real-time feedback on the LED color, brightness level, and mode, enhancing user interaction.
Cirkit Designer LogoOpen Project in Cirkit Designer

Explore Projects Built with Adafruit 14-segment LED Alphanumeric Backpack Yellow

Use Cirkit Designer to design, explore, and prototype these projects online. Some projects support real-time simulation. Click "Open Project" to start designing instantly!
Image of Beunen aan water: A project utilizing Adafruit 14-segment LED Alphanumeric Backpack Yellow in a practical application
Arduino UNO Controlled LED and 7-Segment Display Circuit
This circuit features an Arduino UNO controlling multiple blue LEDs and a 4-digit 7-segment display. The LEDs are configured with current-limiting resistors, and the display is interfaced with the Arduino for potential numeric or character output. The provided code for the Arduino is a template without specific functionality.
Cirkit Designer LogoOpen Project in Cirkit Designer
Image of 6 Ring Series: A project utilizing Adafruit 14-segment LED Alphanumeric Backpack Yellow in a practical application
Arduino UNO Controlled NeoPixel Ring Light Show
This circuit consists of an Arduino UNO microcontroller connected to six Adafruit 12 NeoPixel Rings, each with 12 LEDs, for a total of 72 LEDs. The Arduino controls the LEDs to display a yellow color with varying brightness, creating a pulsating effect.
Cirkit Designer LogoOpen Project in Cirkit Designer
Image of enel290: A project utilizing Adafruit 14-segment LED Alphanumeric Backpack Yellow in a practical application
Arduino UNO Controlled Dual Seven Segment Display with Pushbutton Interaction and AHT10 Temperature Sensor
This circuit features an Arduino UNO microcontroller connected to two seven-segment displays, a pushbutton, a red LED with a 330-ohm resistor, and an AHT10 temperature and humidity sensor. The Arduino controls the segments of the displays via its digital pins and reads the pushbutton state. The LED is used as an indicator, and the AHT10 sensor interfaces with the Arduino over I2C to provide environmental data.
Cirkit Designer LogoOpen Project in Cirkit Designer
Image of Blinking LED  with joystick: A project utilizing Adafruit 14-segment LED Alphanumeric Backpack Yellow in a practical application
Arduino Nano Controlled Joystick and Rotary Encoder Interface with OLED Display and Multi-Color LED Feedback
This circuit features an Arduino Nano interfaced with a joystick module, a rotary encoder, an OLED display, and multiple LEDs with current-limiting resistors. The joystick controls the selection of LED colors and toggles a blinking mode, while the rotary encoder adjusts the brightness of the LEDs and toggles their on/off state. The OLED display provides real-time feedback on the LED color, brightness level, and mode, enhancing user interaction.
Cirkit Designer LogoOpen Project in Cirkit Designer

Common Applications and Use Cases

  • Digital clocks and timers
  • Counter displays
  • Electronic scoreboards
  • Message boards
  • User interfaces for projects

Technical Specifications

Key Technical Details

  • Display Color: Yellow
  • Operating Voltage: 3.3V - 5V
  • Max Current (per segment): 20mA
  • I2C Interface: Yes
  • Dimensions: 1.4" x 1.75" x 0.07" (without headers)

Pin Configuration and Descriptions

Pin Function Description
GND Ground Connect to system ground
VCC Power Supply 3.3V - 5V power supply to the backpack
SDA I2C Data I2C data line
SCL I2C Clock I2C clock line
RST Reset (optional) Active-low reset, typically pulled high

Usage Instructions

How to Use the Component in a Circuit

  1. Power Connections: Connect the VCC pin to a 3.3V or 5V power supply and the GND pin to the ground of your power supply.
  2. I2C Connections: Connect the SDA and SCL pins to the I2C data and clock lines on your microcontroller.
  3. Address Selection: The backpack has solder jumpers for address selection, allowing multiple units on the same I2C bus. Set these according to your needs.
  4. Programming: Use the Adafruit LED Backpack library to control the display through your microcontroller.

Important Considerations and Best Practices

  • Ensure that the power supply is within the specified voltage range to prevent damage.
  • Use pull-up resistors on the I2C lines if your microcontroller does not have them built-in.
  • When daisy-chaining multiple displays, ensure that each has a unique I2C address.
  • Avoid exposing the display to direct sunlight for extended periods to prevent color fading.

Example Code for Arduino UNO

#include <Wire.h>
#include <Adafruit_GFX.h>
#include <Adafruit_LEDBackpack.h>

Adafruit_AlphaNum4 alpha4 = Adafruit_AlphaNum4();

void setup() {
  alpha4.begin(0x70);  // Initialize the display with its I2C address
}

void loop() {
  alpha4.writeDigitAscii(0, 'A'); // Display 'A' on the first character position
  alpha4.writeDigitAscii(1, 'd'); // Display 'd' on the second character position
  alpha4.writeDigitAscii(2, 'a'); // Display 'a' on the third character position
  alpha4.writeDigitAscii(3, 'F'); // Display 'F' on the fourth character position
  alpha4.writeDisplay();          // Send data to the display to show the characters
  delay(1000);                    // Wait for 1 second
}

Troubleshooting and FAQs

Common Issues

  • Display Not Lighting Up: Check the power connections and ensure the voltage is correct. Verify that the I2C connections are secure and that the correct I2C address is being used in your code.
  • Garbled Characters: This can be due to incorrect I2C communication. Check for loose connections and ensure pull-up resistors are in place if needed.
  • Dim Display: Ensure that the power supply can deliver sufficient current for all segments. If multiple displays are connected, the power supply must be able to handle the cumulative current draw.

Solutions and Tips for Troubleshooting

  • Double-check wiring, especially the I2C lines and power connections.
  • Use the i2cdetect utility or similar to confirm the device's address on the I2C bus.
  • Review the Adafruit LED Backpack library's documentation for additional functions and examples.

FAQs

Q: Can I use this display with a 3.3V system?
A: Yes, the display can operate at 3.3V, but the brightness may be reduced compared to 5V operation.

Q: How many of these displays can I chain together?
A: You can chain up to eight displays using different I2C addresses.

Q: Is it possible to display custom characters?
A: Yes, the Adafruit GFX library allows you to define custom characters by setting individual segments.

Q: Can I use this display with platforms other than Arduino?
A: Yes, as long as the platform supports I2C communication and you can port or find a compatible library for controlling the LED driver.