How to Use u2c: Examples, Pinouts, and Specs
Introduction
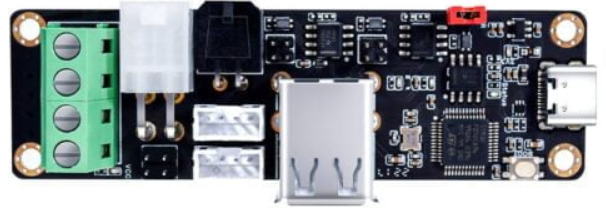
The U2C (Universal to CAN) converter is a versatile electronic device designed to bridge communication between USB interfaces and Controller Area Network (CAN) systems. It enables seamless data transfer and control, making it an essential tool in automotive diagnostics, industrial automation, and embedded system development. By converting USB signals to CAN protocol, the U2C allows users to monitor, debug, and control CAN-based systems using a standard computer or microcontroller.
Explore Projects Built with u2c


Explore Projects Built with u2c
Common Applications and Use Cases
- Automotive diagnostics and testing
- Industrial automation and control systems
- Embedded system development and debugging
- Real-time monitoring of CAN networks
- Prototyping and testing CAN-based devices
Technical Specifications
Key Technical Details
| Parameter | Value/Description |
|---|---|
| USB Interface | USB 2.0 (compatible with USB 1.1 and 3.0) |
| CAN Protocol Support | CAN 2.0A and CAN 2.0B |
| Baud Rate (CAN) | Up to 1 Mbps |
| Operating Voltage | 5V (via USB) |
| Current Consumption | Typically < 100 mA |
| Operating Temperature | -40°C to +85°C |
| Dimensions | Compact, varies by manufacturer |
| Drivers | Compatible with Windows, Linux, and macOS |
Pin Configuration and Descriptions
The U2C converter typically has the following pinouts for the CAN interface:
| Pin Number | Pin Name | Description |
|---|---|---|
| 1 | CAN_H | High line of the CAN bus |
| 2 | CAN_L | Low line of the CAN bus |
| 3 | GND | Ground connection for the CAN bus |
| 4 | V+ (Optional) | Optional power supply for external devices |
| 5 | Shield | Shielding for the CAN cable (optional) |
The USB interface connects directly to a computer or microcontroller via a standard USB Type-A or Type-C connector, depending on the model.
Usage Instructions
How to Use the U2C Converter in a Circuit
- Connect the USB Interface: Plug the U2C converter into a USB port on your computer or microcontroller.
- Install Drivers: Ensure the appropriate drivers for your operating system are installed. These are typically provided by the manufacturer or can be downloaded from their website.
- Connect to the CAN Bus:
- Attach the
CAN_HandCAN_Lpins to the corresponding lines on the CAN bus. - Connect the
GNDpin to the ground of the CAN system. - If required, connect the
V+pin to power external devices.
- Attach the
- Configure the Software:
- Use CAN monitoring software or a custom application to configure the baud rate and other settings.
- Ensure the baud rate matches the CAN network's configuration.
- Start Communication: Begin sending and receiving CAN messages using the software interface.
Important Considerations and Best Practices
- Termination Resistors: Ensure the CAN bus is properly terminated with 120-ohm resistors at both ends to prevent signal reflections.
- Baud Rate Matching: The U2C converter's baud rate must match the CAN network's baud rate for successful communication.
- Cable Length: Keep the CAN bus cable length within the recommended limits to avoid signal degradation.
- Power Supply: If using the
V+pin, ensure the connected device does not exceed the U2C's power output capacity.
Example Code for Arduino UNO
The U2C converter can be used with an Arduino UNO to send and receive CAN messages. Below is an example using the CAN library:
#include <CAN.h> // Include the CAN library

void setup() {
  Serial.begin(9600); // Initialize serial communication for debugging
  while (!Serial);

  // Initialize the CAN bus at 500 kbps
  if (!CAN.begin(500E3)) {
    Serial.println("Starting CAN failed!");
    while (1);
  }
  Serial.println("CAN initialized successfully.");
}

void loop() {
  // Send a CAN message
  CAN.beginPacket(0x123); // Set CAN ID to 0x123
  CAN.write(0x45);        // Write data byte
  CAN.endPacket();        // End the packet
  Serial.println("Message sent!");

  // Check for incoming CAN messages
  if (CAN.parsePacket()) {
    Serial.print("Received message with ID: ");
    Serial.println(CAN.packetId(), HEX);

    while (CAN.available()) {
      Serial.print("Data: ");
      Serial.println(CAN.read(), HEX);
    }
  }

  delay(1000); // Wait 1 second before sending the next message
}
Troubleshooting and FAQs
Common Issues and Solutions
No Communication with CAN Bus:
- Verify the
CAN_HandCAN_Lconnections. - Check if the CAN bus is properly terminated with 120-ohm resistors.
- Ensure the baud rate matches the CAN network's configuration.
- Verify the
U2C Not Recognized by Computer:
- Confirm the USB cable is functional and properly connected.
- Install or update the U2C drivers for your operating system.
- Try a different USB port or computer.
Data Loss or Corruption:
- Check for excessive noise on the CAN bus.
- Ensure the cable length and quality meet CAN specifications.
- Verify that all devices on the CAN bus are operating at the same baud rate.
Power Issues:
- Ensure the USB port provides sufficient power for the U2C converter.
- If using the
V+pin, confirm the connected device does not exceed the power output capacity.
FAQs
Q: Can the U2C converter support multiple CAN channels?
A: Some U2C models support dual CAN channels. Check the specifications of your specific model.
Q: Is the U2C compatible with CAN FD?
A: Standard U2C converters typically support CAN 2.0A and 2.0B. For CAN FD, ensure your U2C model explicitly supports it.
Q: Can I use the U2C with a Raspberry Pi?
A: Yes, the U2C can be used with a Raspberry Pi. Install the appropriate drivers and use a compatible CAN library.
Q: What software can I use to monitor CAN messages?
A: Popular options include PCAN-View, CANalyzer, and open-source tools like SocketCAN (Linux).
By following this documentation, users can effectively integrate the U2C converter into their projects and troubleshoot common issues.