Cirkit Designer Logo
Cirkit Designer
Your all-in-one circuit design IDE
Home / 
Component Documentation

How to Use Raspberry Pi Touch Display 10.1": Examples, Pinouts, and Specs

Image of Raspberry Pi Touch Display 10.1"
Cirkit Designer LogoDesign with Raspberry Pi Touch Display 10.1" in Cirkit Designer

Introduction

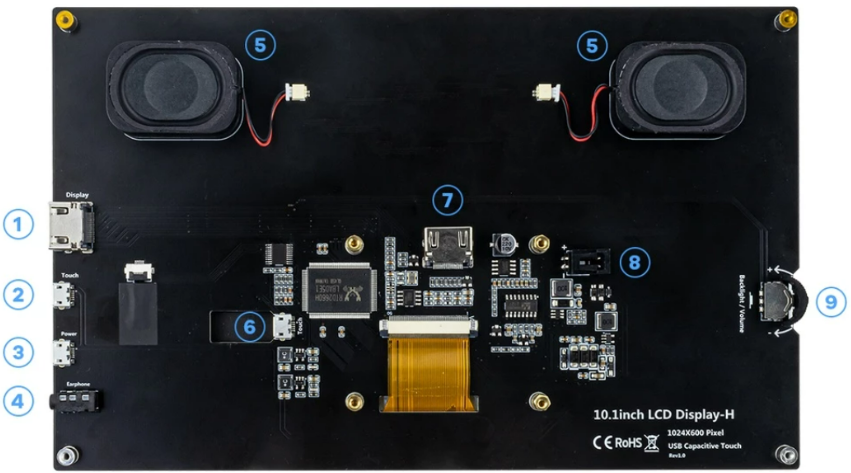
The Raspberry Pi Touch Display 10.1" is a high-quality touchscreen designed specifically for use with Raspberry Pi boards. It features a 10.1-inch capacitive touch interface with a resolution of 800x480 pixels, making it ideal for interactive applications such as kiosks, home automation systems, and portable computing projects. Its plug-and-play compatibility with Raspberry Pi boards ensures seamless integration and ease of use.

Explore Projects Built with Raspberry Pi Touch Display 10.1"

Use Cirkit Designer to design, explore, and prototype these projects online. Some projects support real-time simulation. Click "Open Project" to start designing instantly!
Raspberry Pi 3B Powered 15.6-inch Touchscreen Display with USB Type-C Power Delivery
Image of Pi Touch Screen Kiosk: A project utilizing Raspberry Pi Touch Display 10.1" in a practical application
This circuit powers a 15.6-inch capacitive touch display and a Raspberry Pi 3B using a USB Type C power delivery breakout and two buck converters. The Raspberry Pi connects to the display via HDMI and USB for touch functionality, while the power delivery breakout provides regulated power to both the display and the Raspberry Pi through the buck converters.
Cirkit Designer LogoOpen Project in Cirkit Designer
Raspberry Pi Zero W-Based Handheld Gaming Console with LCD Display
Image of pigame: A project utilizing Raspberry Pi Touch Display 10.1" in a practical application
This circuit integrates a Raspberry Pi Zero W with an LCD TFT screen and two custom PiGrrl Zero gamepad PCBs. The Raspberry Pi provides power to the LCD screen and communicates with it via GPIO pins for control signals and SPI for data transfer. The gamepad PCBs are connected to the Raspberry Pi's GPIO pins, allowing for user input to be processed by the Raspberry Pi for gaming or other interactive applications.
Cirkit Designer LogoOpen Project in Cirkit Designer
Raspberry Pi 4B-Based Current Monitoring System with I2C OLED Display
Image of Virtual Energy Monitoring Circuit: A project utilizing Raspberry Pi Touch Display 10.1" in a practical application
This circuit features a Raspberry Pi 4B as the central processing unit, interfaced with an Adafruit ADS1115 16-bit I2C ADC for analog-to-digital conversion and a 0.96" OLED display for visual output. The ADS1115 is connected to a current sensor for measuring electrical current, with the sensor's output and burden pins connected to the ADC's analog input channels. The Raspberry Pi communicates with both the ADC and the OLED display over the I2C bus, using its GPIO2 and GPIO3 pins for data (SDA) and clock (SCL) lines, respectively.
Cirkit Designer LogoOpen Project in Cirkit Designer
Raspberry Pi 4B with I2C Current Sensing and OLED Display
Image of iot task 2: A project utilizing Raspberry Pi Touch Display 10.1" in a practical application
This circuit features a Raspberry Pi 4B as the central processing unit, interfaced with an Adafruit ADS1115 16-bit I2C ADC for analog-to-digital conversion and a 0.96" OLED display for visual output. The ADC is connected to a current sensor for measuring electrical current, with the sensor's output connected to the ADC's AIN0 pin and the burden resistor connected to AIN1. The Raspberry Pi communicates with both the ADC and the OLED display over the I2C bus, using GPIO2 (SDA) and GPIO3 (SCL) for data exchange.
Cirkit Designer LogoOpen Project in Cirkit Designer

Explore Projects Built with Raspberry Pi Touch Display 10.1"

Use Cirkit Designer to design, explore, and prototype these projects online. Some projects support real-time simulation. Click "Open Project" to start designing instantly!
Image of Pi Touch Screen Kiosk: A project utilizing Raspberry Pi Touch Display 10.1" in a practical application
Raspberry Pi 3B Powered 15.6-inch Touchscreen Display with USB Type-C Power Delivery
This circuit powers a 15.6-inch capacitive touch display and a Raspberry Pi 3B using a USB Type C power delivery breakout and two buck converters. The Raspberry Pi connects to the display via HDMI and USB for touch functionality, while the power delivery breakout provides regulated power to both the display and the Raspberry Pi through the buck converters.
Cirkit Designer LogoOpen Project in Cirkit Designer
Image of pigame: A project utilizing Raspberry Pi Touch Display 10.1" in a practical application
Raspberry Pi Zero W-Based Handheld Gaming Console with LCD Display
This circuit integrates a Raspberry Pi Zero W with an LCD TFT screen and two custom PiGrrl Zero gamepad PCBs. The Raspberry Pi provides power to the LCD screen and communicates with it via GPIO pins for control signals and SPI for data transfer. The gamepad PCBs are connected to the Raspberry Pi's GPIO pins, allowing for user input to be processed by the Raspberry Pi for gaming or other interactive applications.
Cirkit Designer LogoOpen Project in Cirkit Designer
Image of Virtual Energy Monitoring Circuit: A project utilizing Raspberry Pi Touch Display 10.1" in a practical application
Raspberry Pi 4B-Based Current Monitoring System with I2C OLED Display
This circuit features a Raspberry Pi 4B as the central processing unit, interfaced with an Adafruit ADS1115 16-bit I2C ADC for analog-to-digital conversion and a 0.96" OLED display for visual output. The ADS1115 is connected to a current sensor for measuring electrical current, with the sensor's output and burden pins connected to the ADC's analog input channels. The Raspberry Pi communicates with both the ADC and the OLED display over the I2C bus, using its GPIO2 and GPIO3 pins for data (SDA) and clock (SCL) lines, respectively.
Cirkit Designer LogoOpen Project in Cirkit Designer
Image of iot task 2: A project utilizing Raspberry Pi Touch Display 10.1" in a practical application
Raspberry Pi 4B with I2C Current Sensing and OLED Display
This circuit features a Raspberry Pi 4B as the central processing unit, interfaced with an Adafruit ADS1115 16-bit I2C ADC for analog-to-digital conversion and a 0.96" OLED display for visual output. The ADC is connected to a current sensor for measuring electrical current, with the sensor's output connected to the ADC's AIN0 pin and the burden resistor connected to AIN1. The Raspberry Pi communicates with both the ADC and the OLED display over the I2C bus, using GPIO2 (SDA) and GPIO3 (SCL) for data exchange.
Cirkit Designer LogoOpen Project in Cirkit Designer

Common Applications and Use Cases

  • Interactive kiosks and point-of-sale systems
  • Home automation control panels
  • Portable media players and gaming consoles
  • Educational and prototyping projects
  • Industrial monitoring and control systems

Technical Specifications

Key Technical Details

Specification Value
Display Size 10.1 inches
Resolution 800x480 pixels
Touch Technology Capacitive (10-point touch)
Interface DSI (Display Serial Interface)
Power Supply 5V (via Raspberry Pi or external)
Dimensions 255mm x 174mm x 20mm
Weight ~450g
Viewing Angle 70°/70°/50°/70° (L/R/U/D)
Brightness 250 cd/m²
Contrast Ratio 500:1

Pin Configuration and Descriptions

The Raspberry Pi Touch Display 10.1" connects to the Raspberry Pi board via the DSI port. Below is the pin configuration for the DSI connector:

Pin Number Signal Name Description
1 GND Ground
2 DSI_CLK_P Differential Clock Positive
3 DSI_CLK_N Differential Clock Negative
4 GND Ground
5 DSI_D0_P Differential Data Lane 0 Positive
6 DSI_D0_N Differential Data Lane 0 Negative
7 GND Ground
8 DSI_D1_P Differential Data Lane 1 Positive
9 DSI_D1_N Differential Data Lane 1 Negative
10 GND Ground

Usage Instructions

How to Use the Component in a Circuit

  1. Connect the Display to the Raspberry Pi:

    • Attach the ribbon cable from the display to the DSI port on the Raspberry Pi board.
    • Ensure the cable is securely connected with the correct orientation (contacts facing the DSI port pins).
  2. Power the Display:

    • The display can be powered directly from the Raspberry Pi via the GPIO pins or an external 5V power source.
    • If using GPIO, connect the 5V and GND pins from the Raspberry Pi to the display's power input.
  3. Enable the Touchscreen:

    • The Raspberry Pi OS (or compatible operating system) should automatically detect the display and enable touch functionality.
    • If the display is not detected, ensure the DSI interface is enabled in the Raspberry Pi configuration settings.
  4. Adjust Display Settings:

    • Use the Raspberry Pi configuration tool (raspi-config) to adjust resolution, orientation, and other display settings as needed.

Important Considerations and Best Practices

  • Compatibility: Ensure your Raspberry Pi board supports the DSI interface (e.g., Raspberry Pi 4, 3, or 2).
  • Power Supply: Use a reliable 5V power source to avoid flickering or instability.
  • Mounting: Secure the display using a compatible case or mounting hardware to prevent damage.
  • Software Updates: Keep your Raspberry Pi OS updated to ensure compatibility with the display.

Example Code for Raspberry Pi

Below is an example Python script to create a simple touch-enabled GUI using the tkinter library:


Import the tkinter library for GUI development

import tkinter as tk

Create the main application window

root = tk.Tk() root.title("Touch Display Example") root.geometry("800x480") # Set the resolution to match the display

Add a label to the window

label = tk.Label(root, text="Hello, Raspberry Pi Touch Display!", font=("Arial", 16)) label.pack(pady=20)

Add a button to demonstrate touch interaction

def on_button_click(): label.config(text="Button Pressed!")

button = tk.Button(root, text="Press Me", font=("Arial", 14), command=on_button_click) button.pack(pady=20)

Run the application

root.mainloop()


> **Note**: Ensure the `tkinter` library is installed on your Raspberry Pi. You can install it using the command:  
> `sudo apt-get install python3-tk`

Troubleshooting and FAQs

Common Issues Users Might Face

  1. Display Not Turning On:

    • Cause: Loose or incorrect connection of the ribbon cable.
    • Solution: Recheck the ribbon cable connection to the DSI port and ensure it is secure.
  2. Touchscreen Not Responding:

    • Cause: Outdated Raspberry Pi OS or disabled DSI interface.
    • Solution: Update the Raspberry Pi OS and enable the DSI interface in the configuration settings.
  3. Flickering or Unstable Display:

    • Cause: Insufficient power supply.
    • Solution: Use a reliable 5V power source with adequate current (at least 2.5A).
  4. Incorrect Resolution or Orientation:

    • Cause: Default display settings not matching the screen.
    • Solution: Adjust the resolution and orientation using the raspi-config tool.

Solutions and Tips for Troubleshooting

  • Check Connections: Ensure all cables are securely connected and oriented correctly.
  • Test with Another Raspberry Pi: If the display does not work, test it with another Raspberry Pi board to rule out hardware issues.
  • Refer to Logs: Check system logs (dmesg or /var/log/syslog) for errors related to the DSI interface or touchscreen.

By following this documentation, you can effectively integrate and utilize the Raspberry Pi Touch Display 10.1" in your projects.