How to Use 15W 16V Digital Amplifier Module: Examples, Pinouts, and Specs
Introduction
The 15W 16V Digital Amplifier Module is a compact and efficient audio amplifier designed to deliver up to 15 watts of power at 16 volts. This module is ideal for driving small to medium-sized speakers in a variety of audio applications. Its digital design ensures high efficiency, low heat generation, and minimal distortion, making it suitable for portable audio systems, DIY speaker projects, and embedded audio solutions.
Explore Projects Built with 15W 16V Digital Amplifier Module


Explore Projects Built with 15W 16V Digital Amplifier Module
Common Applications
- DIY Bluetooth speakers
- Home audio systems
- Embedded audio in IoT devices
- Portable sound systems
- Educational and prototyping projects
Technical Specifications
Below are the key technical details of the 15W 16V Digital Amplifier Module:
| Parameter | Value |
|---|---|
| Manufacturer | Generic |
| Part ID | 15W 16V Digital Amplifier Module |
| Output Power | 15W |
| Operating Voltage | 8V - 16V |
| Recommended Voltage | 12V - 16V |
| Input Signal Type | Analog (e.g., AUX, Line-In) |
| Output Load | 4Ω - 8Ω speakers |
| Efficiency | >90% |
| Total Harmonic Distortion (THD) | <0.1% |
| Dimensions | 30mm x 20mm x 10mm |
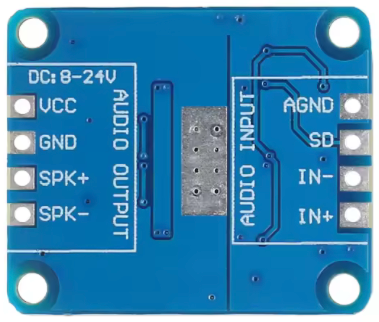
Pin Configuration and Descriptions
The module has a simple pinout for easy integration into circuits. Below is the pin configuration:
| Pin Name | Description |
|---|---|
| VCC | Positive power supply input (8V - 16V) |
| GND | Ground connection |
| IN+ | Positive input for the audio signal |
| IN- | Negative input for the audio signal (grounded in most cases) |
| OUT+ | Positive output to the speaker |
| OUT- | Negative output to the speaker |
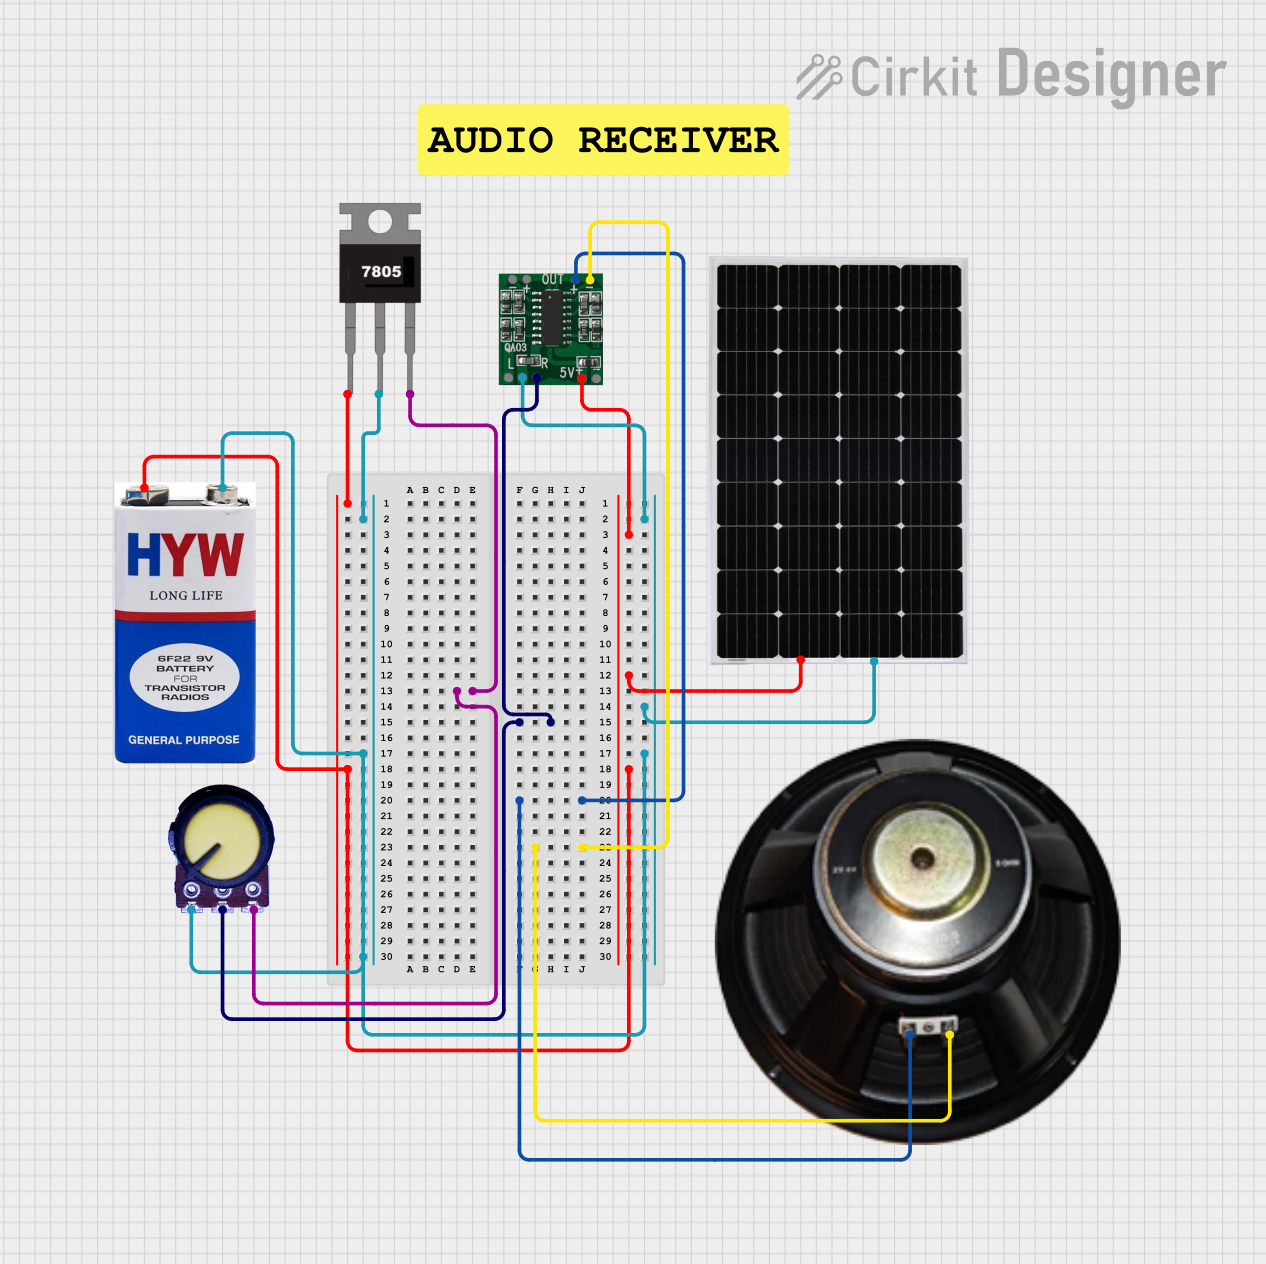
Usage Instructions
How to Use the Component in a Circuit
- Power Supply: Connect a DC power supply (8V to 16V) to the
VCCandGNDpins. Ensure the power supply can provide sufficient current (at least 1.5A for full power output). - Audio Input: Connect the audio source (e.g., AUX cable, audio jack) to the
IN+andIN-pins. For single-ended audio sources, connectIN-to ground. - Speaker Connection: Attach a 4Ω or 8Ω speaker to the
OUT+andOUT-pins. Ensure the speaker can handle the 15W output power. - Operation: Once all connections are secure, power on the module. Adjust the input signal level to control the output volume.
Important Considerations and Best Practices
- Heat Dissipation: Although the module is highly efficient, ensure adequate ventilation or attach a small heatsink if operating at maximum power for extended periods.
- Speaker Impedance: Use speakers with an impedance of 4Ω or 8Ω. Lower impedance may damage the module.
- Power Supply: Use a stable and noise-free DC power supply to avoid audio distortion or damage to the module.
- Signal Grounding: Ensure proper grounding of the audio input to minimize noise and interference.
Example: Connecting to an Arduino UNO
The module can be used with an Arduino UNO to generate audio signals (e.g., tones or music). Below is an example code snippet to generate a simple tone:
// Example: Generate a tone using Arduino UNO and 15W 16V Digital Amplifier Module
// Connect Arduino pin 9 to IN+ of the amplifier module
// Connect IN- of the amplifier module to GND

void setup() {
  pinMode(9, OUTPUT); // Set pin 9 as an output
}

void loop() {
  // Generate a 1kHz tone on pin 9
  tone(9, 1000); // 1000 Hz frequency
  delay(1000);   // Play tone for 1 second
  noTone(9);     // Stop the tone
  delay(1000);   // Wait for 1 second
}
Note: The Arduino's output is a low-power signal, so it is safe to connect directly to the amplifier's input.
Troubleshooting and FAQs
Common Issues and Solutions
No Sound Output
- Cause: Incorrect wiring or loose connections.
- Solution: Double-check all connections, especially the power supply, input, and speaker wiring.
Distorted Audio
- Cause: Insufficient power supply or overdriven input signal.
- Solution: Use a stable power supply with sufficient current. Reduce the input signal level.
Overheating
- Cause: Prolonged operation at maximum power without proper ventilation.
- Solution: Ensure adequate airflow or attach a heatsink to the module.
Noise or Interference
- Cause: Poor grounding or noisy power supply.
- Solution: Use a clean power source and ensure proper grounding of the audio input.
FAQs
Q1: Can I use a 3Ω speaker with this module?
A1: No, using a 3Ω speaker may overload the module and cause damage. Stick to 4Ω or 8Ω speakers.
Q2: What is the maximum input voltage for this module?
A2: The maximum input voltage is 16V. Exceeding this voltage may damage the module.
Q3: Can I use this module with a battery?
A3: Yes, you can use a battery (e.g., 12V Li-ion pack) as long as it provides sufficient current and voltage within the specified range.
Q4: Is this module stereo or mono?
A4: This module is a mono amplifier. For stereo applications, you will need two modules.
By following this documentation, you can effectively integrate the 15W 16V Digital Amplifier Module into your audio projects and troubleshoot common issues with ease.