
How to Use POWER SUPPLY 24V: Examples, Pinouts, and Specs
 Design with POWER SUPPLY 24V in Cirkit Designer
Introduction
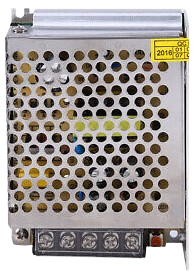
The POWER SUPPLY 24V is a device that converts electrical energy from an input source (such as AC mains or DC power) into a stable 24V DC output. It is widely used to power electronic circuits, industrial equipment, and automation systems. This component ensures a reliable and consistent voltage supply, which is critical for the proper functioning of sensitive electronic devices.
Explore Projects Built with POWER SUPPLY 24V
 Open Project in Cirkit Designer
 Open Project in Cirkit Designer
 Open Project in Cirkit Designer
 Open Project in Cirkit Designer
Explore Projects Built with POWER SUPPLY 24V
Open Project in Cirkit DesignerOpen Project in Cirkit DesignerOpen Project in Cirkit DesignerOpen Project in Cirkit DesignerCommon Applications and Use Cases
- Powering industrial control systems and PLCs (Programmable Logic Controllers)
- Supplying voltage to sensors, actuators, and relays
- Driving LED lighting systems
- Providing power to motor drivers and robotics
- General-purpose use in laboratory and prototyping setups
Technical Specifications
Below are the key technical details for the POWER SUPPLY 24V:
| Parameter | Specification |
|---|---|
| Input Voltage Range | 100-240V AC (typical) or 12-48V DC |
| Output Voltage | 24V DC ± 1% |
| Output Current | 1A to 10A (varies by model) |
| Power Rating | 24W to 240W (depending on model) |
| Efficiency | ≥ 85% |
| Ripple and Noise | ≤ 50mV |
| Operating Temperature | -20°C to +70°C |
| Protection Features | Overvoltage, Overcurrent, Short Circuit |
| Mounting Options | DIN rail, panel mount, or standalone |
Pin Configuration and Descriptions
The POWER SUPPLY 24V typically has the following input and output terminals:
| Pin/Terminal | Label | Description |
|---|---|---|
| 1 | L | Live AC input (for AC-powered models) |
| 2 | N | Neutral AC input (for AC-powered models) |
| 3 | +V | Positive 24V DC output |
| 4 | -V | Negative (ground) 24V DC output |
| 5 (optional) | FG | Frame Ground (for safety and EMI shielding) |
For DC-powered models, the input terminals are typically labeled as +Vin and -Vin.
Usage Instructions
How to Use the POWER SUPPLY 24V in a Circuit
Input Connection:
- For AC-powered models, connect the
LandNterminals to the live and neutral wires of the AC mains supply. Ensure proper grounding by connecting theFGterminal to earth ground. - For DC-powered models, connect the
+Vinand-Vinterminals to the appropriate DC input voltage source.
- For AC-powered models, connect the
Output Connection:
- Connect the
+Vterminal to the positive rail of your circuit. - Connect the
-Vterminal to the ground rail of your circuit.
- Connect the
Load Considerations:
- Ensure that the total current drawn by the connected devices does not exceed the maximum output current rating of the power supply.
- Use appropriately rated wires to handle the current without excessive voltage drop.
Mounting:
- Secure the power supply in a well-ventilated area to prevent overheating.
- For DIN rail or panel-mounted models, follow the manufacturer’s mounting instructions.
Important Considerations and Best Practices
- Safety First: Always disconnect the power supply from the mains before making any connections.
- Voltage Adjustment: Some models include a potentiometer to fine-tune the output voltage. Use this feature carefully to avoid exceeding the voltage tolerance of connected devices.
- Heat Dissipation: Ensure adequate airflow around the power supply to prevent overheating, especially under high load conditions.
- EMI/Noise Reduction: Use proper grounding and shielding to minimize electromagnetic interference in sensitive applications.
Example: Connecting to an Arduino UNO
The POWER SUPPLY 24V can be used to power an Arduino UNO via a step-down voltage regulator (e.g., LM2596) to convert 24V to 5V. Below is an example circuit and Arduino code:
Circuit Setup
- Connect the
+Vand-Vterminals of the power supply to the input of the step-down regulator. - Adjust the regulator output to 5V using a multimeter.
- Connect the regulator output to the Arduino UNO's
5VandGNDpins.
Arduino Code Example
// Example code to blink an LED connected to pin 13 of the Arduino UNO
// Ensure the Arduino is powered via the 5V output of the step-down regulator

void setup() {
  pinMode(13, OUTPUT); // Set pin 13 as an output
}

void loop() {
  digitalWrite(13, HIGH); // Turn the LED on
  delay(1000);            // Wait for 1 second
  digitalWrite(13, LOW);  // Turn the LED off
  delay(1000);            // Wait for 1 second
}
Troubleshooting and FAQs
Common Issues and Solutions
| Issue | Possible Cause | Solution |
|---|---|---|
| No output voltage | Input power not connected or incorrect | Verify input connections and voltage |
| Output voltage too low or unstable | Overloaded power supply | Reduce the load to within rated capacity |
| Power supply overheating | Poor ventilation or excessive load | Improve airflow or reduce the load |
| High ripple or noise on output | Insufficient filtering or grounding issues | Check grounding and add external capacitors |
FAQs
Can I use the POWER SUPPLY 24V to charge batteries?
- Yes, but ensure the power supply has a current-limiting feature or use an external charge controller to prevent overcharging.
What happens if I exceed the maximum current rating?
- The power supply will activate its overcurrent protection, shutting down or limiting the output to prevent damage.
Can I connect multiple power supplies in parallel for higher current?
- Only if the power supplies are designed for parallel operation. Check the manufacturer’s documentation for compatibility.
Is the POWER SUPPLY 24V waterproof?
- Most models are not waterproof. Use an enclosure for outdoor or wet environments.
By following this documentation, you can safely and effectively use the POWER SUPPLY 24V in your projects and applications.