Cirkit Designer Logo
Cirkit Designer
Your all-in-one circuit design IDE
Home / 
Component Documentation

How to Use Plug: Examples, Pinouts, and Specs

Image of Plug
Cirkit Designer LogoDesign with Plug in Cirkit Designer

Introduction

A plug is a device designed to connect an electrical appliance to a power source, enabling the flow of electricity into the appliance. It is a critical component in electrical systems, ensuring a safe and reliable connection between devices and power outlets. Plugs come in various types and configurations to accommodate different voltage levels, current ratings, and regional standards.

Explore Projects Built with Plug

Use Cirkit Designer to design, explore, and prototype these projects online. Some projects support real-time simulation. Click "Open Project" to start designing instantly!
Pushbutton Interface with General Purpose I/O Plug
Image of Assista GP IO: A project utilizing Plug in a practical application
This circuit consists of a General Purpose Input/Output (GPIO) plug connected to four pushbuttons. Each pushbutton is wired to a unique input pin on the GPIO plug, allowing the state of each button (pressed or not pressed) to be detected individually. The common terminals of the pushbuttons are interconnected and likely serve as a ground or reference voltage connection.
Cirkit Designer LogoOpen Project in Cirkit Designer
Heater Control Circuit with Power Socket Integration
Image of Simple Water Heater: A project utilizing Plug in a practical application
The circuit connects a heater to a power source via a socket. The heater is likely to be powered directly from the socket, with the positive and negative terminals of the socket providing the necessary voltage and ground connections to the heater. There are no control elements or sensors present in the circuit, indicating that the heater operates at a constant power level when connected.
Cirkit Designer LogoOpen Project in Cirkit Designer
Dual 5V Power Supply Distribution Circuit with Toggle Switch Control
Image of rfdriver: A project utilizing Plug in a practical application
This circuit consists of two 5V 5A power supplies connected to an AC wall plug point, providing DC output through a 12-way connector. The ground connections from both power supplies are interconnected and also connected to the ground pins of two toggle switches. The DC outputs from the power supplies are separately connected to different pins on the 12-way connector, with each power supply output being switchable via one of the toggle switches.
Cirkit Designer LogoOpen Project in Cirkit Designer
Pushbutton-Controlled Interface with 40-Pin Connector and UBS Power Supply
Image of connect 4: A project utilizing Plug in a practical application
This circuit consists of a 40-pin connector interfacing with four pushbuttons and a UBS power supply. The pushbuttons are used as inputs to the connector, which then relays the signals to other components or systems. The UBS power supply provides the necessary 24V power to the pushbuttons and the common ground for the circuit.
Cirkit Designer LogoOpen Project in Cirkit Designer

Explore Projects Built with Plug

Use Cirkit Designer to design, explore, and prototype these projects online. Some projects support real-time simulation. Click "Open Project" to start designing instantly!
Image of Assista GP IO: A project utilizing Plug in a practical application
Pushbutton Interface with General Purpose I/O Plug
This circuit consists of a General Purpose Input/Output (GPIO) plug connected to four pushbuttons. Each pushbutton is wired to a unique input pin on the GPIO plug, allowing the state of each button (pressed or not pressed) to be detected individually. The common terminals of the pushbuttons are interconnected and likely serve as a ground or reference voltage connection.
Cirkit Designer LogoOpen Project in Cirkit Designer
Image of Simple Water Heater: A project utilizing Plug in a practical application
Heater Control Circuit with Power Socket Integration
The circuit connects a heater to a power source via a socket. The heater is likely to be powered directly from the socket, with the positive and negative terminals of the socket providing the necessary voltage and ground connections to the heater. There are no control elements or sensors present in the circuit, indicating that the heater operates at a constant power level when connected.
Cirkit Designer LogoOpen Project in Cirkit Designer
Image of rfdriver: A project utilizing Plug in a practical application
Dual 5V Power Supply Distribution Circuit with Toggle Switch Control
This circuit consists of two 5V 5A power supplies connected to an AC wall plug point, providing DC output through a 12-way connector. The ground connections from both power supplies are interconnected and also connected to the ground pins of two toggle switches. The DC outputs from the power supplies are separately connected to different pins on the 12-way connector, with each power supply output being switchable via one of the toggle switches.
Cirkit Designer LogoOpen Project in Cirkit Designer
Image of connect 4: A project utilizing Plug in a practical application
Pushbutton-Controlled Interface with 40-Pin Connector and UBS Power Supply
This circuit consists of a 40-pin connector interfacing with four pushbuttons and a UBS power supply. The pushbuttons are used as inputs to the connector, which then relays the signals to other components or systems. The UBS power supply provides the necessary 24V power to the pushbuttons and the common ground for the circuit.
Cirkit Designer LogoOpen Project in Cirkit Designer

Common Applications and Use Cases

  • Powering household appliances such as refrigerators, televisions, and lamps.
  • Connecting industrial equipment to power supplies.
  • Charging electronic devices like smartphones and laptops.
  • Temporary power connections for tools and machinery in workshops.

Technical Specifications

The technical specifications of a plug vary depending on its type and intended application. Below are general specifications for a standard household plug:

General Specifications

Parameter Value/Description
Voltage Rating 110V - 240V AC (varies by region)
Current Rating 6A - 16A (depending on plug type)
Frequency 50Hz or 60Hz
Material Thermoplastic or thermoset for insulation
Pin Material Brass or nickel-plated brass
Safety Features Insulated pins, grounding pin, shutters

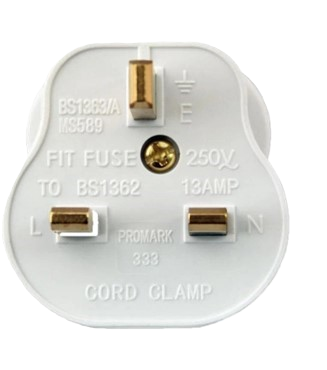
Pin Configuration and Descriptions

Below is an example of a 3-pin plug configuration commonly used in many regions:

Pin Name Description
Live (L) Carries the current from the power source to the appliance.
Neutral (N) Completes the circuit by returning current to the power source.
Ground (G) Provides a safety path for fault currents to prevent electric shock.

Usage Instructions

How to Use the Plug in a Circuit

  1. Inspect the Plug: Ensure the plug is in good condition, with no visible damage to the pins or casing.
  2. Connect to Appliance: Attach the plug to the appliance's power cord securely.
  3. Insert into Power Outlet: Align the pins with the outlet and push the plug in firmly.
  4. Turn on Power: If the outlet has a switch, turn it on to supply power to the appliance.

Important Considerations and Best Practices

  • Voltage Compatibility: Verify that the plug's voltage rating matches the power source and appliance.
  • Grounding: Always use a plug with a grounding pin for appliances with metal casings to ensure safety.
  • Overloading: Avoid exceeding the plug's current rating to prevent overheating or damage.
  • Regional Standards: Use plugs that comply with the standards of your region (e.g., Type A, Type C, Type G).
  • Secure Connections: Ensure the plug fits snugly into the outlet to avoid loose connections.

Example: Using a Plug with an Arduino UNO

If you are powering an Arduino UNO using a plug and a power adapter, follow these steps:

  1. Use a DC power adapter with a plug that matches your region's outlet type.
  2. Ensure the adapter provides 7-12V DC output, as required by the Arduino UNO.
  3. Connect the adapter's barrel jack to the Arduino's power input port.
// Example Arduino code to blink an LED
// This assumes the Arduino is powered via a plug and adapter

void setup() {
  pinMode(13, OUTPUT); // Set pin 13 as an output for the LED
}

void loop() {
  digitalWrite(13, HIGH); // Turn the LED on
  delay(1000);            // Wait for 1 second
  digitalWrite(13, LOW);  // Turn the LED off
  delay(1000);            // Wait for 1 second
}

Troubleshooting and FAQs

Common Issues Users Might Face

  1. Loose Connection: The plug does not fit securely into the outlet.
    • Solution: Check for debris in the outlet or bent pins on the plug. Replace if necessary.
  2. Overheating: The plug becomes hot during use.
    • Solution: Ensure the current drawn by the appliance does not exceed the plug's rating.
  3. No Power to Appliance: The appliance does not turn on when the plug is connected.
    • Solution: Verify the outlet is functional and the plug is properly inserted. Check the appliance's power cord for damage.
  4. Sparking: Sparks appear when inserting or removing the plug.
    • Solution: Turn off the outlet switch before plugging in or unplugging. Replace worn-out plugs or outlets.

FAQs

Q: Can I use a 110V plug in a 220V outlet?
A: No, using a plug rated for 110V in a 220V outlet can damage the appliance and pose a safety hazard. Always match the plug's voltage rating to the power source.

Q: How do I know if my plug is grounded?
A: A grounded plug typically has three pins, with the third pin (ground) being longer or thicker than the others.

Q: Can I replace a damaged plug myself?
A: Yes, but only if you are familiar with electrical wiring. Ensure the replacement plug matches the original specifications and follow proper wiring practices.

Q: Why does my plug have shutters on the pinholes?
A: Shutters are a safety feature to prevent accidental contact with live parts, especially in regions with Type G plugs.