Cirkit Designer Logo
Cirkit Designer
Your all-in-one circuit design IDE
Home / 
Component Documentation

How to Use Arduino pro micro leonardo: Examples, Pinouts, and Specs

Image of Arduino pro micro leonardo
Cirkit Designer LogoDesign with Arduino pro micro leonardo in Cirkit Designer

Arduino Pro Micro Leonardo Documentation

1. Introduction

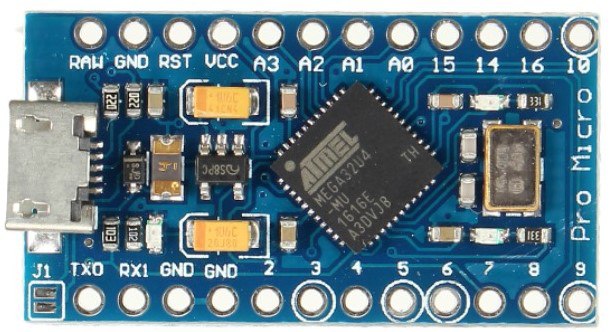
The Arduino Pro Micro Leonardo is a compact microcontroller board based on the ATmega32U4. It features built-in USB connectivity, allowing for direct communication with a computer without the need for an external USB-to-serial converter. This makes it an ideal choice for projects that require a small form factor and direct USB communication, such as keyboard emulators, game controllers, and various IoT applications.

Common Applications and Use Cases

  • Keyboard and Mouse Emulation: Create custom input devices.
  • IoT Projects: Connect sensors and actuators directly to the internet.
  • Robotics: Control motors and sensors in a compact design.
  • Wearable Devices: Integrate into small, portable electronics.

2. Technical Specifications

Key Technical Details

Specification Value
Microcontroller ATmega32U4
Operating Voltage 5V
Input Voltage 7-12V (recommended 9V)
Digital I/O Pins 12
PWM Pins 5
Analog Input Pins 4
Flash Memory 32 KB (ATmega32U4)
SRAM 2.5 KB
EEPROM 1 KB
Clock Speed 16 MHz
USB Interface Full-speed USB

Pin Configuration and Descriptions

Pin Number Pin Name Description
1 VCC Power supply (5V)
2 GND Ground connection
3 RX0 Serial receive pin
4 TX0 Serial transmit pin
5 D0 Digital I/O pin (PWM capable)
6 D1 Digital I/O pin (PWM capable)
7 D2 Digital I/O pin
8 D3 Digital I/O pin (PWM capable)
9 D4 Digital I/O pin
10 D5 Digital I/O pin (PWM capable)
11 D6 Digital I/O pin
12 D7 Digital I/O pin
13 D8 Digital I/O pin
14 A0 Analog input pin
15 A1 Analog input pin
16 A2 Analog input pin
17 A3 Analog input pin
18 A4 I2C SDA pin
19 A5 I2C SCL pin

3. Usage Instructions

How to Use the Component in a Circuit

  1. Powering the Board:

    • Connect the VCC pin to a 5V power supply.
    • Connect the GND pin to the ground of your circuit.
  2. Connecting to USB:

    • Use a micro USB cable to connect the board to your computer for programming and power.
  3. Programming:

    • Use the Arduino IDE to write and upload your code. Select "Arduino Leonardo" as the board type.

Important Considerations and Best Practices

  • Power Supply: Ensure that the input voltage does not exceed 12V to avoid damaging the board.
  • USB Connection: Always connect the board to a computer via USB for programming and debugging.
  • Pin Usage: Be mindful of the pin capabilities (e.g., PWM, analog) when designing your circuit.

4. Troubleshooting and FAQs

Common Issues Users Might Face

  1. Board Not Recognized by Computer:

    • Ensure the USB cable is functional and properly connected.
    • Check if the correct board type is selected in the Arduino IDE.
  2. Code Upload Fails:

    • Press the reset button on the board just before uploading the code.
    • Ensure that the correct COM port is selected in the Arduino IDE.
  3. Unexpected Behavior in Code:

    • Double-check your code for syntax errors or logical mistakes.
    • Verify that the correct pins are being used for input/output.

Solutions and Tips for Troubleshooting

  • Resetting the Board: If the board becomes unresponsive, try resetting it by pressing the reset button.
  • Check Connections: Ensure all connections are secure and correctly wired.
  • Consult the Community: Utilize forums and community resources for additional support.

Example Code for Arduino Pro Micro Leonardo

Here is a simple example code that blinks an LED connected to pin 13:

// Blink an LED connected to pin 13
void setup() {
  // Set pin 13 as an output
  pinMode(13, OUTPUT);
}

void loop() {
  // Turn the LED on
  digitalWrite(13, HIGH);
  // Wait for 1000 milliseconds (1 second)
  delay(1000);
  // Turn the LED off
  digitalWrite(13, LOW);
  // Wait for 1000 milliseconds (1 second)
  delay(1000);
}

This code will make the LED blink on and off every second. Upload it to your Arduino Pro Micro Leonardo using the Arduino IDE to see it in action.

Explore Projects Built with Arduino pro micro leonardo

Use Cirkit Designer to design, explore, and prototype these projects online. Some projects support real-time simulation. Click "Open Project" to start designing instantly!
Arduino Leonardo-Controlled Robot with L298N Motor Driver and Multiple Sensors
Image of arduino car: A project utilizing Arduino pro micro leonardo in a practical application
This is a microcontroller-based control system using an Arduino Leonardo to manage DC gearmotors through an L298N motor driver, process inputs from IR and ultrasonic sensors, and actuate a servomotor. It features visual indicators (LEDs), an audible alert (piezo speaker), and a power management system with a rocker switch.
Cirkit Designer LogoOpen Project in Cirkit Designer
Arduino Leonardo Controlled I2C LCD Display for Text Scrolling
Image of final year project: A project utilizing Arduino pro micro leonardo in a practical application
This circuit features an Arduino Leonardo microcontroller connected to a 16x2 I2C LCD screen, powered by a 5V battery. The Arduino is programmed to display and continuously scroll a message on the LCD. The I2C communication protocol is used for the microcontroller to interface with the LCD, utilizing the SDA and SCL connections for data transfer.
Cirkit Designer LogoOpen Project in Cirkit Designer
Arduino Leonardo Controlled OLED Display with Pushbutton Interaction
Image of game and gain: A project utilizing Arduino pro micro leonardo in a practical application
This circuit features an Arduino Leonardo microcontroller connected to a 0.96" OLED display and a pushbutton with a pull-up resistor. The OLED display communicates with the Arduino via I2C (SDA and SCL lines), and the pushbutton, when pressed, changes the display content on the OLED screen. The microcontroller's code suggests the display alternates between showing an overview with speed and experience points and a player stats screen, likely for a game or interactive application.
Cirkit Designer LogoOpen Project in Cirkit Designer
Arduino Leonardo-Based Smart Security System with Ultrasonic Sensors and GSM Module
Image of rsbvp new: A project utilizing Arduino pro micro leonardo in a practical application
This circuit is a sensor-based monitoring and control system using an Arduino Leonardo. It integrates multiple sensors (ultrasonic, vibration), a relay module to control a 12V motor, an I2C LCD for display, and a SIM800L module for communication. The system is powered by a 12V battery with step-down converters providing appropriate voltages to different components.
Cirkit Designer LogoOpen Project in Cirkit Designer

Explore Projects Built with Arduino pro micro leonardo

Use Cirkit Designer to design, explore, and prototype these projects online. Some projects support real-time simulation. Click "Open Project" to start designing instantly!
Image of arduino car: A project utilizing Arduino pro micro leonardo in a practical application
Arduino Leonardo-Controlled Robot with L298N Motor Driver and Multiple Sensors
This is a microcontroller-based control system using an Arduino Leonardo to manage DC gearmotors through an L298N motor driver, process inputs from IR and ultrasonic sensors, and actuate a servomotor. It features visual indicators (LEDs), an audible alert (piezo speaker), and a power management system with a rocker switch.
Cirkit Designer LogoOpen Project in Cirkit Designer
Image of final year project: A project utilizing Arduino pro micro leonardo in a practical application
Arduino Leonardo Controlled I2C LCD Display for Text Scrolling
This circuit features an Arduino Leonardo microcontroller connected to a 16x2 I2C LCD screen, powered by a 5V battery. The Arduino is programmed to display and continuously scroll a message on the LCD. The I2C communication protocol is used for the microcontroller to interface with the LCD, utilizing the SDA and SCL connections for data transfer.
Cirkit Designer LogoOpen Project in Cirkit Designer
Image of game and gain: A project utilizing Arduino pro micro leonardo in a practical application
Arduino Leonardo Controlled OLED Display with Pushbutton Interaction
This circuit features an Arduino Leonardo microcontroller connected to a 0.96" OLED display and a pushbutton with a pull-up resistor. The OLED display communicates with the Arduino via I2C (SDA and SCL lines), and the pushbutton, when pressed, changes the display content on the OLED screen. The microcontroller's code suggests the display alternates between showing an overview with speed and experience points and a player stats screen, likely for a game or interactive application.
Cirkit Designer LogoOpen Project in Cirkit Designer
Image of rsbvp new: A project utilizing Arduino pro micro leonardo in a practical application
Arduino Leonardo-Based Smart Security System with Ultrasonic Sensors and GSM Module
This circuit is a sensor-based monitoring and control system using an Arduino Leonardo. It integrates multiple sensors (ultrasonic, vibration), a relay module to control a 12V motor, an I2C LCD for display, and a SIM800L module for communication. The system is powered by a 12V battery with step-down converters providing appropriate voltages to different components.
Cirkit Designer LogoOpen Project in Cirkit Designer