Cirkit Designer Logo
Cirkit Designer
Your all-in-one circuit design IDE
Home / 
Component Documentation

How to Use Adafruit MCP9600: Examples, Pinouts, and Specs

Image of Adafruit MCP9600
Cirkit Designer LogoDesign with Adafruit MCP9600 in Cirkit Designer

Introduction

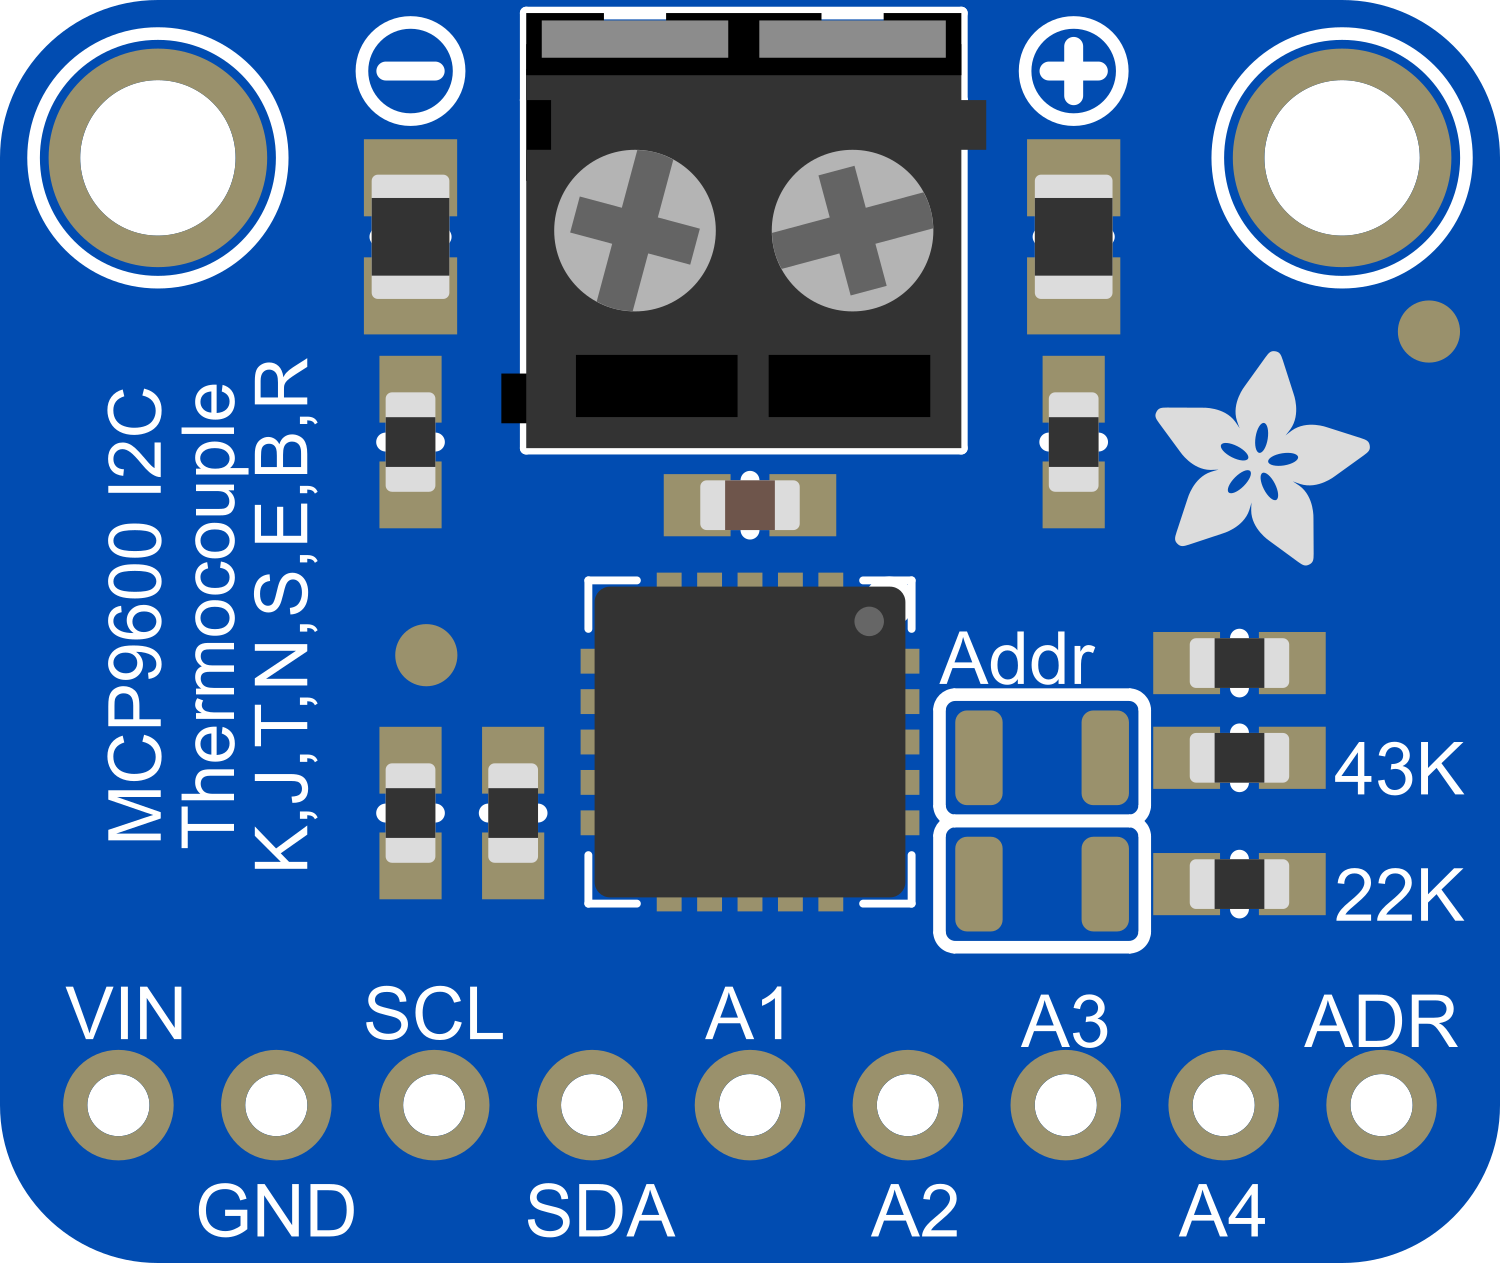
The Adafruit MCP9600 is a high-accuracy thermocouple amplifier breakout board based on the MCP9600 chip from Microchip Technology. This component is designed to amplify the tiny voltage differences generated by thermocouples and convert them into a more easily readable format, such as degrees Celsius or Fahrenheit. It supports a variety of thermocouple types (K, J, T, N, S, E, B, and R) and communicates with a microcontroller over I2C.

Common applications for the Adafruit MCP9600 include:

  • Industrial temperature monitoring
  • Consumer appliances
  • HVAC systems
  • Food temperature monitoring

Explore Projects Built with Adafruit MCP9600

Use Cirkit Designer to design, explore, and prototype these projects online. Some projects support real-time simulation. Click "Open Project" to start designing instantly!
Battery-Powered Smart Sensor Hub with Adafruit QT Py RP2040
Image of wearable final: A project utilizing Adafruit MCP9600 in a practical application
This circuit features an Adafruit QT Py RP2040 microcontroller interfaced with an APDS9960 proximity sensor, an MPU6050 accelerometer and gyroscope, and an OLED display via I2C communication. It also includes a buzzer controlled by the microcontroller and is powered by a 3.7V LiPo battery with a toggle switch for power control.
Cirkit Designer LogoOpen Project in Cirkit Designer
Battery-Powered Sensor Hub with Adafruit QT Py RP2040 and OLED Display
Image of 512: A project utilizing Adafruit MCP9600 in a practical application
This circuit features an Adafruit QT Py RP2040 microcontroller interfacing with an MPU-6050 accelerometer, an Adafruit APDS-9960 sensor, and a 0.96" OLED display via I2C communication. It is powered by a 3.7V LiPo battery and includes a green LED with a current-limiting resistor connected to an analog pin of the microcontroller.
Cirkit Designer LogoOpen Project in Cirkit Designer
Raspberry Pi 4B-Based Multi-Sensor Interface Hub with GPS and GSM
Image of Rocket: A project utilizing Adafruit MCP9600 in a practical application
This circuit features a Raspberry Pi 4B interfaced with an IMX296 color global shutter camera, a Neo 6M GPS module, an Adafruit BMP388 barometric pressure sensor, an MPU-6050 accelerometer/gyroscope, and a Sim800l GSM module for cellular connectivity. Power management is handled by an MT3608 boost converter, which steps up the voltage from a Lipo battery, with a resettable fuse PTC and a 1N4007 diode for protection. The Adafruit Perma-Proto HAT is used for organizing connections and interfacing the sensors and modules with the Raspberry Pi via I2C and GPIO pins.
Cirkit Designer LogoOpen Project in Cirkit Designer
Arduino UNO-Based Sensor Data Acquisition System with Bluetooth and Wi-Fi Connectivity
Image of smrpe: A project utilizing Adafruit MCP9600 in a practical application
This circuit is a multi-sensor data acquisition system with wireless communication capabilities. It utilizes an Arduino UNO to interface with an MPU-6050 gyroscope, an Adafruit ADXL345 accelerometer, an Adafruit MPR121 capacitive touch sensor, and a SparkFun Electret Microphone for audio input. The system can transmit sensor data via an HC-05 Bluetooth module and an ESP8266 WiFi module, and it includes a bi-directional logic level converter for voltage level matching between devices. The circuit is powered by a 9V battery connected to the Arduino's Vin pin.
Cirkit Designer LogoOpen Project in Cirkit Designer

Explore Projects Built with Adafruit MCP9600

Use Cirkit Designer to design, explore, and prototype these projects online. Some projects support real-time simulation. Click "Open Project" to start designing instantly!
Image of wearable final: A project utilizing Adafruit MCP9600 in a practical application
Battery-Powered Smart Sensor Hub with Adafruit QT Py RP2040
This circuit features an Adafruit QT Py RP2040 microcontroller interfaced with an APDS9960 proximity sensor, an MPU6050 accelerometer and gyroscope, and an OLED display via I2C communication. It also includes a buzzer controlled by the microcontroller and is powered by a 3.7V LiPo battery with a toggle switch for power control.
Cirkit Designer LogoOpen Project in Cirkit Designer
Image of 512: A project utilizing Adafruit MCP9600 in a practical application
Battery-Powered Sensor Hub with Adafruit QT Py RP2040 and OLED Display
This circuit features an Adafruit QT Py RP2040 microcontroller interfacing with an MPU-6050 accelerometer, an Adafruit APDS-9960 sensor, and a 0.96" OLED display via I2C communication. It is powered by a 3.7V LiPo battery and includes a green LED with a current-limiting resistor connected to an analog pin of the microcontroller.
Cirkit Designer LogoOpen Project in Cirkit Designer
Image of Rocket: A project utilizing Adafruit MCP9600 in a practical application
Raspberry Pi 4B-Based Multi-Sensor Interface Hub with GPS and GSM
This circuit features a Raspberry Pi 4B interfaced with an IMX296 color global shutter camera, a Neo 6M GPS module, an Adafruit BMP388 barometric pressure sensor, an MPU-6050 accelerometer/gyroscope, and a Sim800l GSM module for cellular connectivity. Power management is handled by an MT3608 boost converter, which steps up the voltage from a Lipo battery, with a resettable fuse PTC and a 1N4007 diode for protection. The Adafruit Perma-Proto HAT is used for organizing connections and interfacing the sensors and modules with the Raspberry Pi via I2C and GPIO pins.
Cirkit Designer LogoOpen Project in Cirkit Designer
Image of smrpe: A project utilizing Adafruit MCP9600 in a practical application
Arduino UNO-Based Sensor Data Acquisition System with Bluetooth and Wi-Fi Connectivity
This circuit is a multi-sensor data acquisition system with wireless communication capabilities. It utilizes an Arduino UNO to interface with an MPU-6050 gyroscope, an Adafruit ADXL345 accelerometer, an Adafruit MPR121 capacitive touch sensor, and a SparkFun Electret Microphone for audio input. The system can transmit sensor data via an HC-05 Bluetooth module and an ESP8266 WiFi module, and it includes a bi-directional logic level converter for voltage level matching between devices. The circuit is powered by a 9V battery connected to the Arduino's Vin pin.
Cirkit Designer LogoOpen Project in Cirkit Designer

Technical Specifications

Key Technical Details

  • Supply Voltage: 2.7V to 5.5V
  • Temperature Range (depends on thermocouple type): -200°C to +1372°C
  • Resolution: 0.0625°C
  • Interface: I2C
  • 4x Programmable Temperature Alert Outputs

Pin Configuration and Descriptions

Pin Number Pin Name Description
1 VIN Power supply (2.7V to 5.5V)
2 GND Ground
3 SDA I2C Data Line
4 SCL I2C Clock Line
5 ALERT Alert output (configurable)
6 ADD Address selection for I2C (configurable)

Usage Instructions

Connecting the MCP9600 to a Circuit

  1. Connect the VIN pin to a 2.7V to 5.5V power supply.
  2. Connect the GND pin to the ground of the power supply.
  3. Connect the SDA and SCL pins to the I2C data and clock lines on your microcontroller.
  4. Optionally, connect the ALERT pin to a digital input on your microcontroller if you wish to use the alert feature.
  5. Connect the thermocouple wires to the thermocouple input terminals on the breakout board.

Important Considerations and Best Practices

  • Ensure that the thermocouple wires are connected with the correct polarity.
  • Use pull-up resistors on the I2C lines if they are not already present on your microcontroller board.
  • Keep the thermocouple wires away from electrical noise sources to prevent inaccurate readings.
  • Configure the I2C address using the ADD pin if you are using multiple MCP9600s on the same I2C bus.

Example Code for Arduino UNO

#include <Wire.h>
#include <Adafruit_MCP9600.h>

Adafruit_MCP9600 mcp;

void setup() {
  Serial.begin(9600);
  Wire.begin();

  if (!mcp.begin()) {
    Serial.println("Sensor not found. Please check wiring.");
    while (1);
  }
  Serial.println("MCP9600 Found!");
}

void loop() {
  // Read and print the temperature from the MCP9600
  Serial.print("Temperature: ");
  Serial.print(mcp.readThermocouple());
  Serial.println(" *C");

  // Optional: Check for alert status
  if (mcp.getFault()) {
    Serial.println("Thermocouple fault detected!");
  }

  delay(1000);
}

Troubleshooting and FAQs

Common Issues

  • No temperature reading or incorrect values: Ensure that the thermocouple is properly connected with the correct polarity and that the breakout board is correctly powered.
  • I2C communication errors: Check the wiring of the SDA and SCL lines, and ensure pull-up resistors are in place if needed.

Solutions and Tips for Troubleshooting

  • Double-check the wiring and connections.
  • Use the mcp.getFault() function to check for any thermocouple faults.
  • Ensure that the I2C address is correctly set if using multiple devices on the same bus.

FAQs

Q: Can the MCP9600 work with any type of thermocouple?

A: The MCP9600 is compatible with K, J, T, N, S, E, B, and R type thermocouples.

Q: What is the maximum temperature the MCP9600 can measure?

A: The maximum temperature depends on the thermocouple type used, but the MCP9600 itself can handle readings from -200°C to +1372°C.

Q: How do I change the I2C address of the MCP9600?

A: The I2C address can be changed by connecting the ADD pin to either GND, VIN, SDA, or SCL, providing up to 8 different I2C addresses.

Q: Can I use multiple MCP9600s on the same I2C bus?

A: Yes, you can use multiple devices on the same I2C bus by configuring each with a unique I2C address using the ADD pin.