How to Use Ludus ProtoShield Wireless: Examples, Pinouts, and Specs
Introduction
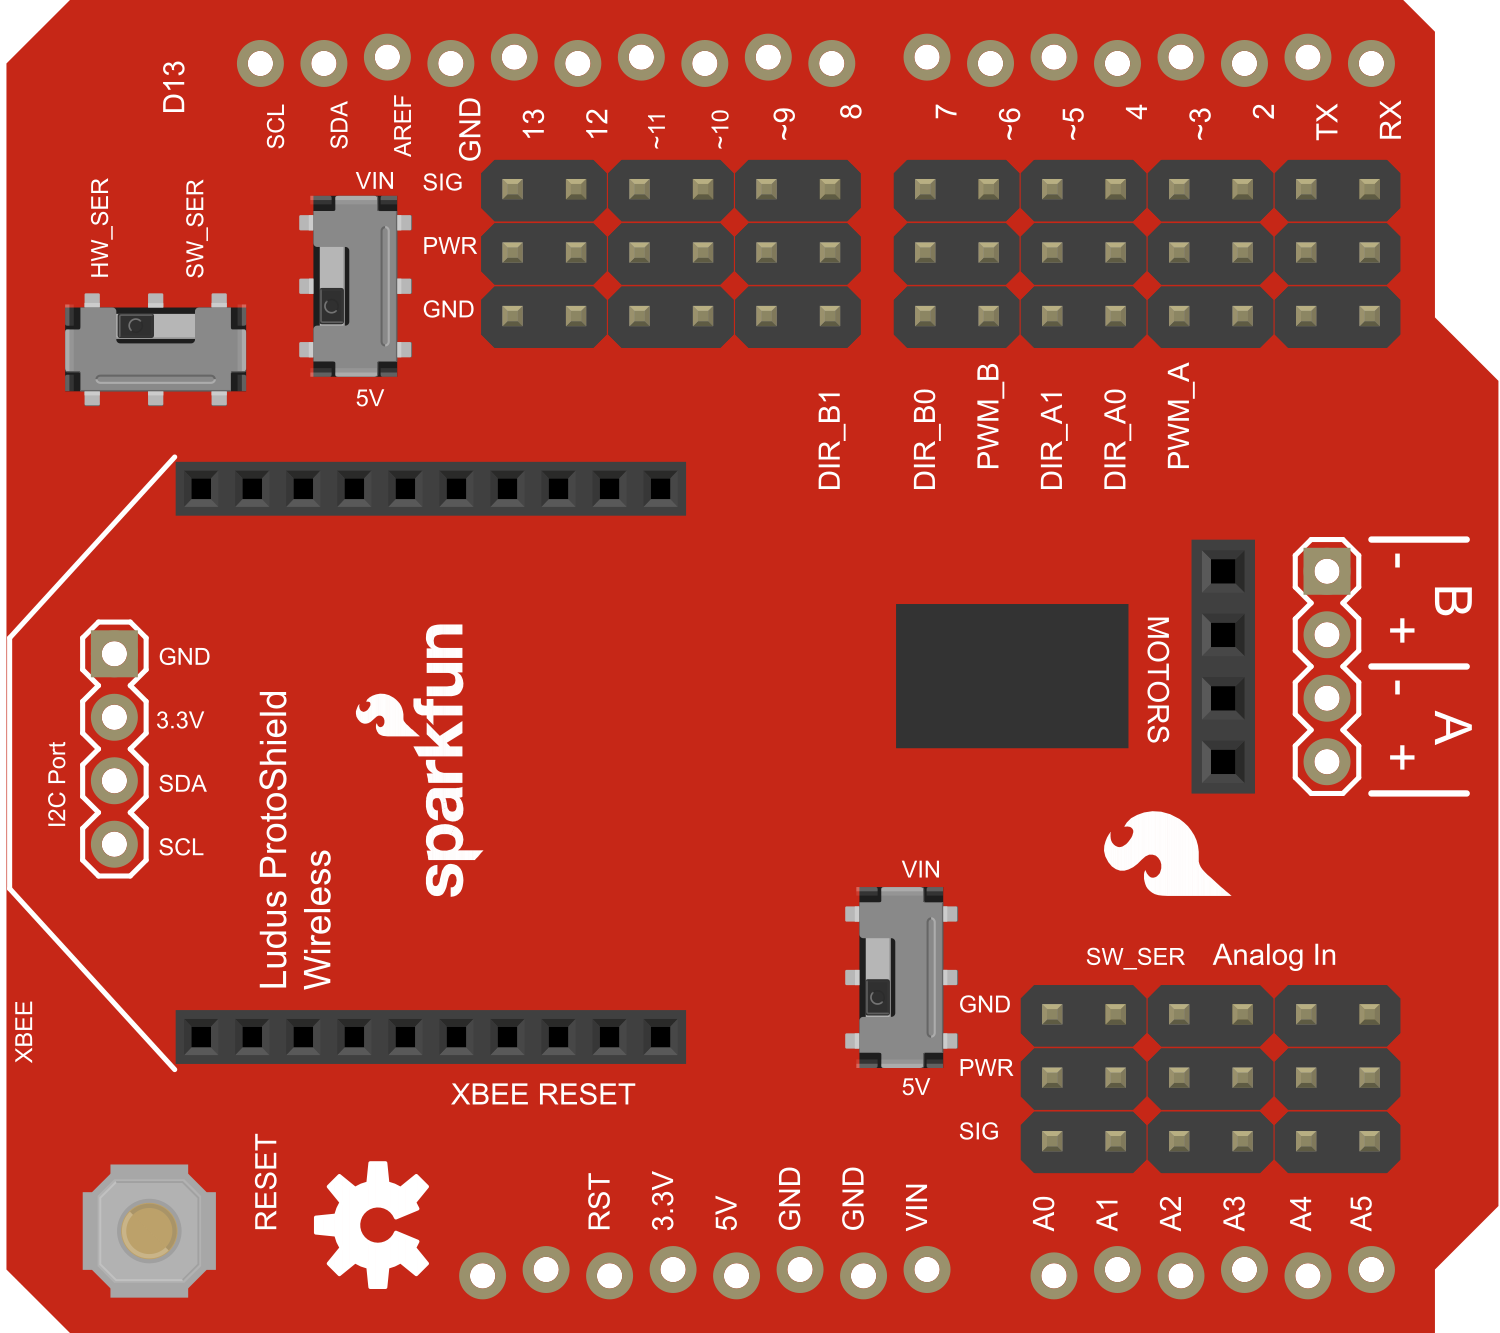
The Ludus ProtoShield Wireless is a versatile prototyping shield designed for use with Arduino boards. It features built-in wireless communication capabilities, making it an ideal choice for Internet of Things (IoT) projects. This shield simplifies the integration of sensors, modules, and other components, enabling rapid prototyping and development of wireless-enabled applications.
Explore Projects Built with Ludus ProtoShield Wireless


Explore Projects Built with Ludus ProtoShield Wireless
Common Applications and Use Cases
- IoT projects requiring wireless communication (e.g., Wi-Fi, Bluetooth)
- Prototyping sensor-based systems
- Smart home automation
- Remote monitoring and control systems
- Educational projects for learning wireless communication and Arduino programming
Technical Specifications
The Ludus ProtoShield Wireless is designed to be compatible with Arduino boards such as the Arduino UNO, Mega, and Leonardo. Below are the key technical details:
General Specifications
| Parameter | Value |
|---|---|
| Operating Voltage | 5V (from Arduino board) |
| Wireless Communication | Wi-Fi (ESP8266) and Bluetooth |
| Dimensions | 68.6mm x 53.4mm (Arduino UNO size) |
| Compatible Boards | Arduino UNO, Mega, Leonardo |
| Prototyping Area | Solderable area for custom circuits |
| Onboard LEDs | Power, TX, RX, and Status |
Pin Configuration and Descriptions
The Ludus ProtoShield Wireless connects directly to the Arduino board, exposing the following pins:
| Pin Name | Description |
|---|---|
| VIN | Input voltage from Arduino (5V) |
| GND | Ground connection |
| TX | Transmit pin for serial communication (connected to ESP8266 or Bluetooth) |
| RX | Receive pin for serial communication (connected to ESP8266 or Bluetooth) |
| A0-A5 | Analog input pins for connecting sensors |
| D0-D13 | Digital I/O pins for general-purpose use |
| 3.3V | 3.3V output for powering low-voltage components |
| Reset | Resets the Arduino and shield |
Usage Instructions
How to Use the Ludus ProtoShield Wireless in a Circuit
- Attach the Shield: Place the Ludus ProtoShield Wireless on top of your Arduino board, ensuring the pins align correctly.
- Connect Sensors/Modules: Use the prototyping area to solder or connect sensors, modules, or other components.
- Configure Wireless Communication:
- For Wi-Fi: Use the onboard ESP8266 module.
- For Bluetooth: Pair the shield with a Bluetooth-enabled device.
- Upload Code: Write and upload your Arduino sketch to control the shield and connected components.
Important Considerations and Best Practices
- Ensure the shield is securely connected to the Arduino board to avoid loose connections.
- Use level shifters if connecting 3.3V sensors to 5V pins.
- Avoid drawing excessive current from the Arduino board to prevent damage.
- When using the ESP8266 module, ensure the correct baud rate is set in your code (commonly 9600 or 115200).
Example Code for Arduino UNO
Below is an example sketch to send data over Wi-Fi using the ESP8266 module:
#include <SoftwareSerial.h>

// Define RX and TX pins for ESP8266 communication
SoftwareSerial esp8266(2, 3); // RX = Pin 2, TX = Pin 3

void setup() {
  Serial.begin(9600); // Initialize Serial Monitor
  esp8266.begin(9600); // Initialize ESP8266 communication

  // Send AT command to test communication
  esp8266.println("AT");
  delay(1000);

  // Check for response from ESP8266
  if (esp8266.available()) {
    while (esp8266.available()) {
      char c = esp8266.read();
      Serial.print(c); // Print response to Serial Monitor
    }
  } else {
    Serial.println("No response from ESP8266. Check connections.");
  }
}

void loop() {
  // Example: Send data to a server (replace with your server details)
  esp8266.println("AT+CIPSTART=\"TCP\",\"example.com\",80");
  delay(2000);
  esp8266.println("AT+CIPSEND=18");
  delay(1000);
  esp8266.println("GET / HTTP/1.1");
  delay(1000);
}
Notes:
- Replace
example.comwith your server's address. - Ensure the ESP8266 module is properly configured for your Wi-Fi network.
Troubleshooting and FAQs
Common Issues and Solutions
No Response from ESP8266 or Bluetooth Module:
- Ensure the shield is properly seated on the Arduino board.
- Check the RX and TX pin connections.
- Verify the baud rate in your code matches the module's default baud rate.
Wi-Fi Connection Fails:
- Double-check your Wi-Fi credentials in the code.
- Ensure the ESP8266 module is within range of the Wi-Fi router.
Arduino Fails to Upload Code:
- Disconnect the RX and TX pins before uploading code to the Arduino.
- Ensure the correct COM port and board are selected in the Arduino IDE.
Power Issues:
- Avoid connecting high-power components directly to the Arduino's 5V or 3.3V pins.
- Use an external power supply if necessary.
FAQs
Q: Can I use this shield with an Arduino Mega?
A: Yes, the Ludus ProtoShield Wireless is compatible with the Arduino Mega. However, you may need to adjust the pin assignments in your code.
Q: Does the shield support both Wi-Fi and Bluetooth simultaneously?
A: No, the shield can only use one wireless communication mode at a time. You must configure the desired mode in your code.
Q: Can I use this shield for battery-powered projects?
A: Yes, but ensure the battery provides sufficient voltage and current for both the Arduino and the shield.
Q: How do I update the firmware on the ESP8266 module?
A: You can update the firmware using a USB-to-serial adapter and the ESP8266 flashing tool. Refer to the ESP8266 documentation for detailed instructions.
By following this documentation, you can effectively use the Ludus ProtoShield Wireless for your IoT and prototyping projects.