How to Use Nicla Vision: Examples, Pinouts, and Specs
Introduction
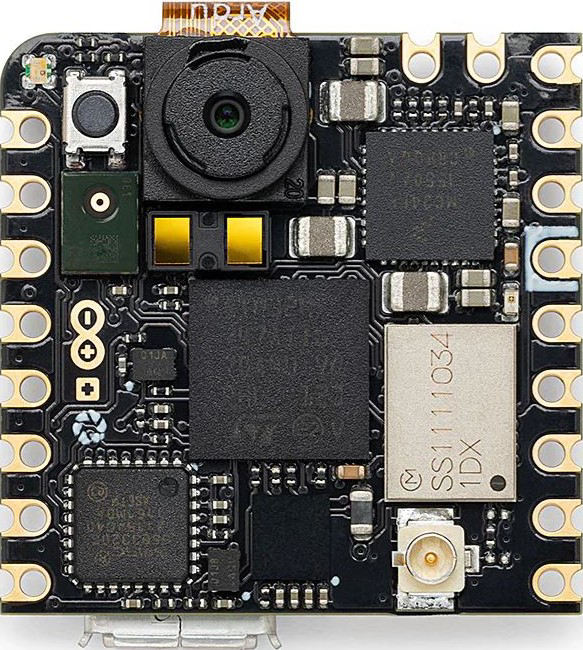
The Nicla Vision (Manufacturer Part ID: ABX00051-ND) is a compact and powerful development board designed by Arduino for computer vision and edge AI applications. It features an onboard camera, advanced processing capabilities, and multiple connectivity options, making it ideal for IoT projects and smart sensing applications. With its small form factor and robust design, the Nicla Vision is perfect for deploying AI models directly on the edge.
Explore Projects Built with Nicla Vision


Explore Projects Built with Nicla Vision
Common Applications and Use Cases
- Object detection and recognition
- Industrial automation and quality control
- Smart home and IoT devices
- Environmental monitoring
- Gesture and motion recognition
- Edge AI and machine learning inference
Technical Specifications
Key Technical Details
| Feature | Specification |
|---|---|
| Processor | STM32H747AII6 Dual ARM® Cortex®-M7/M4 (480 MHz / 240 MHz) |
| Camera | 2 MP OV5640 camera module |
| Memory | 8 MB SDRAM, 16 MB NOR Flash |
| Connectivity | Wi-Fi (802.11 b/g/n), Bluetooth® Low Energy (BLE) |
| Sensors | 6-axis IMU (accelerometer + gyroscope), microphone |
| Interfaces | I2C, SPI, UART, GPIO |
| Power Supply | 3.7V Li-Po battery or 5V via USB-C |
| Dimensions | 22.86 mm x 22.86 mm (0.9 in x 0.9 in) |
| Operating Temperature | -40°C to 85°C |
| Weight | 5 grams |
Pin Configuration and Descriptions
| Pin | Name | Type | Description |
|---|---|---|---|
| 1 | VIN | Power Input | Main power input (3.7V Li-Po battery or 5V USB-C). |
| 2 | GND | Ground | Ground connection. |
| 3 | SDA | I2C Data | I2C data line for communication with external devices. |
| 4 | SCL | I2C Clock | I2C clock line for communication with external devices. |
| 5 | TX | UART TX | UART transmit pin for serial communication. |
| 6 | RX | UART RX | UART receive pin for serial communication. |
| 7 | GPIO | GPIO | General-purpose input/output pin. |
| 8 | SPI_MOSI | SPI Data Out | SPI Master Out Slave In (MOSI) for SPI communication. |
| 9 | SPI_MISO | SPI Data In | SPI Master In Slave Out (MISO) for SPI communication. |
| 10 | SPI_SCK | SPI Clock | SPI clock line for SPI communication. |
| 11 | SPI_CS | SPI Chip Select | SPI chip select line for selecting the SPI slave device. |
Usage Instructions
How to Use the Nicla Vision in a Circuit
- Powering the Board:
- Connect a 3.7V Li-Po battery to the VIN pin or power the board via the USB-C port (5V).
- Connecting Peripherals:
- Use the I2C, SPI, or UART pins to interface with external sensors, actuators, or other devices.
- Programming the Board:
- The Nicla Vision can be programmed using the Arduino IDE or OpenMV IDE. Install the necessary board support package (BSP) from the Arduino Boards Manager.
- Deploying AI Models:
- Train your AI model using tools like TensorFlow Lite or Edge Impulse. Export the model and upload it to the Nicla Vision for edge inference.
Important Considerations and Best Practices
- Ensure the power supply is stable and within the specified voltage range to avoid damage.
- Use proper pull-up resistors for I2C communication if required by your circuit.
- When deploying AI models, optimize them for the board's processing capabilities to ensure smooth performance.
- Avoid exposing the board to extreme temperatures or moisture to maintain reliability.
Example Code for Arduino UNO Integration
The Nicla Vision can communicate with an Arduino UNO via I2C. Below is an example code snippet for reading data from the Nicla Vision:
#include <Wire.h> // Include the Wire library for I2C communication

#define NICLA_I2C_ADDRESS 0x3C // Replace with the actual I2C address of Nicla Vision

void setup() {
  Wire.begin(); // Initialize I2C communication
  Serial.begin(9600); // Start serial communication for debugging
  Serial.println("Initializing Nicla Vision...");
}

void loop() {
  Wire.beginTransmission(NICLA_I2C_ADDRESS); // Start communication with Nicla Vision
  Wire.write(0x01); // Example command to request data (replace with actual command)
  Wire.endTransmission();

  delay(10); // Wait for the response

  Wire.requestFrom(NICLA_I2C_ADDRESS, 10); // Request 10 bytes of data
  while (Wire.available()) {
    char c = Wire.read(); // Read each byte
    Serial.print(c); // Print the received data to the Serial Monitor
  }
  Serial.println();

  delay(1000); // Wait 1 second before the next request
}
Notes:
- Replace
NICLA_I2C_ADDRESSwith the actual I2C address of your Nicla Vision. - Modify the command (
0x01) and data handling as per your specific application.
Troubleshooting and FAQs
Common Issues and Solutions
The board is not powering on:
- Ensure the power supply is within the specified range (3.7V for Li-Po or 5V via USB-C).
- Check the connections for any loose wires or damaged cables.
Unable to upload code:
- Verify that the correct board and port are selected in the Arduino IDE.
- Ensure the Nicla Vision is in bootloader mode by double-pressing the reset button.
I2C communication is not working:
- Check the I2C address of the Nicla Vision and ensure it matches the address in your code.
- Use pull-up resistors on the SDA and SCL lines if necessary.
AI model runs too slowly:
- Optimize the model for edge devices by reducing its size and complexity.
- Use quantization techniques to improve performance.
FAQs
Can the Nicla Vision be used without an external microcontroller?
Yes, the Nicla Vision is a standalone development board with its own processor and memory.What IDEs are compatible with the Nicla Vision?
The Nicla Vision can be programmed using the Arduino IDE or OpenMV IDE.Does the Nicla Vision support battery operation?
Yes, it supports 3.7V Li-Po batteries for portable applications.Can I use the onboard camera for real-time video streaming?
The onboard camera is optimized for image capture and processing, but real-time streaming may be limited by processing and bandwidth constraints.What is the maximum range of the BLE connection?
The BLE range depends on environmental factors but typically ranges from 10 to 30 meters.