Cirkit Designer Logo
Cirkit Designer
Your all-in-one circuit design IDE
Home / 
Component Documentation

How to Use bob: Examples, Pinouts, and Specs

Image of bob
Cirkit Designer LogoDesign with bob in Cirkit Designer

Introduction

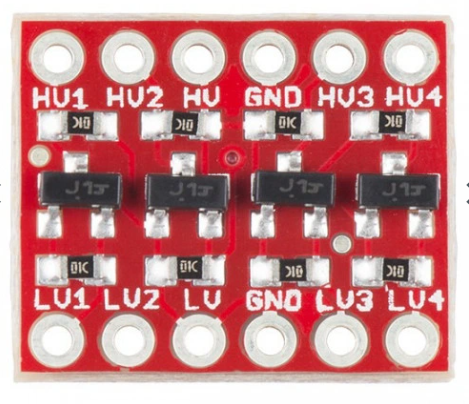
The SparkFun BOB-12009 is a breakout board designed to simplify the integration of specific electronic components into your projects. While the name "BOB" may evoke thoughts of a fictional character, in this context, it stands for "Breakout Board." This versatile component is commonly used to interface with sensors, modules, or other devices that require a convenient connection to a microcontroller or other circuitry.

Explore Projects Built with bob

Use Cirkit Designer to design, explore, and prototype these projects online. Some projects support real-time simulation. Click "Open Project" to start designing instantly!
Arduino UNO Bluetooth-Controlled Robotic Arm with Servo Motors and DC Motors
Image of ROBOTIC_ARM: A project utilizing bob in a practical application
This circuit is a Bluetooth-controlled robotic system powered by an Arduino UNO, which drives two DC motors via an L298N motor driver and controls six servos. The system includes an HC-05 Bluetooth module for wireless communication, and a DC-DC buck converter to step down the voltage from a 12V battery to power the servos and other components.
Cirkit Designer LogoOpen Project in Cirkit Designer
Arduino Mega 2560 Bluetooth-Controlled Robotic Car with Voice Recognition and Ultrasonic Sensor
Image of Voice Controlled Wheelchair: A project utilizing bob in a practical application
This circuit is a robotic system controlled by an Arduino Mega 2560, featuring Bluetooth communication via an HC-05 module, voice recognition, and ultrasonic sensing for obstacle detection. It drives four DC motors through an L293D motor driver and includes a green LED indicator. The system is powered by two 9V batteries.
Cirkit Designer LogoOpen Project in Cirkit Designer
Arduino UNO-Based RC Boat Monitoring System with Bluetooth Control
Image of Water_Pollution_Monitoring_RC_Boat: A project utilizing bob in a practical application
This circuit is an RC boat monitoring and control system using an Arduino UNO. It integrates various sensors (pH, turbidity, temperature) and actuators (motors, servo) to monitor water quality and control the boat's movement via Bluetooth commands.
Cirkit Designer LogoOpen Project in Cirkit Designer
Arduino UNO-Based Bluetooth-Controlled Agricultural Robot
Image of CIRCUIT DIAGRAM: A project utilizing bob in a practical application
This circuit is a Bluetooth-controlled agricultural robot powered by an Arduino UNO. It includes multiple DC motors for movement, servo motors for seed dispensing and ploughing, a water pump for irrigation, and a relay for controlling the pump. The robot can perform tasks such as moving, digging, sowing seeds, ploughing soil, and watering seeds based on commands received via a Bluetooth module.
Cirkit Designer LogoOpen Project in Cirkit Designer

Explore Projects Built with bob

Use Cirkit Designer to design, explore, and prototype these projects online. Some projects support real-time simulation. Click "Open Project" to start designing instantly!
Image of ROBOTIC_ARM: A project utilizing bob in a practical application
Arduino UNO Bluetooth-Controlled Robotic Arm with Servo Motors and DC Motors
This circuit is a Bluetooth-controlled robotic system powered by an Arduino UNO, which drives two DC motors via an L298N motor driver and controls six servos. The system includes an HC-05 Bluetooth module for wireless communication, and a DC-DC buck converter to step down the voltage from a 12V battery to power the servos and other components.
Cirkit Designer LogoOpen Project in Cirkit Designer
Image of Voice Controlled Wheelchair: A project utilizing bob in a practical application
Arduino Mega 2560 Bluetooth-Controlled Robotic Car with Voice Recognition and Ultrasonic Sensor
This circuit is a robotic system controlled by an Arduino Mega 2560, featuring Bluetooth communication via an HC-05 module, voice recognition, and ultrasonic sensing for obstacle detection. It drives four DC motors through an L293D motor driver and includes a green LED indicator. The system is powered by two 9V batteries.
Cirkit Designer LogoOpen Project in Cirkit Designer
Image of Water_Pollution_Monitoring_RC_Boat: A project utilizing bob in a practical application
Arduino UNO-Based RC Boat Monitoring System with Bluetooth Control
This circuit is an RC boat monitoring and control system using an Arduino UNO. It integrates various sensors (pH, turbidity, temperature) and actuators (motors, servo) to monitor water quality and control the boat's movement via Bluetooth commands.
Cirkit Designer LogoOpen Project in Cirkit Designer
Image of CIRCUIT DIAGRAM: A project utilizing bob in a practical application
Arduino UNO-Based Bluetooth-Controlled Agricultural Robot
This circuit is a Bluetooth-controlled agricultural robot powered by an Arduino UNO. It includes multiple DC motors for movement, servo motors for seed dispensing and ploughing, a water pump for irrigation, and a relay for controlling the pump. The robot can perform tasks such as moving, digging, sowing seeds, ploughing soil, and watering seeds based on commands received via a Bluetooth module.
Cirkit Designer LogoOpen Project in Cirkit Designer

Common Applications and Use Cases

  • Prototyping and testing electronic circuits
  • Interfacing sensors or modules with microcontrollers
  • Simplifying connections in breadboard-based projects
  • Educational purposes for learning about breakout boards

Technical Specifications

The SparkFun BOB-12009 is designed to provide a simple and reliable interface for various electronic components. Below are its key technical details:

General Specifications

Parameter Value
Manufacturer SparkFun
Part ID BOB-12009
Operating Voltage 3.3V or 5V
Maximum Current 100mA
Dimensions 25mm x 25mm
Mounting Type Through-hole or breadboard

Pin Configuration and Descriptions

The SparkFun BOB-12009 features a standard pinout for easy integration. Below is the pin configuration:

Pin Number Pin Name Description
1 VCC Power supply input (3.3V or 5V)
2 GND Ground connection
3 DATA Data signal pin for communication or input/output
4 CLK Clock signal pin (if applicable)
5 EN Enable pin to activate the breakout board

Usage Instructions

The SparkFun BOB-12009 is straightforward to use in a variety of circuits. Follow the steps below to integrate it into your project:

Step 1: Powering the Board

  • Connect the VCC pin to a 3.3V or 5V power source, depending on your system's requirements.
  • Connect the GND pin to the ground of your circuit.

Step 2: Connecting to a Microcontroller

  • Use the DATA pin to send or receive signals between the breakout board and your microcontroller.
  • If your application requires a clock signal, connect the CLK pin to the appropriate clock output of your microcontroller.
  • To enable the board, ensure the EN pin is connected to a HIGH signal (or leave it unconnected if it has an internal pull-up resistor).

Step 3: Writing Code for Arduino UNO

If you're using the SparkFun BOB-12009 with an Arduino UNO, here is an example code snippet to get started:

// Example code for using SparkFun BOB-12009 with Arduino UNO
// This code assumes the DATA pin is connected to digital pin 2 on the Arduino

#define DATA_PIN 2  // Define the DATA pin connection

void setup() {
  pinMode(DATA_PIN, OUTPUT);  // Set the DATA pin as an output
  digitalWrite(DATA_PIN, LOW);  // Initialize the pin to LOW
  Serial.begin(9600);  // Start serial communication for debugging
}

void loop() {
  digitalWrite(DATA_PIN, HIGH);  // Set the DATA pin HIGH
  delay(1000);  // Wait for 1 second
  digitalWrite(DATA_PIN, LOW);  // Set the DATA pin LOW
  delay(1000);  // Wait for 1 second
  Serial.println("Toggling DATA pin");  // Print status to Serial Monitor
}

Best Practices

  • Ensure the operating voltage of the breakout board matches your system's voltage.
  • Use pull-up or pull-down resistors on the DATA and CLK lines if required by your application.
  • Avoid exceeding the maximum current rating of 100mA to prevent damage.

Troubleshooting and FAQs

Common Issues

  1. The board is not functioning as expected.

    • Verify that the VCC and GND pins are correctly connected.
    • Check the voltage level to ensure it matches the board's requirements.
  2. No response from the DATA pin.

    • Ensure the microcontroller's pin connected to DATA is configured correctly (input/output).
    • Check for loose or incorrect wiring.
  3. The board overheats.

    • Confirm that the current drawn by connected components does not exceed 100mA.
    • Inspect for short circuits on the breakout board or in your circuit.

Tips for Troubleshooting

  • Use a multimeter to check voltage levels at the VCC and GND pins.
  • Test the board with a simple circuit before integrating it into a complex system.
  • Refer to the SparkFun BOB-12009 datasheet for additional details if needed.

By following this documentation, you can effectively use the SparkFun BOB-12009 in your projects and troubleshoot any issues that arise.