Cirkit Designer Logo
Cirkit Designer
Your all-in-one circuit design IDE
Home / 
Component Documentation

How to Use Adafruit Si7021 Humidity and Temperature Sensor: Examples, Pinouts, and Specs

Image of Adafruit Si7021 Humidity and Temperature Sensor
Cirkit Designer LogoDesign with Adafruit Si7021 Humidity and Temperature Sensor in Cirkit Designer

Introduction

The Adafruit Si7021 sensor is a compact, high-precision digital humidity and temperature sensor that offers reliable performance in a wide range of applications. With its I2C interface, it is easy to integrate with microcontrollers such as the Arduino UNO. The Si7021 is ideal for environmental monitoring in greenhouses, HVAC systems, weather stations, and other applications where accurate humidity and temperature readings are crucial.

Explore Projects Built with Adafruit Si7021 Humidity and Temperature Sensor

Use Cirkit Designer to design, explore, and prototype these projects online. Some projects support real-time simulation. Click "Open Project" to start designing instantly!
Arduino UNO with HTU21D-F Sensor for Temperature and Humidity Monitoring
Image of Interfacing HTU21D Temperature and Humidity Sensor with Arduino UNO: A project utilizing Adafruit Si7021 Humidity and Temperature Sensor in a practical application
This circuit connects an Arduino UNO microcontroller to an Adafruit HTU21D-F Temperature & Humidity Sensor. The Arduino is programmed to read temperature and humidity data from the sensor and output the readings to the Serial Monitor at half-second intervals. The sensor is powered by the Arduino's 5V output and communicates with the microcontroller via the I2C protocol using the SCL and SDA lines.
Cirkit Designer LogoOpen Project in Cirkit Designer
Arduino UNO with Adafruit HTU21D-F Sensor for Temperature and Humidity Monitoring
Image of Interfacing HTU21D Temperature and Humidity Sensor with Arduino UNO: A project utilizing Adafruit Si7021 Humidity and Temperature Sensor in a practical application
This circuit connects an Arduino UNO to an Adafruit HTU21D-F Temperature & Humidity Sensor via I2C communication protocol. The Arduino provides power to the sensor and reads temperature and humidity data, which it then outputs to the Serial Monitor every 500 milliseconds. The purpose of this circuit is to monitor environmental conditions.
Cirkit Designer LogoOpen Project in Cirkit Designer
Wi-Fi Controlled Weather Station with OLED Display and Buzzer
Image of Smart-watch: A project utilizing Adafruit Si7021 Humidity and Temperature Sensor in a practical application
This circuit uses an ESP8266 NodeMCU microcontroller to read temperature and humidity data from a DHT11 sensor and display it on a 1.3" OLED screen. Additionally, it includes a buzzer and two LEDs (red and green) for alerting purposes, with the LEDs connected through current-limiting resistors.
Cirkit Designer LogoOpen Project in Cirkit Designer
Arduino UNO and DHT11 Sensor-Based Temperature and Humidity Monitor
Image of Measure Temperature a: A project utilizing Adafruit Si7021 Humidity and Temperature Sensor in a practical application
This circuit uses an Arduino UNO to read temperature and humidity data from a DHT11 sensor. The sensor is powered by the Arduino's 5V and GND pins, with a 10k ohm pull-up resistor connected to the data line, which is read by the Arduino on digital pin 2. The Arduino runs a program to collect and print the sensor data to the serial monitor.
Cirkit Designer LogoOpen Project in Cirkit Designer

Explore Projects Built with Adafruit Si7021 Humidity and Temperature Sensor

Use Cirkit Designer to design, explore, and prototype these projects online. Some projects support real-time simulation. Click "Open Project" to start designing instantly!
Image of Interfacing HTU21D Temperature and Humidity Sensor with Arduino UNO: A project utilizing Adafruit Si7021 Humidity and Temperature Sensor in a practical application
Arduino UNO with HTU21D-F Sensor for Temperature and Humidity Monitoring
This circuit connects an Arduino UNO microcontroller to an Adafruit HTU21D-F Temperature & Humidity Sensor. The Arduino is programmed to read temperature and humidity data from the sensor and output the readings to the Serial Monitor at half-second intervals. The sensor is powered by the Arduino's 5V output and communicates with the microcontroller via the I2C protocol using the SCL and SDA lines.
Cirkit Designer LogoOpen Project in Cirkit Designer
Image of Interfacing HTU21D Temperature and Humidity Sensor with Arduino UNO: A project utilizing Adafruit Si7021 Humidity and Temperature Sensor in a practical application
Arduino UNO with Adafruit HTU21D-F Sensor for Temperature and Humidity Monitoring
This circuit connects an Arduino UNO to an Adafruit HTU21D-F Temperature & Humidity Sensor via I2C communication protocol. The Arduino provides power to the sensor and reads temperature and humidity data, which it then outputs to the Serial Monitor every 500 milliseconds. The purpose of this circuit is to monitor environmental conditions.
Cirkit Designer LogoOpen Project in Cirkit Designer
Image of Smart-watch: A project utilizing Adafruit Si7021 Humidity and Temperature Sensor in a practical application
Wi-Fi Controlled Weather Station with OLED Display and Buzzer
This circuit uses an ESP8266 NodeMCU microcontroller to read temperature and humidity data from a DHT11 sensor and display it on a 1.3" OLED screen. Additionally, it includes a buzzer and two LEDs (red and green) for alerting purposes, with the LEDs connected through current-limiting resistors.
Cirkit Designer LogoOpen Project in Cirkit Designer
Image of Measure Temperature a: A project utilizing Adafruit Si7021 Humidity and Temperature Sensor in a practical application
Arduino UNO and DHT11 Sensor-Based Temperature and Humidity Monitor
This circuit uses an Arduino UNO to read temperature and humidity data from a DHT11 sensor. The sensor is powered by the Arduino's 5V and GND pins, with a 10k ohm pull-up resistor connected to the data line, which is read by the Arduino on digital pin 2. The Arduino runs a program to collect and print the sensor data to the serial monitor.
Cirkit Designer LogoOpen Project in Cirkit Designer

Technical Specifications

Key Features

  • Relative Humidity Range: 0 to 80% RH (±3% RH)
  • Temperature Range: -10 to 85°C (±0.4°C)
  • Operating Voltage: 1.9 to 3.6 V
  • I2C Interface
  • Low Power Consumption
  • Integrated on-chip heater
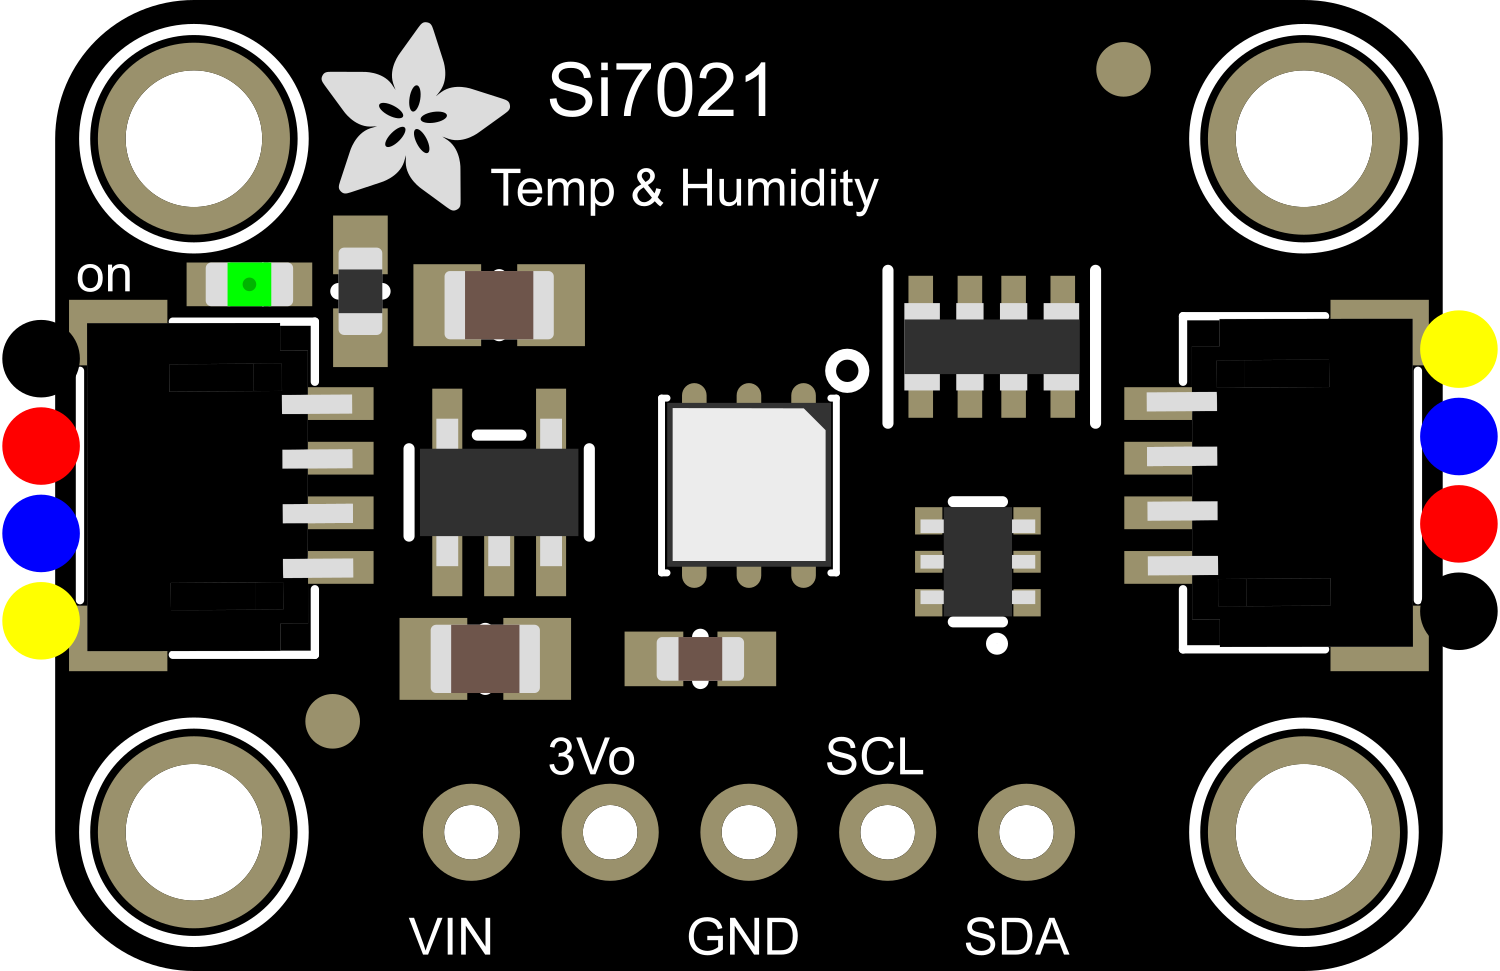
Pin Configuration

Pin Number Name Description
1 VDD Power supply (1.9 to 3.6 V)
2 GND Ground
3 SDA I2C Data
4 SCL I2C Clock

Usage Instructions

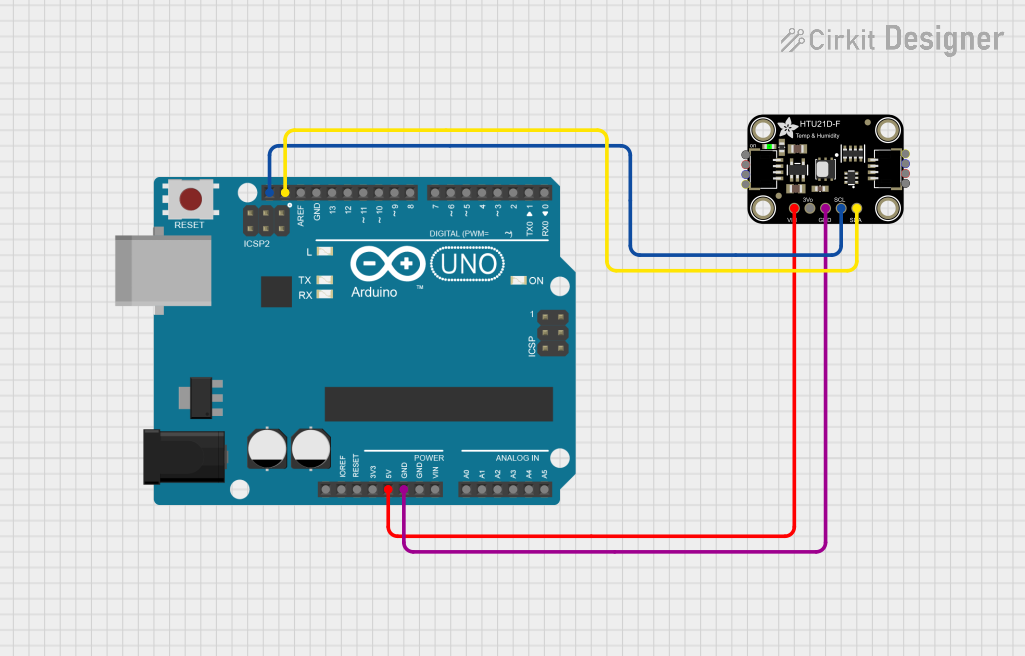
Integration with Arduino

  1. Connecting the Sensor:

    • Connect VDD to the 3.3V output on the Arduino.
    • Connect GND to a ground pin on the Arduino.
    • Connect SDA to the SDA pin on the Arduino.
    • Connect SCL to the SCL pin on the Arduino.
  2. Library Installation:

    • Install the "Adafruit Si7021" library through the Arduino Library Manager.
  3. Sample Code:

    #include <Wire.h>
    #include <Adafruit_Si7021.h>
    
    Adafruit_Si7021 sensor = Adafruit_Si7021();
    
    void setup() {
      Serial.begin(9600);
      // Wait for serial console to open, useful for native USB port only
      while (!Serial) { delay(10); }
    
      Serial.println("Si7021 test!");
    
      if (!sensor.begin()) {
        Serial.println("Did not find Si7021 sensor!");
        while (true);
      }
    }
    
    void loop() {
      float humidity = sensor.readHumidity();
      float temperature = sensor.readTemperature();
    
      Serial.print("Humidity:    ");
      Serial.print(humidity, 2);
      Serial.print("%\t");
      Serial.print("Temperature: ");
      Serial.print(temperature, 2);
      Serial.println("°C");
    
      delay(1000);
    }
    
    • Ensure that the I2C address in the code matches the address of your sensor.
    • The delay(1000); at the end of the loop causes the sensor to take a reading every second.

Best Practices

  • Avoid placing the sensor in direct sunlight or near heat sources to prevent inaccurate readings.
  • Ensure that the sensor is not exposed to condensing humidity levels.
  • Use pull-up resistors with the I2C lines if you are experiencing communication issues.

Troubleshooting and FAQs

Common Issues

  • Sensor Not Detected: Ensure that the wiring is correct and that the sensor is properly powered.
  • Inaccurate Readings: Check for any environmental factors that may affect the sensor's readings, such as direct heat sources or airflow.
  • I2C Communication Errors: Verify that the pull-up resistors are in place and that there are no shorts on the I2C lines.

FAQs

Q: Can the Si7021 sensor be used with 5V systems? A: The Si7021 operates at 1.9 to 3.6 V. A logic level converter should be used when interfacing with 5V systems.

Q: How can I calibrate the sensor? A: The Si7021 is factory-calibrated. However, if calibration is necessary, refer to the sensor's datasheet for calibration procedures.

Q: Is the sensor waterproof? A: No, the Si7021 is not waterproof. It should be protected from moisture that can condense on the sensor.

For further assistance, consult the Adafruit Si7021 datasheet or contact Adafruit's support forums.