How to Use SIM7600-H Hat: Examples, Pinouts, and Specs
Introduction
The SIM7600-H Hat is a GSM/GPRS/LTE module designed to provide cellular connectivity for IoT applications. It enables data transmission, voice communication, and SMS functionality over mobile networks. This versatile module is ideal for projects requiring reliable wireless communication, such as remote monitoring, GPS tracking, smart agriculture, and industrial automation.
The SIM7600-H Hat is compatible with popular development platforms like Raspberry Pi and Arduino, making it a powerful tool for prototyping and deploying IoT solutions.
Explore Projects Built with SIM7600-H Hat


Explore Projects Built with SIM7600-H Hat
Technical Specifications
Key Technical Details
- Module: SIM7600-H
- Cellular Network Support: GSM, GPRS, LTE (4G)
- Frequency Bands:
- LTE: B1/B3/B5/B7/B8/B20/B28
- WCDMA: B1/B5/B8
- GSM: 850/900/1800/1900 MHz
- Data Rates:
- LTE: Up to 150 Mbps (downlink), 50 Mbps (uplink)
- HSPA+: Up to 42 Mbps (downlink), 5.76 Mbps (uplink)
- Power Supply Voltage: 5V (via Raspberry Pi GPIO or external power source)
- Operating Temperature: -40°C to +85°C
- Interfaces:
- UART
- USB 2.0
- GPIO
- SIM card slot
- Antenna Interfaces: Main antenna, GPS antenna, and diversity antenna
- Dimensions: 65mm x 56mm
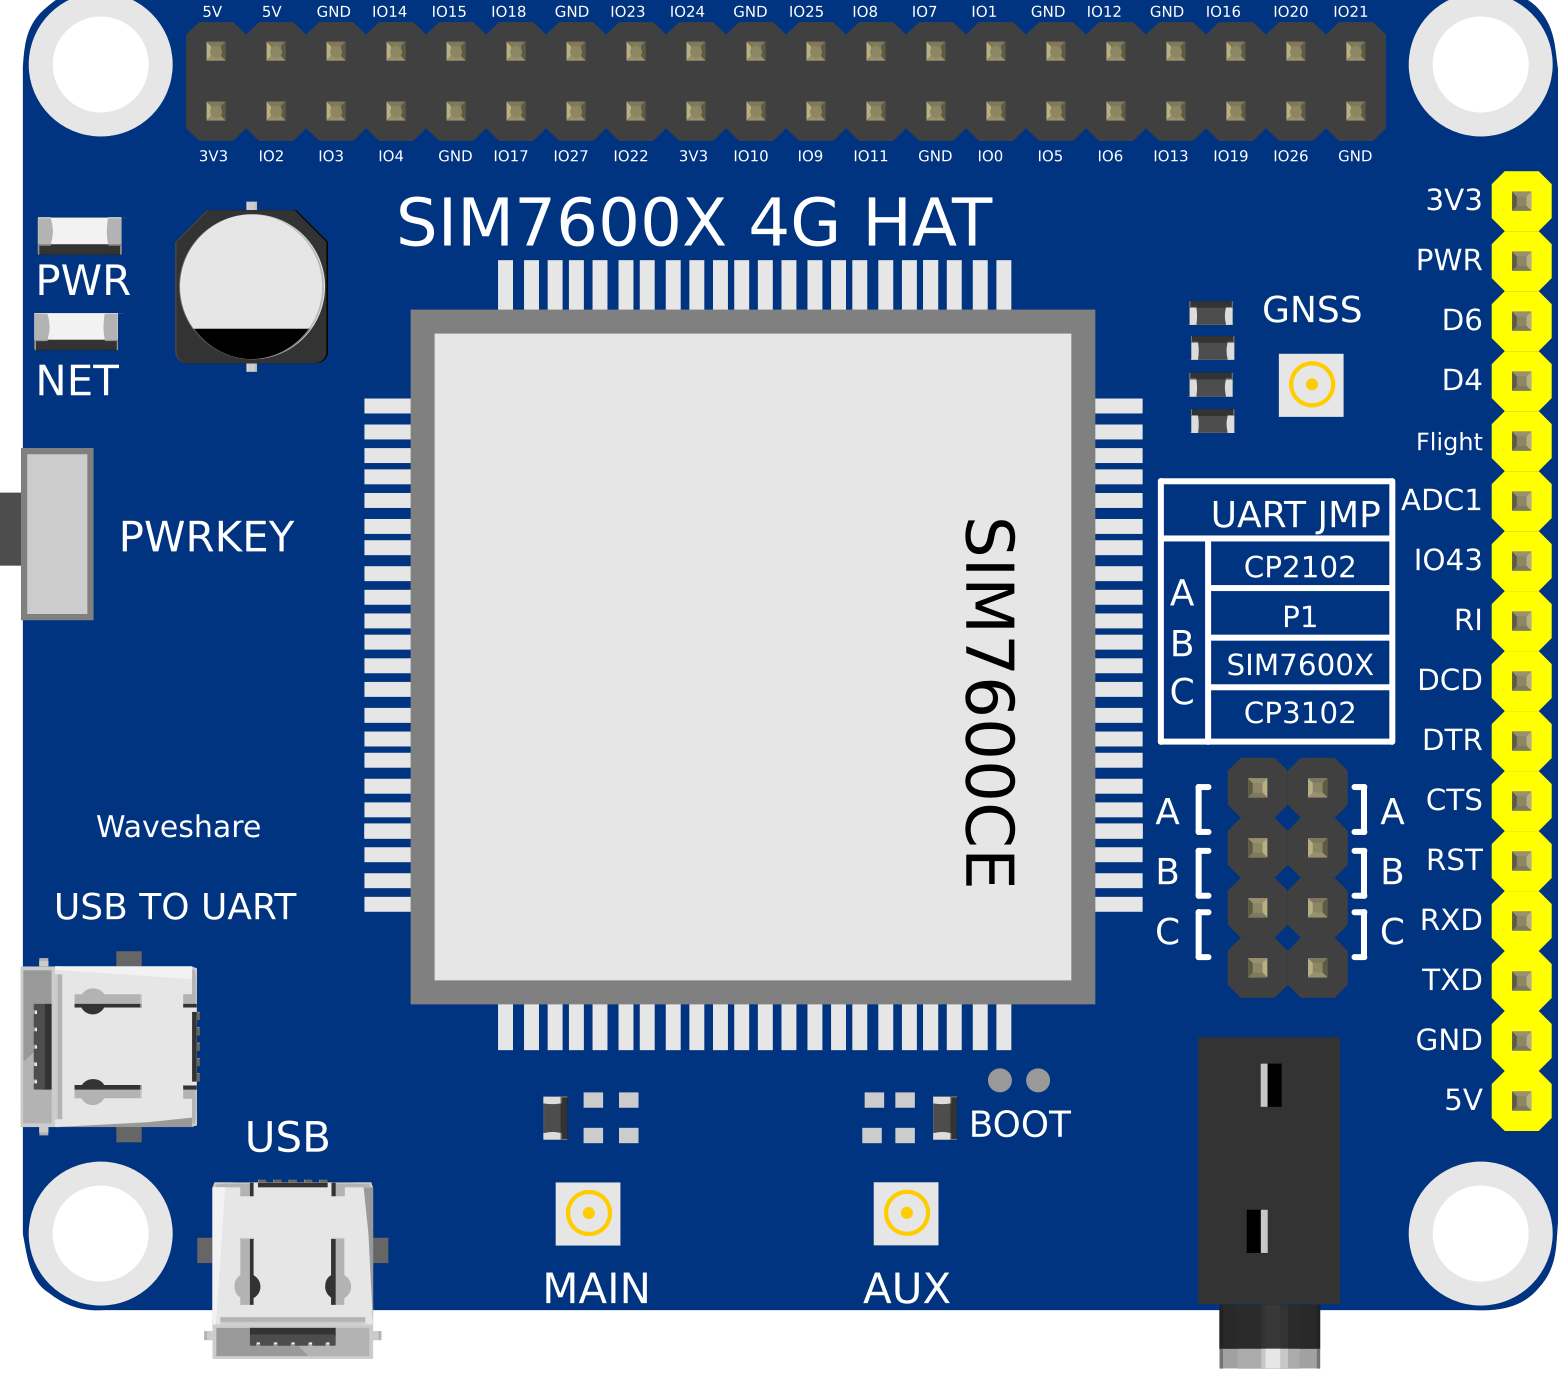
Pin Configuration and Descriptions
The SIM7600-H Hat connects to a Raspberry Pi or other microcontroller via GPIO pins. Below is the pinout description:
| Pin | Name | Description |
|---|---|---|
| 1 | 5V | Power supply (5V input) |
| 2 | GND | Ground |
| 3 | TXD | UART Transmit (data sent from SIM7600-H to host) |
| 4 | RXD | UART Receive (data sent from host to SIM7600-H) |
| 5 | PWRKEY | Power key to turn the module on/off |
| 6 | NETLIGHT | Network status indicator |
| 7 | GPS_TXD | GPS UART Transmit |
| 8 | GPS_RXD | GPS UART Receive |
| 9 | USB_D+ | USB data positive |
| 10 | USB_D- | USB data negative |
Usage Instructions
How to Use the SIM7600-H Hat in a Circuit
Hardware Setup:
- Attach the SIM7600-H Hat to the GPIO header of a Raspberry Pi or connect it to an Arduino using jumper wires.
- Insert a valid SIM card into the SIM card slot.
- Connect the provided LTE and GPS antennas to their respective ports.
- Power the module using the 5V pin or via the Raspberry Pi GPIO header.
Software Setup:
- For Raspberry Pi:
- Install the required drivers and libraries for the SIM7600-H module.
- Enable UART communication in the Raspberry Pi configuration.
- For Arduino:
- Use the
SoftwareSeriallibrary to communicate with the module via UART.
- Use the
- For Raspberry Pi:
Basic AT Command Communication:
- Open a serial terminal (e.g., minicom or Arduino Serial Monitor).
- Send AT commands to configure the module and test connectivity. For example:
AT(Check if the module is responsive)AT+CSQ(Check signal quality)AT+CGATT?(Check if the module is attached to the network)
Important Considerations and Best Practices
- Ensure the SIM card has an active data plan and is properly inserted.
- Use a stable 5V power supply to avoid unexpected resets or malfunctions.
- Place the antennas in an open area for optimal signal reception.
- Avoid placing the module near high-frequency noise sources to prevent interference.
- When using with an Arduino, ensure the UART voltage levels are compatible (use a level shifter if necessary).
Example Code for Arduino UNO
Below is an example code snippet to send an SMS using the SIM7600-H Hat:
#include <SoftwareSerial.h>

// Define RX and TX pins for SoftwareSerial
SoftwareSerial sim7600(10, 11); // RX = pin 10, TX = pin 11

void setup() {
  Serial.begin(9600); // Initialize Serial Monitor
  sim7600.begin(9600); // Initialize SIM7600 UART communication

  // Wait for the module to initialize
  delay(1000);
  Serial.println("Initializing SIM7600...");

  // Send AT command to check module response
  sim7600.println("AT");
  delay(1000);
  while (sim7600.available()) {
    Serial.write(sim7600.read());
  }

  // Set SMS text mode
  sim7600.println("AT+CMGF=1"); // Set SMS to text mode
  delay(1000);

  // Send SMS command
  sim7600.println("AT+CMGS=\"+1234567890\""); // Replace with recipient's number
  delay(1000);
  sim7600.println("Hello from SIM7600-H!"); // SMS content
  delay(1000);
  sim7600.write(26); // Send Ctrl+Z to send the SMS
  delay(5000);

  Serial.println("SMS sent!");
}

void loop() {
  // No actions in loop
}
Troubleshooting and FAQs
Common Issues and Solutions
Module Not Responding to AT Commands:
- Ensure the module is powered on (check the PWRKEY pin or LED indicators).
- Verify the UART connections (TX and RX pins) are correct.
- Check the baud rate settings in your code or terminal.
No Network Connection:
- Confirm the SIM card is active and has sufficient balance or data plan.
- Check the antenna connections and ensure good signal reception.
- Use the
AT+CSQcommand to verify signal strength (values above 10 are acceptable).
GPS Not Working:
- Ensure the GPS antenna is connected and placed in an open area.
- Use the
AT+CGNSPWR=1command to enable GPS functionality.
Module Resets Unexpectedly:
- Verify the power supply is stable and capable of providing sufficient current.
- Avoid using long or thin wires for power connections.
FAQs
Q: Can the SIM7600-H Hat be used for voice calls?
- Yes, the module supports voice calls. Use the
ATDcommand to dial a number.
- Yes, the module supports voice calls. Use the
Q: Is the SIM7600-H Hat compatible with 3G networks?
- Yes, the module supports WCDMA (3G) networks in addition to LTE and GSM.
Q: How do I update the firmware?
- Firmware updates can be performed via the USB interface using the manufacturer's tools.
Q: Can I use the SIM7600-H Hat with a microcontroller other than Arduino?
- Yes, the module can be used with any microcontroller that supports UART or USB communication.
By following this documentation, you can effectively integrate the SIM7600-H Hat into your IoT projects and leverage its powerful cellular connectivity features.