How to Use FS-A8S (Receiver): Examples, Pinouts, and Specs
Introduction
The FS-A8S is a lightweight, compact receiver designed for use in remote control applications. Manufactured by Arduino with the part ID EVO, this receiver provides reliable signal reception and is compatible with a wide range of transmitters. Its small form factor and robust performance make it ideal for drones, RC cars, boats, and other remote-controlled devices.
Explore Projects Built with FS-A8S (Receiver)
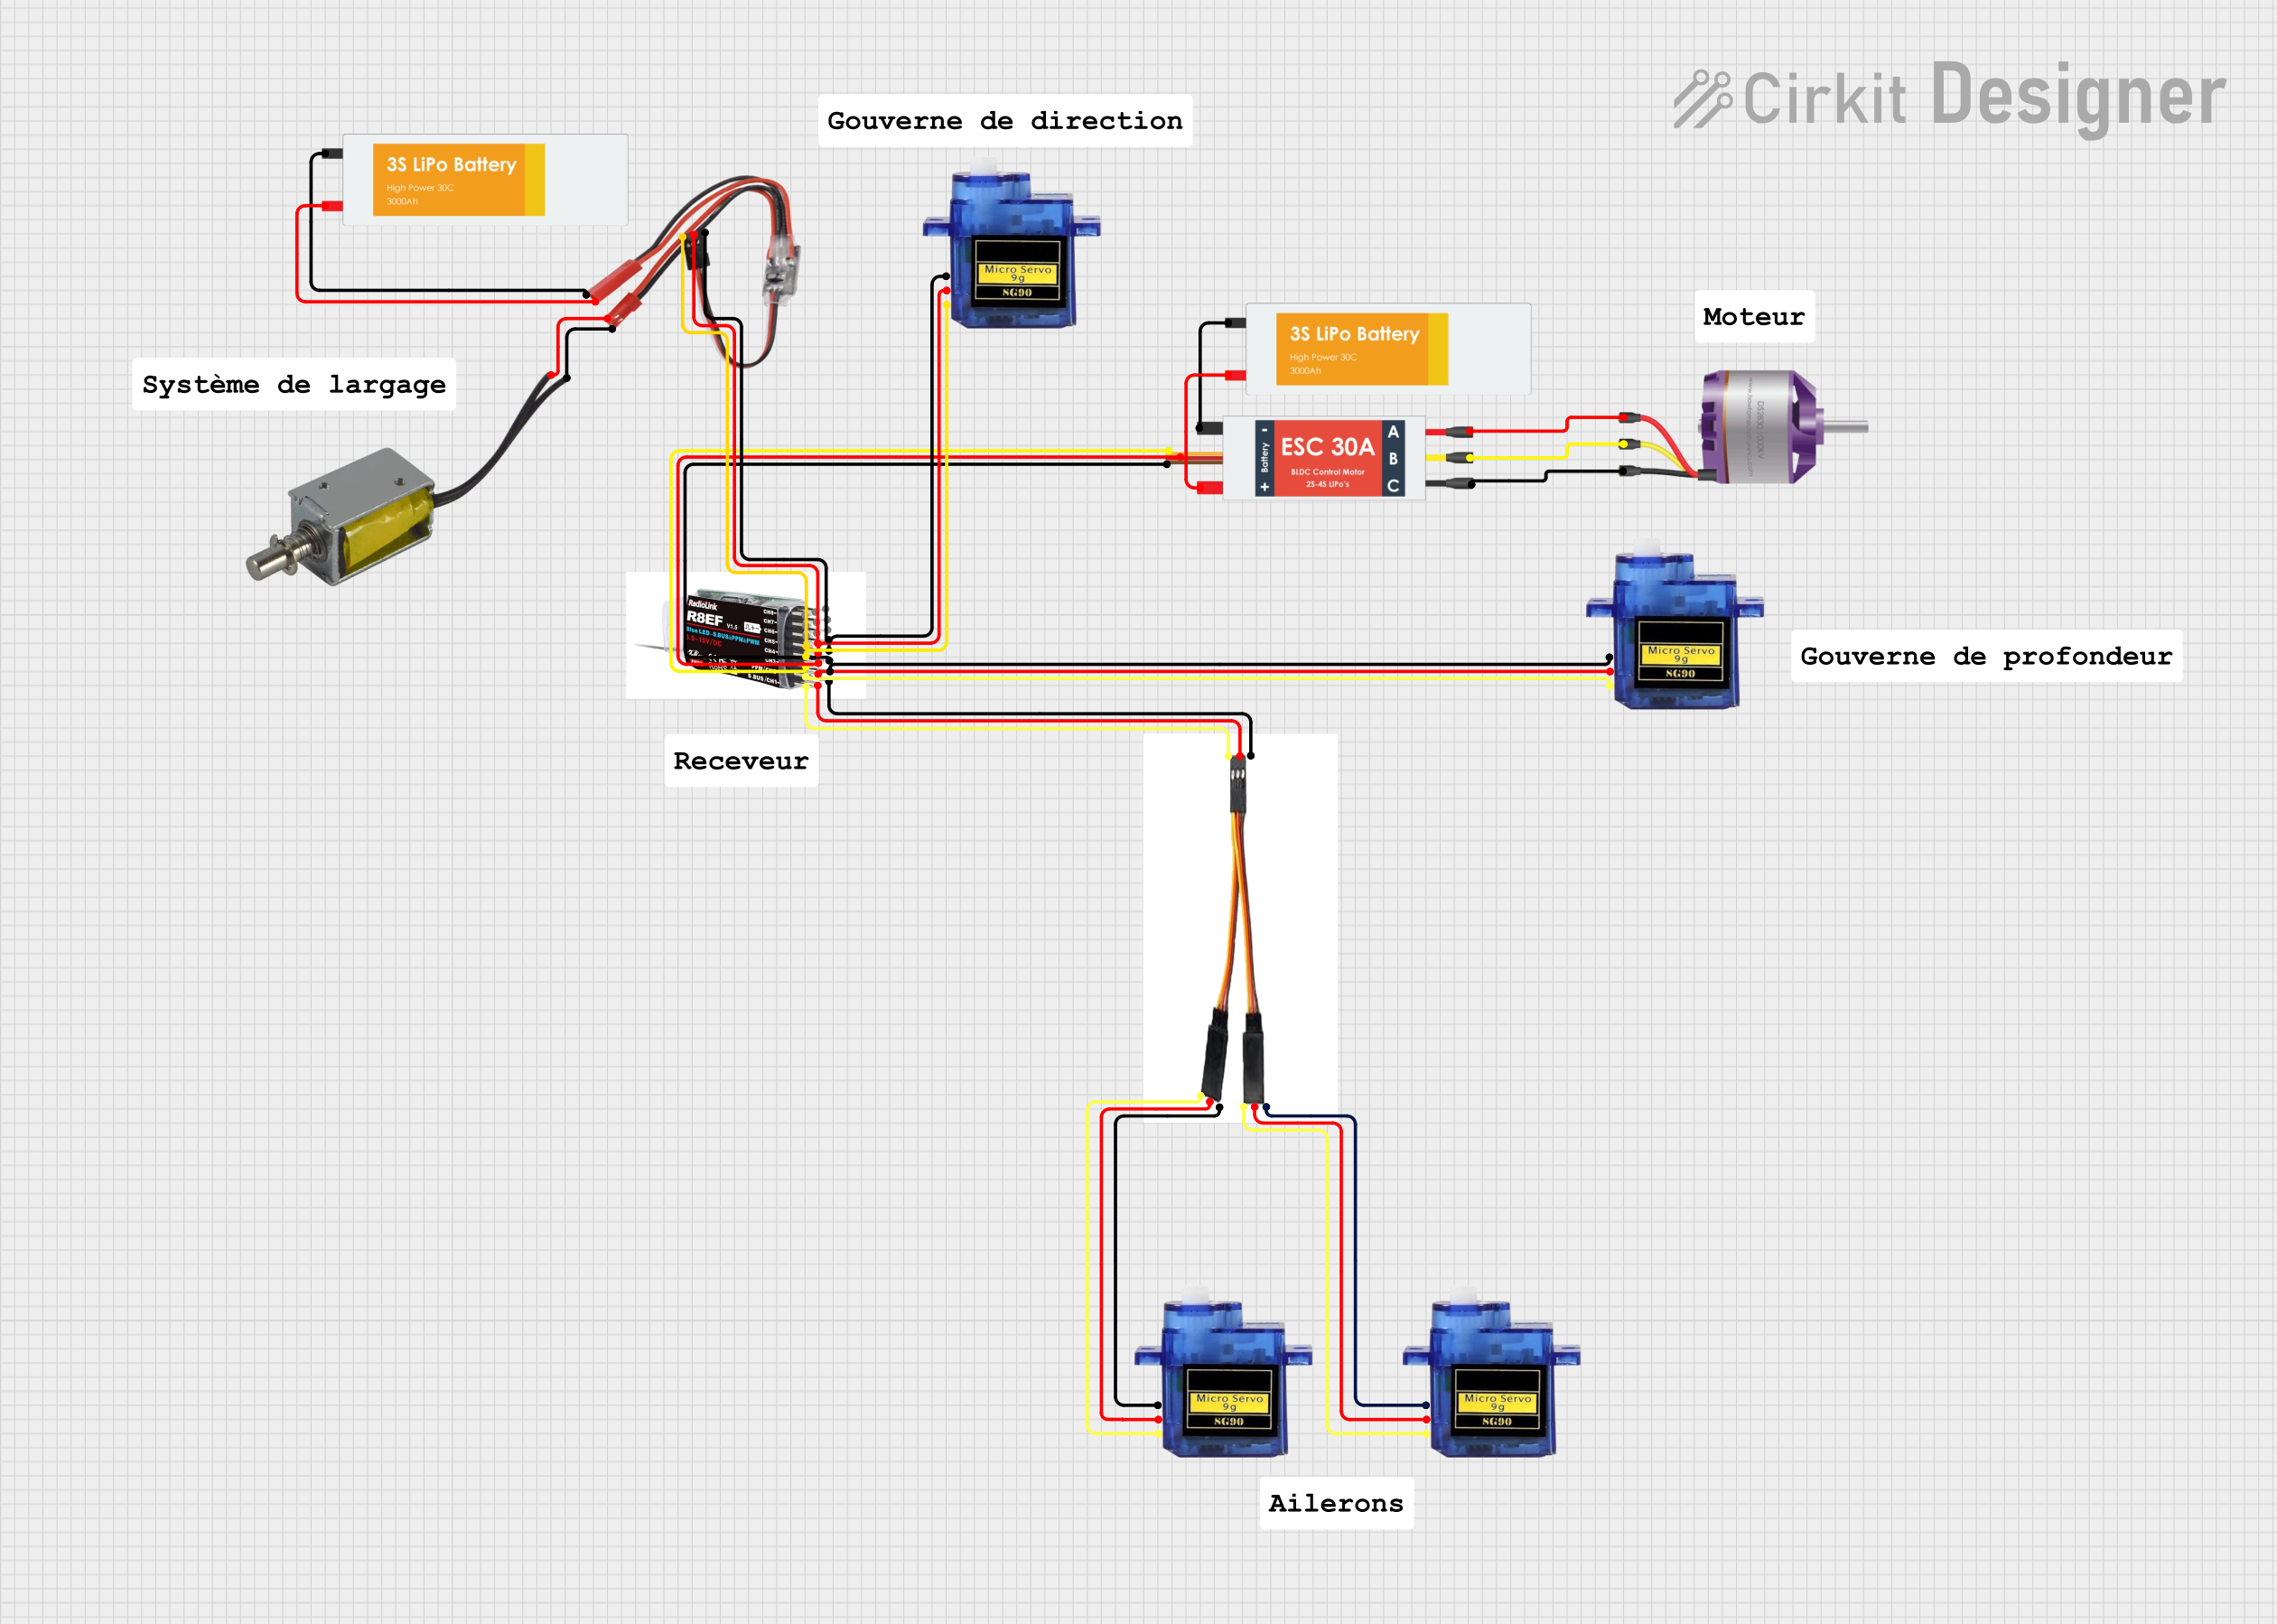


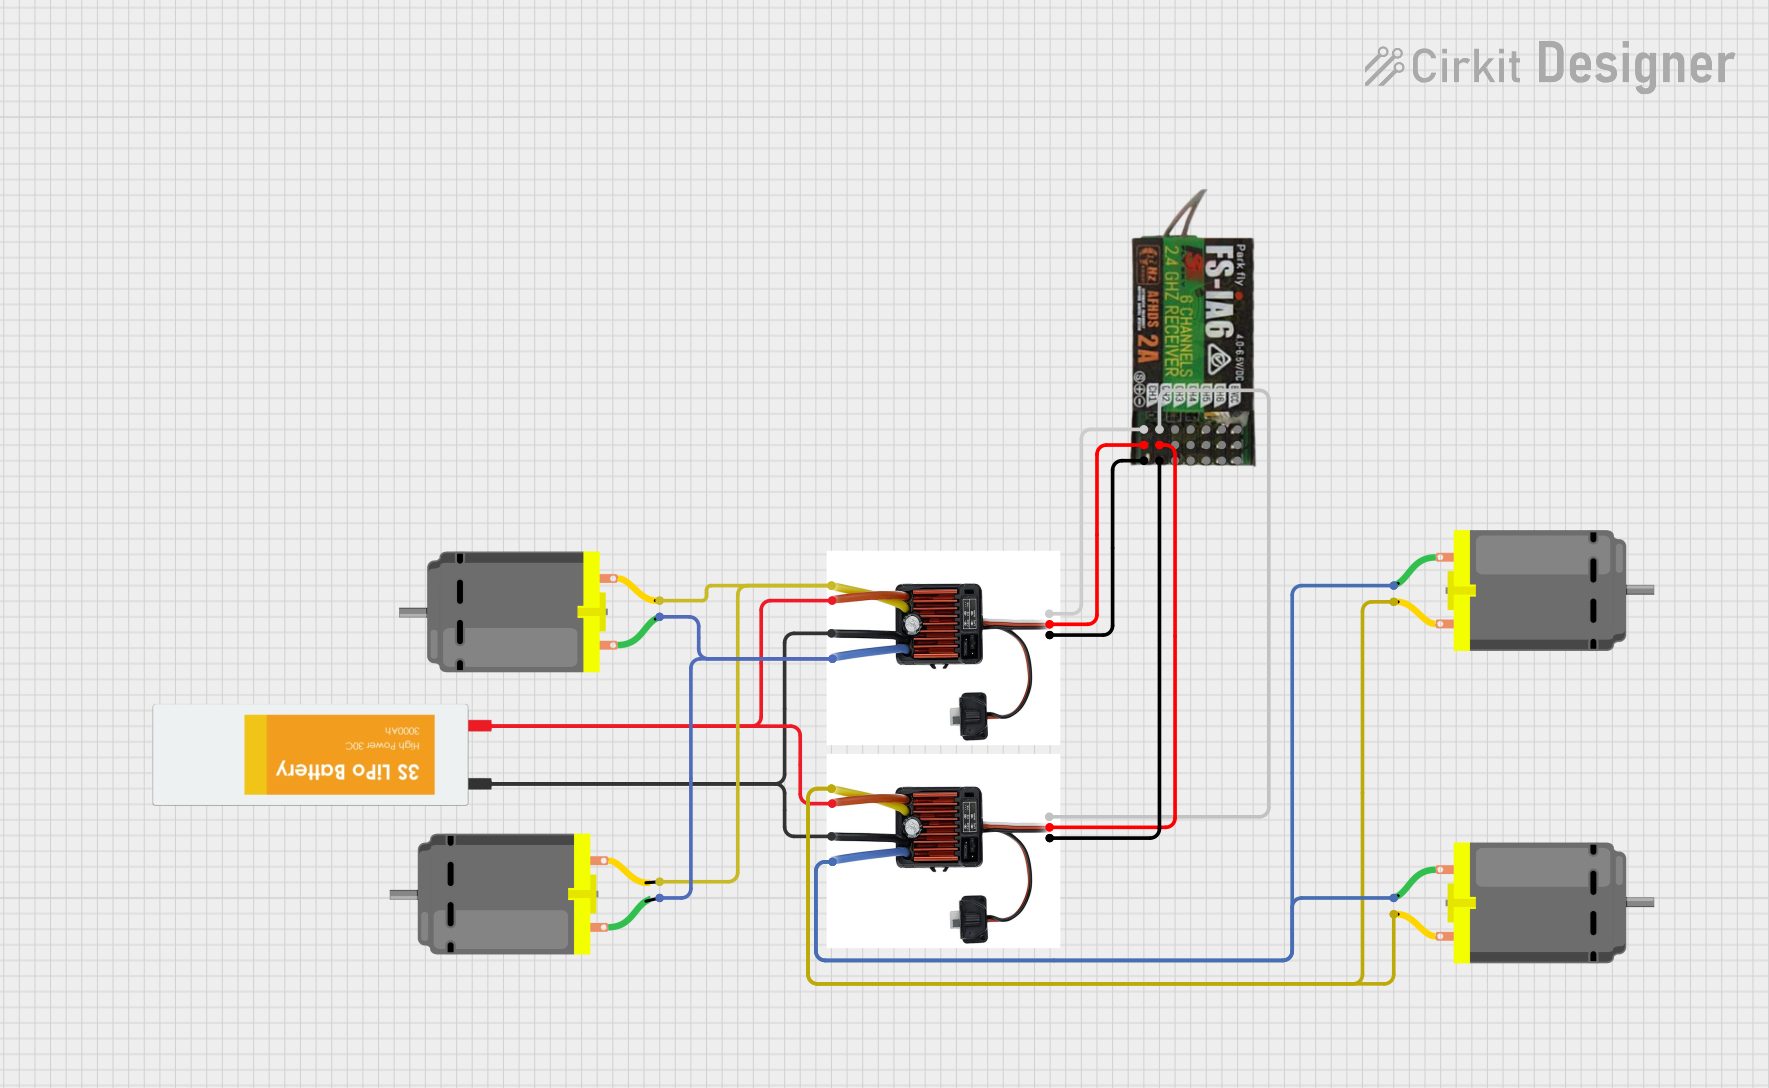
Explore Projects Built with FS-A8S (Receiver)
Common Applications and Use Cases
- Remote-controlled drones and quadcopters
- RC cars, boats, and planes
- Robotics and automation systems
- Wireless communication in hobbyist projects
- Signal reception for Arduino-based remote control systems
Technical Specifications
The FS-A8S receiver is designed to deliver high performance in a compact package. Below are its key technical details:
Key Technical Details
- Operating Voltage: 4.0V to 6.5V
- Current Consumption: ≤ 30mA
- Frequency Range: 2.4GHz ISM band
- Number of Channels: 8 channels (PWM/PPM/iBUS output)
- Signal Output: PWM, PPM, or iBUS
- Dimensions: 20mm x 14mm x 5mm
- Weight: 1.2g
- Antenna: Single antenna for signal reception
- Compatibility: FlySky transmitters and Arduino-based systems
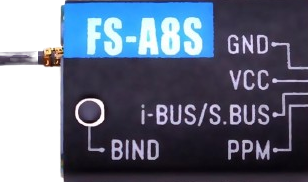
Pin Configuration and Descriptions
The FS-A8S receiver has a simple pin layout for easy integration into your projects. Below is the pin configuration:
| Pin Number | Pin Name | Description |
|---|---|---|
| 1 | VCC | Power input (4.0V to 6.5V) |
| 2 | GND | Ground connection |
| 3 | iBUS/PPM | Signal output (iBUS or PPM mode) |
| 4 | PWM CH1 | PWM signal output for Channel 1 |
| 5 | PWM CH2 | PWM signal output for Channel 2 |
| 6 | PWM CH3 | PWM signal output for Channel 3 |
| 7 | PWM CH4 | PWM signal output for Channel 4 |
| 8 | PWM CH5 | PWM signal output for Channel 5 |
| 9 | PWM CH6 | PWM signal output for Channel 6 |
| 10 | PWM CH7 | PWM signal output for Channel 7 |
| 11 | PWM CH8 | PWM signal output for Channel 8 |
Usage Instructions
The FS-A8S receiver is straightforward to use in remote control and Arduino-based projects. Follow the steps below to integrate it into your system:
Connecting the FS-A8S Receiver
- Power the Receiver: Connect the VCC pin to a 5V power source and the GND pin to ground.
- Select Signal Mode: Use the iBUS/PPM pin for digital signal output or connect the PWM pins for individual channel outputs.
- Bind the Receiver: Pair the FS-A8S with a compatible FlySky transmitter by following the binding procedure in the transmitter's manual.
- Connect to Arduino: For Arduino projects, connect the iBUS/PPM pin to a digital input pin on the Arduino (e.g., D2) for signal processing.
Example Arduino Code
Below is an example of how to read iBUS signals from the FS-A8S receiver using an Arduino UNO:
#include <IBusBM.h> // Include the iBUS library for signal decoding

IBusBM ibus; // Create an iBUS object

void setup() {
  Serial.begin(9600); // Initialize serial communication for debugging
  ibus.begin(Serial); // Initialize iBUS communication on the default serial port
}

void loop() {
  if (ibus.readChannel(0) != -1) {
    // Read channel 0 (Throttle) and check if a valid signal is received
    int throttle = ibus.readChannel(0); // Get the throttle value
    Serial.print("Throttle: ");
    Serial.println(throttle); // Print the throttle value to the serial monitor
  }
  delay(10); // Add a small delay to avoid overwhelming the serial monitor
}
Important Considerations and Best Practices
- Ensure the receiver is powered within the specified voltage range (4.0V to 6.5V).
- Keep the antenna unobstructed and away from metal components to maintain signal strength.
- Use a compatible FlySky transmitter for reliable communication.
- When using the iBUS protocol, ensure the Arduino library supports iBUS decoding.
Troubleshooting and FAQs
Common Issues and Solutions
No Signal Reception
- Cause: The receiver is not bound to the transmitter.
- Solution: Rebind the receiver to the transmitter following the binding procedure.
Intermittent Signal Loss
- Cause: Antenna placement or interference.
- Solution: Ensure the antenna is positioned away from metal objects and other sources of interference.
Incorrect Channel Output
- Cause: Signal mode mismatch (e.g., iBUS vs. PWM).
- Solution: Verify the signal mode and configure the transmitter and receiver accordingly.
Receiver Not Powering On
- Cause: Insufficient power supply.
- Solution: Check the power source and ensure the voltage is within the 4.0V to 6.5V range.
FAQs
Q: Can the FS-A8S receiver be used with non-FlySky transmitters?
A: No, the FS-A8S is designed specifically for FlySky transmitters and may not work with other brands.
Q: How many channels can I use simultaneously?
A: The FS-A8S supports up to 8 channels, which can be used simultaneously in PWM, PPM, or iBUS mode.
Q: Is the FS-A8S compatible with Arduino Nano or Mega?
A: Yes, the FS-A8S can be used with any Arduino board that supports serial communication, including the Nano and Mega.
Q: Can I extend the antenna for better range?
A: It is not recommended to modify the antenna, as it may affect signal quality and void the warranty.
By following this documentation, you can effectively integrate the FS-A8S receiver into your remote control or Arduino-based projects.