Cirkit Designer Logo
Cirkit Designer
Your all-in-one circuit design IDE
Home / 
Component Documentation

How to Use Adafruit MMA8451 Accelerometer: Examples, Pinouts, and Specs

Image of Adafruit MMA8451 Accelerometer
Cirkit Designer LogoDesign with Adafruit MMA8451 Accelerometer in Cirkit Designer

Introduction

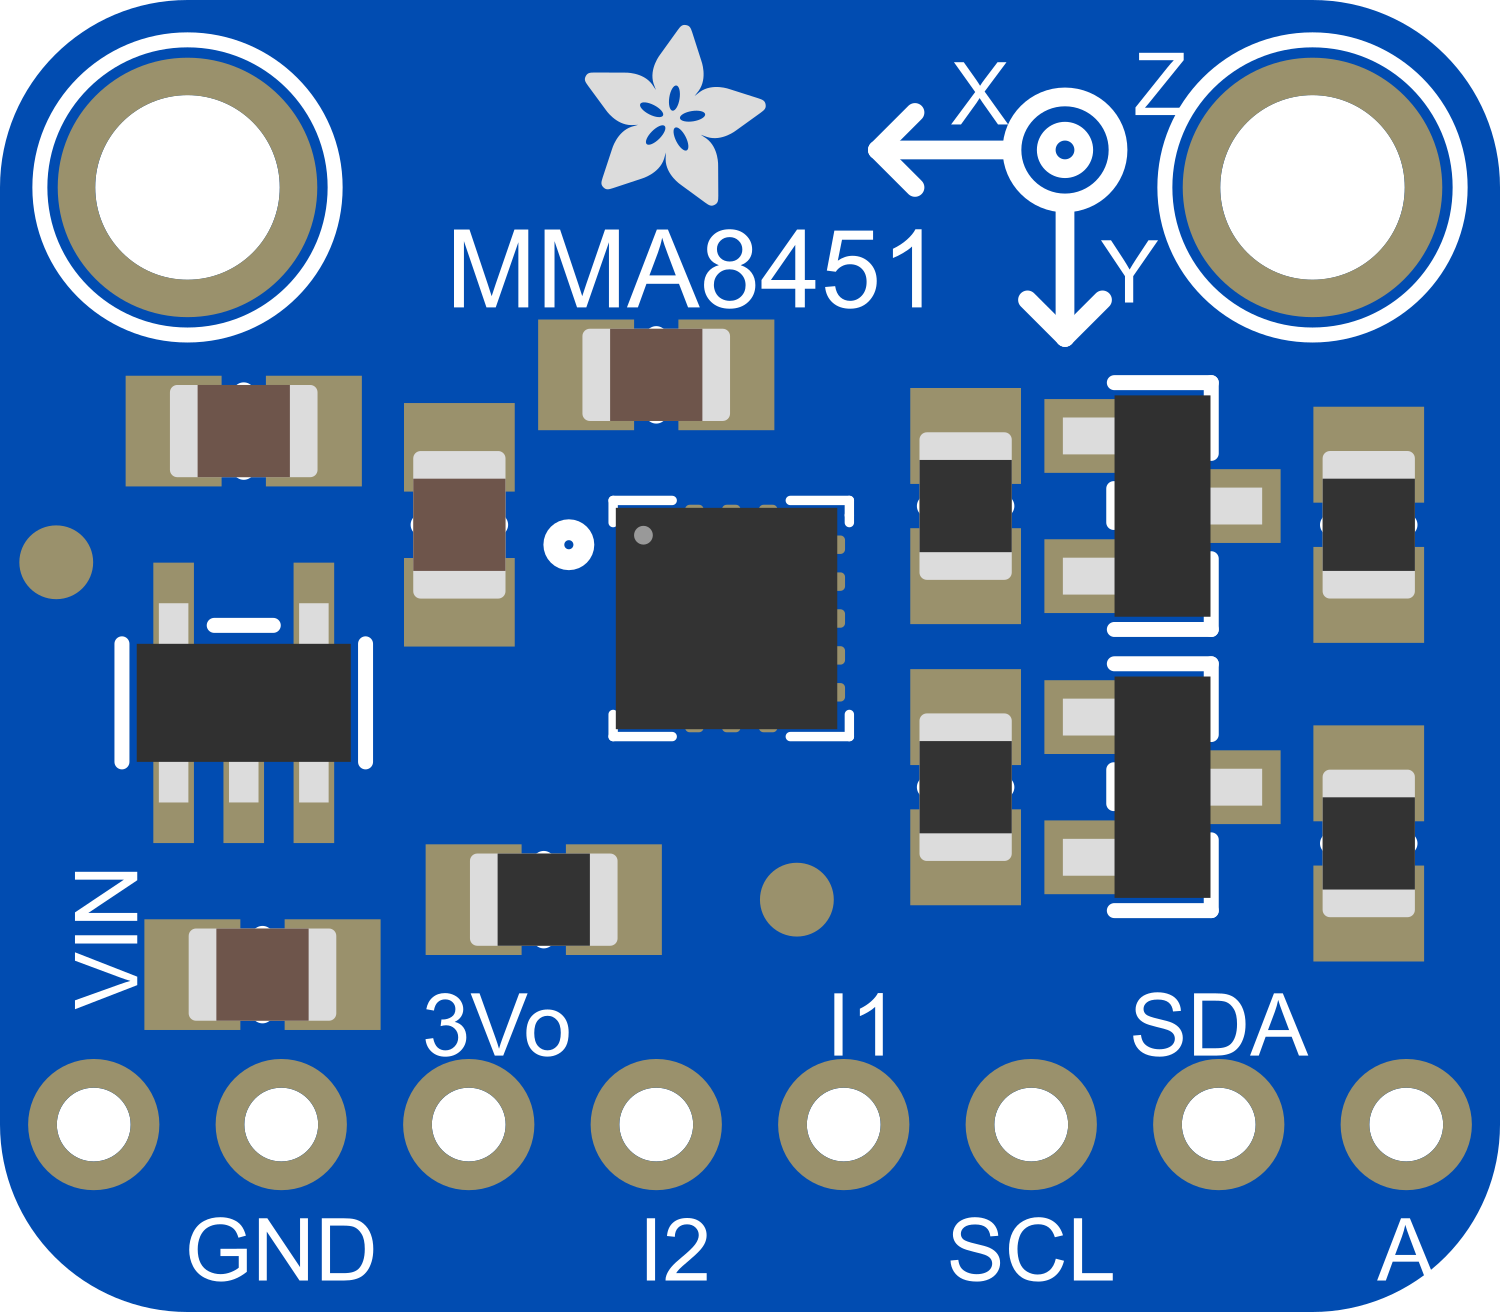
The Adafruit MMA8451 is a sophisticated, low-power, high-resolution 3-axis accelerometer that offers precise and reliable motion sensing capabilities. This component is ideal for a wide range of applications, including robotics, motion tracking, gaming devices, and portable electronics. Its small form factor and low energy consumption make it well-suited for mobile applications.

Explore Projects Built with Adafruit MMA8451 Accelerometer

Use Cirkit Designer to design, explore, and prototype these projects online. Some projects support real-time simulation. Click "Open Project" to start designing instantly!
Teensy 4.1 Based Biometric Data Acquisition System with AD8232 Heart Rate Monitor and LIS3DH Accelerometer
Image of Teensy 4.1 accelerometer: A project utilizing Adafruit MMA8451 Accelerometer in a practical application
This circuit integrates a Teensy 4.1 microcontroller with an Adafruit LIS3DH Triple-Axis Accelerometer and an AD8232 Heart Rate Monitor. The accelerometer communicates with the Teensy via I2C (SCL and SDA lines), while the heart rate monitor's output and lead-off detection (LO+ and LO-) are connected to the Teensy's analog inputs. The circuit is designed to measure both acceleration and heart rate signals, likely for a wearable or health monitoring device.
Cirkit Designer LogoOpen Project in Cirkit Designer
Arduino UNO R4 WiFi and Adafruit LIS3DH Accelerometer-Based Motion Detection System
Image of circuit: A project utilizing Adafruit MMA8451 Accelerometer in a practical application
This circuit consists of an Arduino UNO R4 WiFi connected to an Adafruit LIS3DH Triple-Axis Accelerometer via I2C communication. The Arduino reads acceleration data from the LIS3DH sensor and outputs it to the serial monitor for further analysis or processing.
Cirkit Designer LogoOpen Project in Cirkit Designer
Arduino UNO with Adafruit ADXL345 Accelerometer Data Logger
Image of ADXL345: A project utilizing Adafruit MMA8451 Accelerometer in a practical application
This circuit connects an Arduino UNO microcontroller with an Adafruit ADXL345 accelerometer sensor. The Arduino powers the sensor, communicates with it via I2C (using pins A4 and A5 for SDA and SCL respectively), and runs a program to read and output the acceleration data in three axes. The purpose of the circuit is to measure acceleration and provide real-time data for analysis or further processing.
Cirkit Designer LogoOpen Project in Cirkit Designer
Arduino UNO-Based Sensor Data Acquisition System with Bluetooth and Wi-Fi Connectivity
Image of smrpe: A project utilizing Adafruit MMA8451 Accelerometer in a practical application
This circuit is a multi-sensor data acquisition system with wireless communication capabilities. It utilizes an Arduino UNO to interface with an MPU-6050 gyroscope, an Adafruit ADXL345 accelerometer, an Adafruit MPR121 capacitive touch sensor, and a SparkFun Electret Microphone for audio input. The system can transmit sensor data via an HC-05 Bluetooth module and an ESP8266 WiFi module, and it includes a bi-directional logic level converter for voltage level matching between devices. The circuit is powered by a 9V battery connected to the Arduino's Vin pin.
Cirkit Designer LogoOpen Project in Cirkit Designer

Explore Projects Built with Adafruit MMA8451 Accelerometer

Use Cirkit Designer to design, explore, and prototype these projects online. Some projects support real-time simulation. Click "Open Project" to start designing instantly!
Image of Teensy 4.1 accelerometer: A project utilizing Adafruit MMA8451 Accelerometer in a practical application
Teensy 4.1 Based Biometric Data Acquisition System with AD8232 Heart Rate Monitor and LIS3DH Accelerometer
This circuit integrates a Teensy 4.1 microcontroller with an Adafruit LIS3DH Triple-Axis Accelerometer and an AD8232 Heart Rate Monitor. The accelerometer communicates with the Teensy via I2C (SCL and SDA lines), while the heart rate monitor's output and lead-off detection (LO+ and LO-) are connected to the Teensy's analog inputs. The circuit is designed to measure both acceleration and heart rate signals, likely for a wearable or health monitoring device.
Cirkit Designer LogoOpen Project in Cirkit Designer
Image of circuit: A project utilizing Adafruit MMA8451 Accelerometer in a practical application
Arduino UNO R4 WiFi and Adafruit LIS3DH Accelerometer-Based Motion Detection System
This circuit consists of an Arduino UNO R4 WiFi connected to an Adafruit LIS3DH Triple-Axis Accelerometer via I2C communication. The Arduino reads acceleration data from the LIS3DH sensor and outputs it to the serial monitor for further analysis or processing.
Cirkit Designer LogoOpen Project in Cirkit Designer
Image of ADXL345: A project utilizing Adafruit MMA8451 Accelerometer in a practical application
Arduino UNO with Adafruit ADXL345 Accelerometer Data Logger
This circuit connects an Arduino UNO microcontroller with an Adafruit ADXL345 accelerometer sensor. The Arduino powers the sensor, communicates with it via I2C (using pins A4 and A5 for SDA and SCL respectively), and runs a program to read and output the acceleration data in three axes. The purpose of the circuit is to measure acceleration and provide real-time data for analysis or further processing.
Cirkit Designer LogoOpen Project in Cirkit Designer
Image of smrpe: A project utilizing Adafruit MMA8451 Accelerometer in a practical application
Arduino UNO-Based Sensor Data Acquisition System with Bluetooth and Wi-Fi Connectivity
This circuit is a multi-sensor data acquisition system with wireless communication capabilities. It utilizes an Arduino UNO to interface with an MPU-6050 gyroscope, an Adafruit ADXL345 accelerometer, an Adafruit MPR121 capacitive touch sensor, and a SparkFun Electret Microphone for audio input. The system can transmit sensor data via an HC-05 Bluetooth module and an ESP8266 WiFi module, and it includes a bi-directional logic level converter for voltage level matching between devices. The circuit is powered by a 9V battery connected to the Arduino's Vin pin.
Cirkit Designer LogoOpen Project in Cirkit Designer

Technical Specifications

Key Features

  • 3-axis digital accelerometer
  • ±2g/±4g/±8g dynamically selectable full-scale
  • Output Data Rates (ODR) from 1.56 Hz to 800 Hz
  • 14-bit and 8-bit digital output
  • I2C digital output interface (with a configurable address)
  • Orientation (Portrait/Landscape) detection with programmable hysteresis
  • High Pass Filter Data available in real-time
  • Current Consumption: 6 µA - 165 µA

Pin Configuration and Descriptions

Pin Number Name Description
1 VDD Power supply (2.5V to 5.5V)
2 GND Ground connection
3 SDA I2C Data Line
4 SCL I2C Clock Line
5 INT1 Interrupt 1 (configurable)
6 INT2 Interrupt 2 (configurable)

Usage Instructions

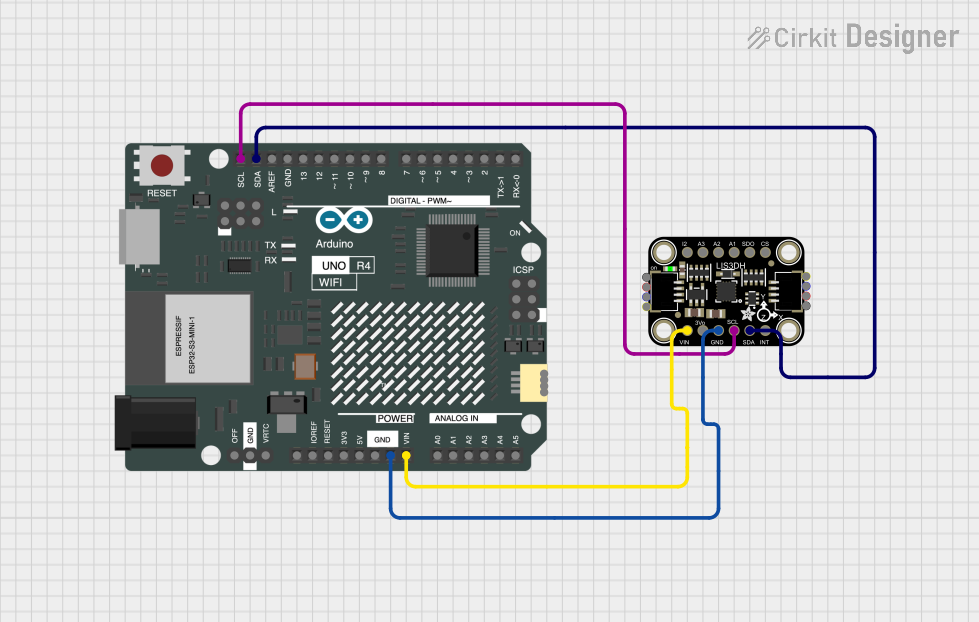
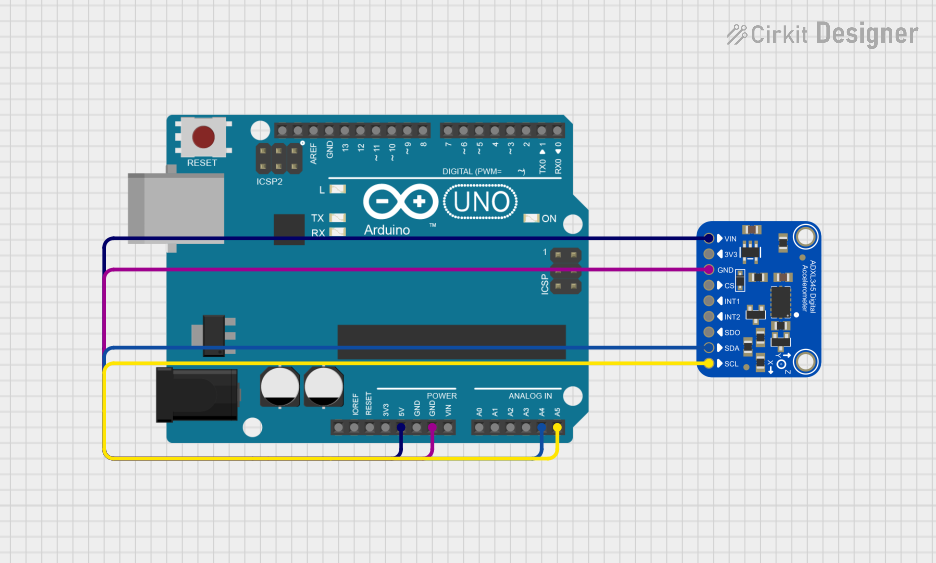
Integration with a Circuit

To use the Adafruit MMA8451 accelerometer in a circuit:

  1. Connect the VDD pin to a 2.5V to 5.5V power supply.
  2. Connect the GND pin to the ground of the power supply.
  3. Connect the SDA and SCL pins to the I2C data and clock lines, respectively.
  4. Optionally, connect the INT1 and INT2 pins to the microcontroller's external interrupt pins if interrupt-driven operation is required.

Best Practices

  • Ensure that the power supply is stable and within the specified voltage range.
  • Use pull-up resistors on the SDA and SCL lines, typically 4.7kΩ to 10kΩ.
  • Keep the I2C lines as short as possible to reduce noise and improve communication reliability.
  • If using interrupts, ensure that the microcontroller's interrupt pins are configured correctly to handle the signals from INT1 and INT2.

Example Code for Arduino UNO

#include <Wire.h>
#include <Adafruit_MMA8451.h>
#include <Adafruit_Sensor.h>

// Create an instance of the Adafruit_MMA8451 class
Adafruit_MMA8451 mma = Adafruit_MMA8451();

void setup() {
  Serial.begin(9600);
  // Initialize the sensor
  if (!mma.begin()) {
    Serial.println("Couldn't start");
    while (1);
  }
  Serial.println("MMA8451 found!");
  
  mma.setRange(MMA8451_RANGE_2_G); // Set the range to 2g
}

void loop() {
  // Read the accelerometer values
  mma.read();
  sensors_event_t event;
  mma.getEvent(&event);

  // Display the accelerometer values
  Serial.print("X: "); Serial.print(event.acceleration.x); Serial.print(" ");
  Serial.print("Y: "); Serial.print(event.acceleration.y); Serial.print(" ");
  Serial.print("Z: "); Serial.print(event.acceleration.z); Serial.println(" m/s^2");

  // Delay before the next reading
  delay(500);
}

Troubleshooting and FAQs

Common Issues

  • Sensor not detected: Ensure that the wiring is correct, and the power supply is within the specified range. Check the pull-up resistors on the I2C lines.
  • Inaccurate readings: Calibrate the sensor as per the datasheet instructions, and ensure that it is placed on a stable surface away from magnetic fields.
  • No response from interrupt pins: Verify that the interrupt pins are configured correctly in both the sensor and the microcontroller.

FAQs

Q: Can the MMA8451 be used with a 3.3V system? A: Yes, the MMA8451 can operate with a power supply ranging from 2.5V to 5.5V, making it compatible with both 3.3V and 5V systems.

Q: How can I change the sensitivity of the accelerometer? A: The sensitivity can be adjusted by changing the full-scale range using the setRange() function in the library.

Q: What is the purpose of the INT1 and INT2 pins? A: These pins can be configured to output interrupt signals for various events such as motion detection, free-fall detection, or orientation change.

Q: How do I calibrate the accelerometer? A: Calibration involves setting the offset registers in the sensor. Refer to the sensor's datasheet for detailed calibration procedures.

Q: Is it necessary to use both interrupt pins? A: No, it is not necessary to use both pins. You can use either one or both depending on your application's requirements.

For further assistance, consult the Adafruit MMA8451 datasheet and the Adafruit Sensor library documentation.