How to Use Seeed Studio XIAO nRF54L15 Sense: Examples, Pinouts, and Specs
Introduction
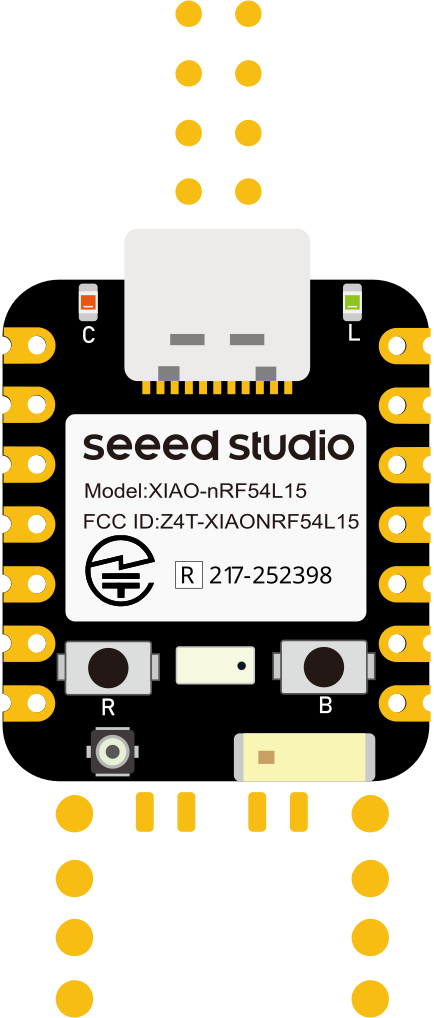
The Seeed Studio XIAO nRF54L15 Sense is a compact and powerful microcontroller board built around the Nordic Semiconductor nRF54L15 System-on-Chip (SoC). Designed for low-power wireless applications, this board is ideal for IoT projects, wearable devices, and environmental monitoring. It features built-in sensors for temperature, humidity, and other environmental parameters, along with Bluetooth Low Energy (BLE) support for seamless wireless connectivity.
Explore Projects Built with Seeed Studio XIAO nRF54L15 Sense


Explore Projects Built with Seeed Studio XIAO nRF54L15 Sense
Common Applications and Use Cases
- IoT devices and smart home systems
- Wearable technology
- Environmental monitoring and data logging
- BLE-based wireless communication
- Prototyping low-power embedded systems
Technical Specifications
Below are the key technical details of the Seeed Studio XIAO nRF54L15 Sense:
| Specification | Details |
|---|---|
| Microcontroller | Nordic nRF54L15 SoC |
| Core Architecture | ARM Cortex-M33 with TrustZone |
| Operating Voltage | 3.3V |
| Input Voltage Range | 3.3V to 5V |
| Flash Memory | 1 MB |
| RAM | 256 KB |
| Wireless Connectivity | Bluetooth Low Energy (BLE) 5.4 |
| Built-in Sensors | Temperature, Humidity, and Ambient Light |
| GPIO Pins | 11 (including analog and digital pins) |
| Communication Interfaces | I2C, SPI, UART |
| Power Consumption | Ultra-low power consumption for battery-powered applications |
| Dimensions | 21 x 17.5 mm |
Pin Configuration and Descriptions
The XIAO nRF54L15 Sense features a total of 14 pins, including power, GPIO, and communication pins. Below is the pinout description:
| Pin | Name | Type | Description |
|---|---|---|---|
| 1 | 3V3 | Power | 3.3V power output |
| 2 | GND | Power | Ground |
| 3 | D0/A0 | GPIO/Analog | General-purpose I/O or analog input |
| 4 | D1/A1 | GPIO/Analog | General-purpose I/O or analog input |
| 5 | D2 | GPIO | General-purpose I/O |
| 6 | D3 | GPIO | General-purpose I/O |
| 7 | D4 | GPIO | General-purpose I/O |
| 8 | D5 | GPIO | General-purpose I/O |
| 9 | SDA | I2C | I2C data line |
| 10 | SCL | I2C | I2C clock line |
| 11 | RX | UART | UART receive |
| 12 | TX | UART | UART transmit |
| 13 | SWDIO | Debug | Single Wire Debug I/O |
| 14 | SWCLK | Debug | Single Wire Debug clock |
Usage Instructions
How to Use the Component in a Circuit
- Powering the Board: Connect the 3.3V and GND pins to a suitable power source. The board can also be powered via USB-C.
- Connecting Sensors: Use the built-in sensors for environmental monitoring. For external sensors, connect them to the I2C or GPIO pins.
- Programming: The board can be programmed using the Arduino IDE or Nordic's nRF Connect SDK. Install the necessary board support package (BSP) for the XIAO nRF54L15 Sense.
- Wireless Communication: Use the BLE functionality to communicate with other BLE-enabled devices.
Important Considerations and Best Practices
- Ensure the input voltage does not exceed 5V to avoid damaging the board.
- Use appropriate pull-up resistors for I2C communication if required.
- When using BLE, ensure the antenna area is not obstructed for optimal signal strength.
- For battery-powered applications, monitor power consumption and optimize sleep modes.
Example Code for Arduino IDE
Below is an example of how to read the built-in temperature sensor and send the data over BLE:
#include <Wire.h>
#include <BLEPeripheral.h>

// Initialize BLE peripheral
BLEPeripheral blePeripheral;
BLEService tempService("1809"); // Temperature Service UUID
BLECharacteristic tempCharacteristic("2A1C", BLERead | BLENotify, 4);

// I2C address for the temperature sensor
const int tempSensorAddress = 0x48;

void setup() {
  // Initialize serial communication
  Serial.begin(9600);
  while (!Serial);

  // Initialize BLE
  blePeripheral.setLocalName("XIAO nRF54L15");
  blePeripheral.setAdvertisedServiceUuid(tempService.uuid());
  blePeripheral.addAttribute(tempService);
  blePeripheral.addAttribute(tempCharacteristic);
  blePeripheral.begin();

  // Initialize I2C
  Wire.begin();
  Serial.println("BLE Temperature Sensor Ready");
}

void loop() {
  // BLE poll
  blePeripheral.poll();

  // Read temperature from the sensor
  Wire.beginTransmission(tempSensorAddress);
  Wire.write(0x00); // Command to read temperature
  Wire.endTransmission();
  Wire.requestFrom(tempSensorAddress, 2);

  if (Wire.available() == 2) {
    int tempRaw = (Wire.read() << 8) | Wire.read();
    float temperature = tempRaw * 0.02 - 273.15; // Convert to Celsius

    // Print temperature to Serial
    Serial.print("Temperature: ");
    Serial.print(temperature);
    Serial.println(" °C");

    // Update BLE characteristic
    tempCharacteristic.setValue((int)(temperature * 100)); // Send as integer
  }

  delay(1000); // Wait 1 second
}
Troubleshooting and FAQs
Common Issues and Solutions
Board Not Detected in Arduino IDE:
- Ensure the correct board support package (BSP) is installed.
- Check the USB connection and ensure the correct COM port is selected.
BLE Connection Fails:
- Verify that the BLE device is within range.
- Ensure no other devices are interfering with the BLE signal.
Sensors Not Responding:
- Check the I2C connections and ensure the correct sensor address is used.
- Verify that the sensors are enabled in the firmware.
High Power Consumption:
- Use low-power modes and optimize sleep settings in your code.
- Disable unused peripherals to reduce power draw.
FAQs
Q: Can I use this board with a LiPo battery?
A: Yes, the XIAO nRF54L15 Sense supports LiPo batteries. Ensure the battery voltage is within the supported range.
Q: What is the maximum BLE range?
A: The BLE range depends on environmental factors but typically extends up to 50 meters in open space.
Q: Is the board compatible with CircuitPython?
A: Currently, the board is not officially supported by CircuitPython, but you can use the Arduino IDE or nRF Connect SDK for programming.
Q: How do I update the firmware?
A: Firmware updates can be performed using the Nordic nRF Connect tools or the Arduino IDE with the appropriate bootloader.