Cirkit Designer
Your all-in-one circuit design IDE
Home /
Component Documentation
How to Use Puente H carrito: Examples, Pinouts, and Specs
Introduction
Un Puente H es un circuito electrónico que permite a un motor eléctrico girar en cualquier dirección. Es comúnmente utilizado en robots y vehículos controlados a distancia para controlar el movimiento del motor. Este componente es esencial para aplicaciones que requieren control bidireccional de motores de corriente continua (DC), como robots móviles, sistemas de control de movimiento y proyectos de automatización.
Explore Projects Built with Puente H carrito
Arduino UNO-Based Obstacle-Avoiding Robot with Ultrasonic Sensor and H-Bridge Motor Control
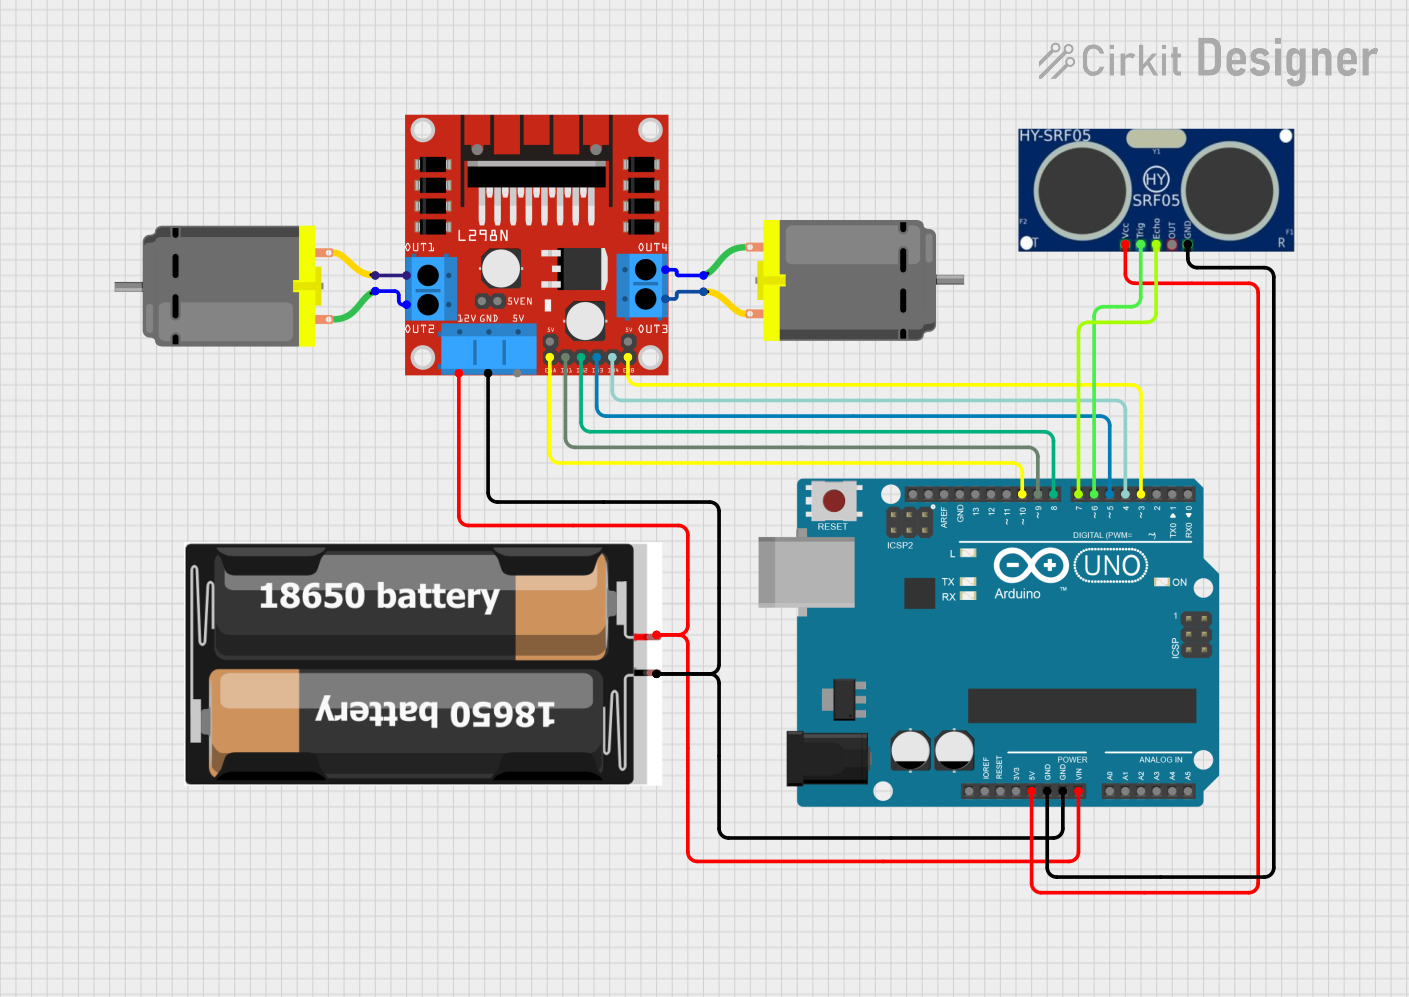
This circuit is a robotic car controlled by an Arduino UNO, which uses an ultrasonic sensor (HC-SR05) to measure distance and a motor driver (Puente H carrito) to control two DC motors. The Arduino reads the distance from the sensor and adjusts the motor movements to avoid obstacles, moving forward, backward, or turning based on the detected distance.
Arduino UNO-Based Autonomous Obstacle-Avoiding Robot with Ultrasonic Sensors
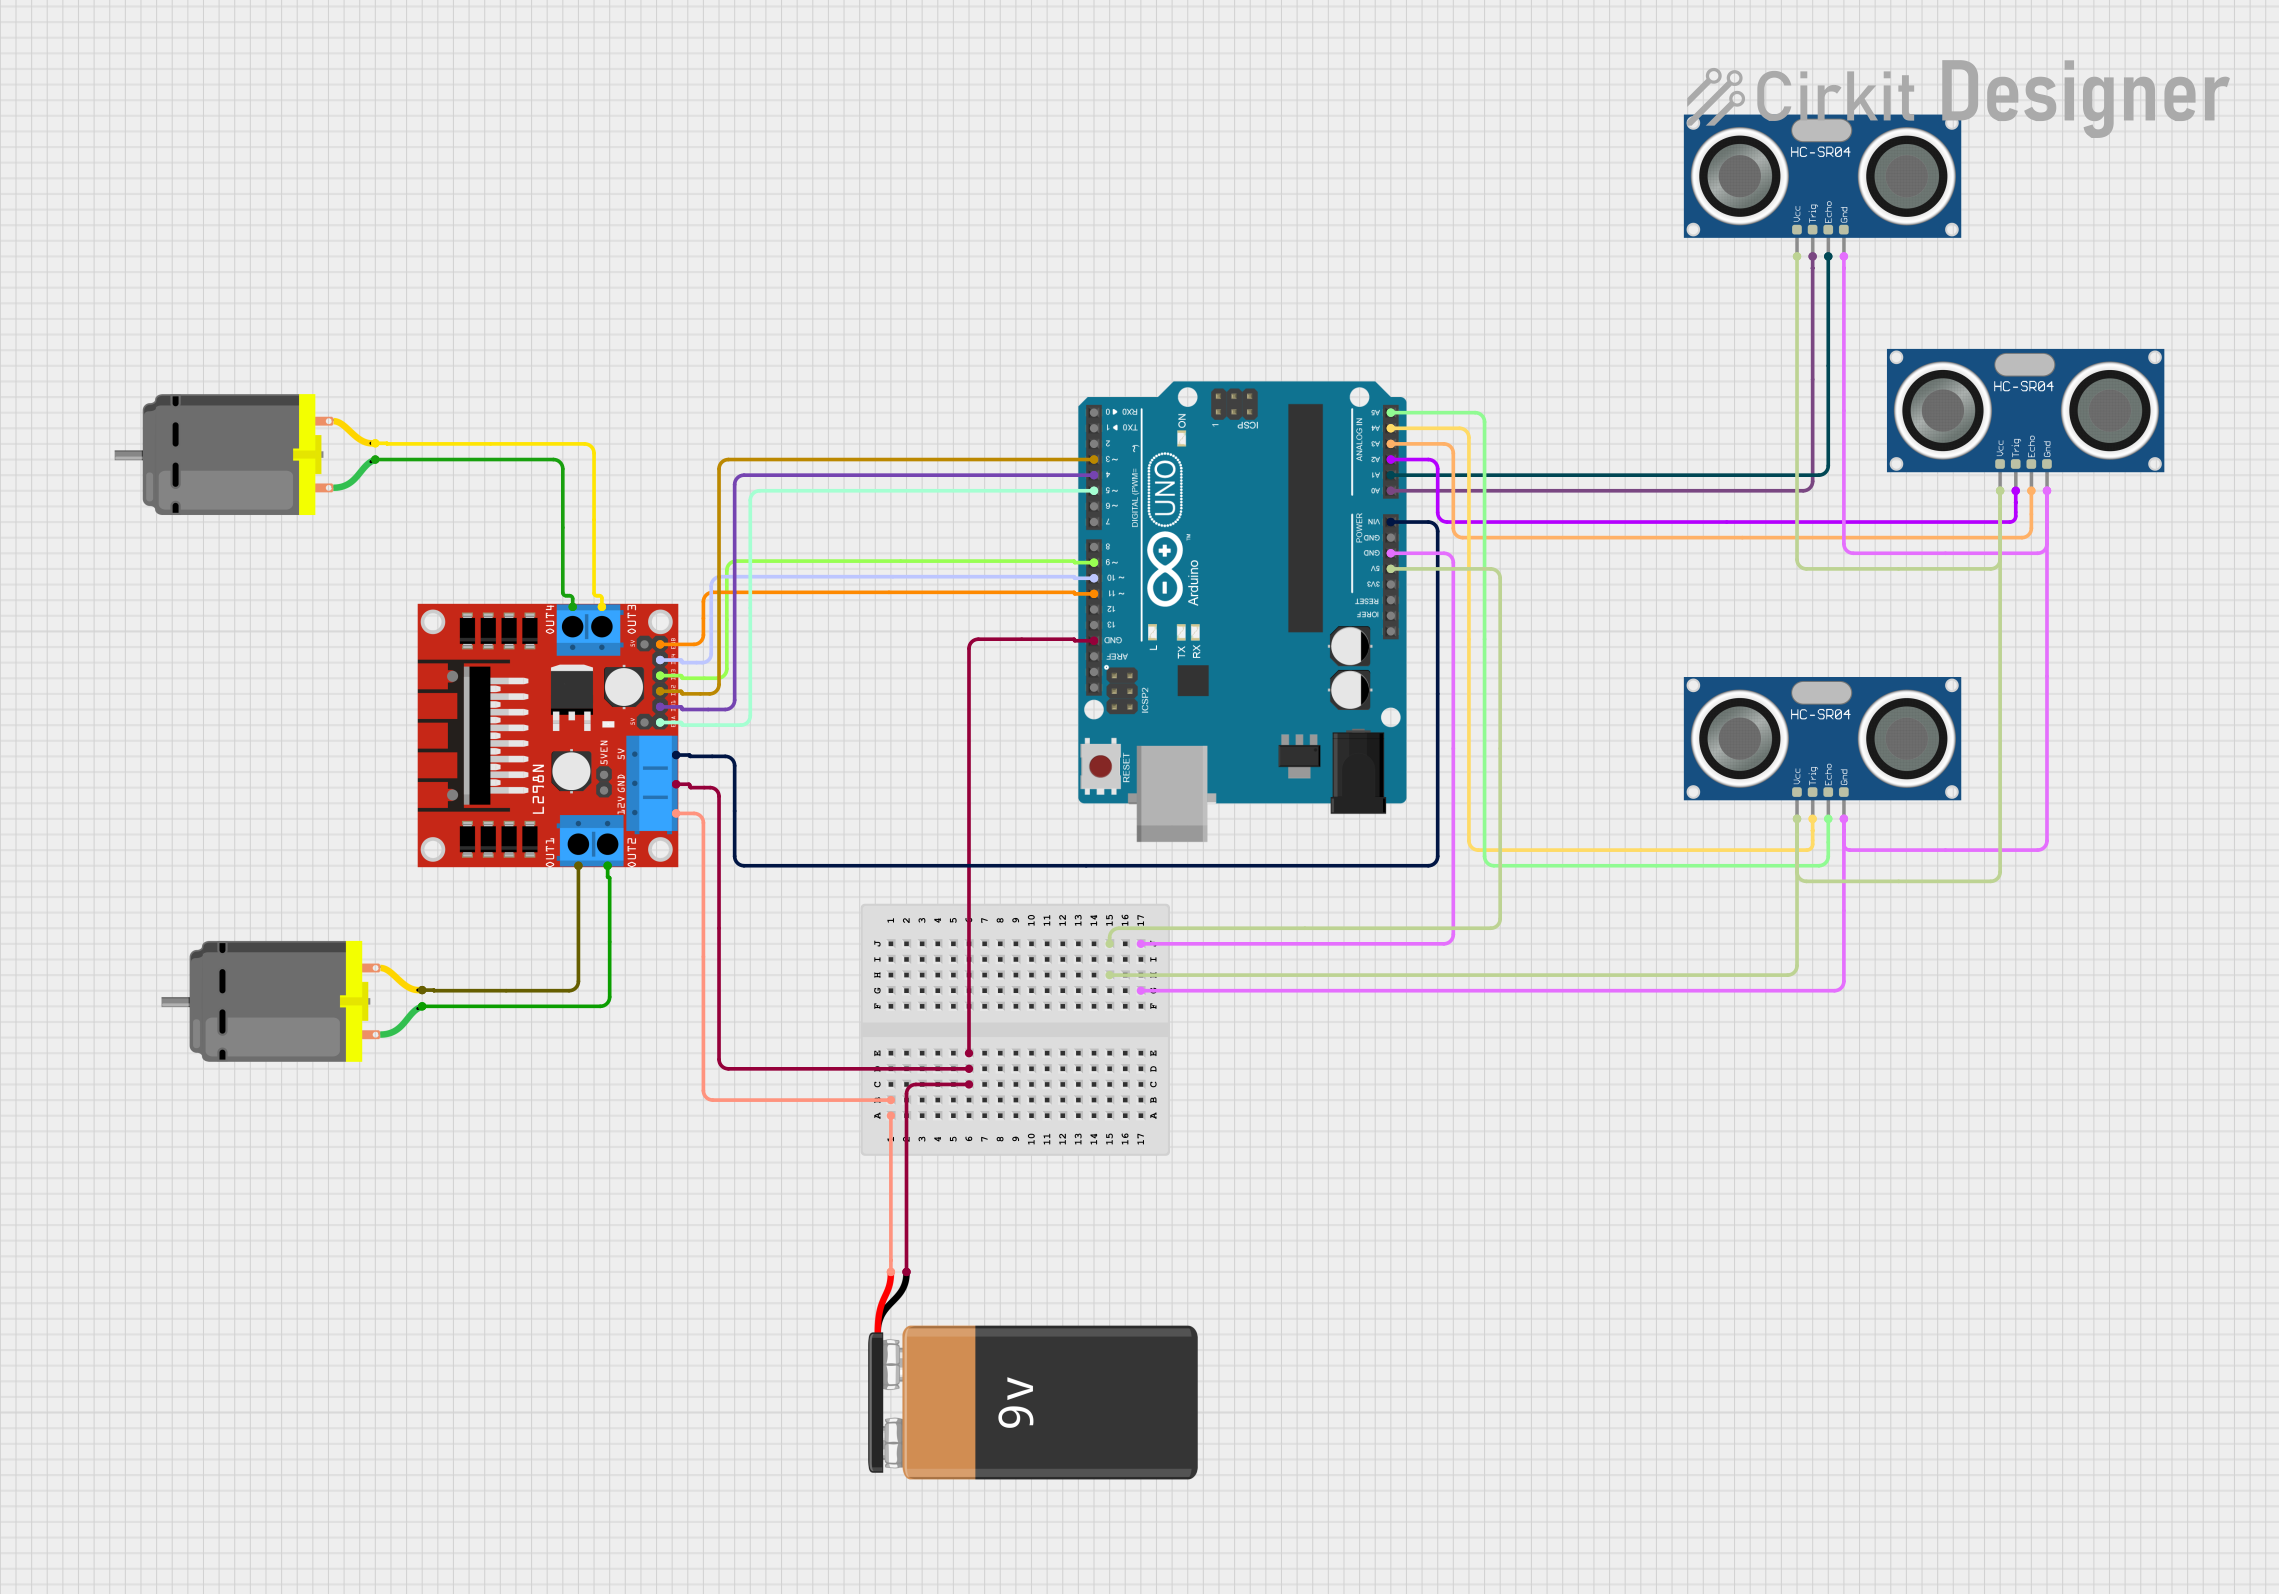
This circuit is a robotic car controlled by an Arduino UNO, which uses three HC-SR04 ultrasonic sensors for obstacle detection and a motor driver (Puente H) to control two DC motors. The Arduino processes distance measurements from the sensors to navigate the car by driving the motors forward, left, or right based on the detected obstacles.
Arduino Mega 2560-Based Motor Control System with Optical Encoder and Current/Voltage Sensing
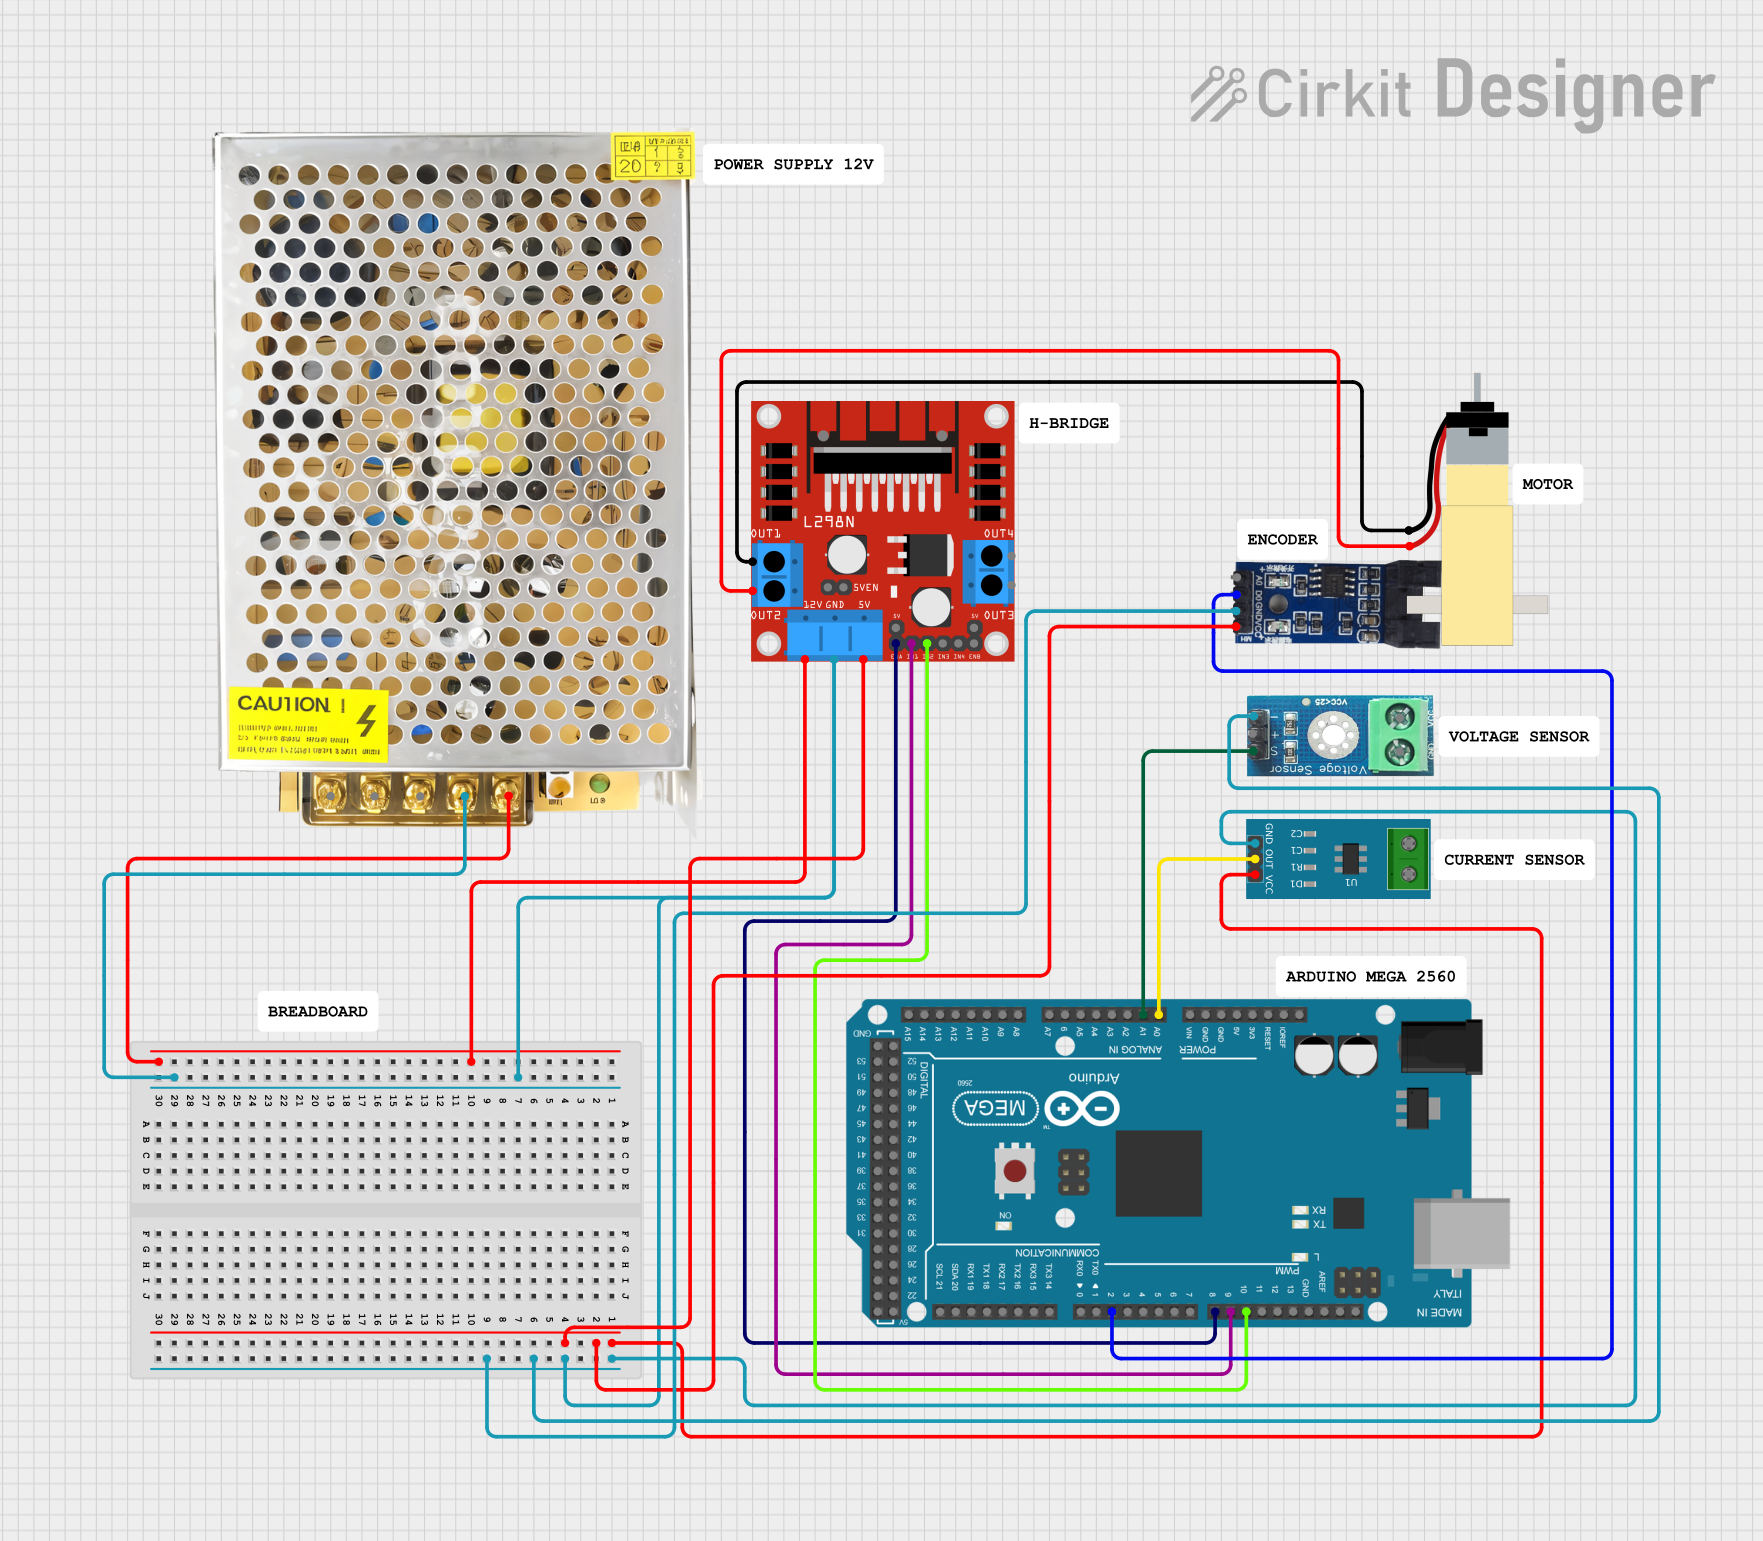
This circuit is designed to control a motor using an Arduino Mega 2560, an H-bridge motor driver, and various sensors. The Arduino reads data from a current sensor, a voltage sensor, and an optical encoder to monitor and control the motor's operation. Power is supplied by an SMPS, and the motor's speed and direction are controlled via PWM signals from the Arduino to the H-bridge.
Arduino UNO Bluetooth-Controlled Motor Driver Circuit
This circuit is a Bluetooth-controlled motor driver system using an Arduino UNO. The Arduino UNO interfaces with an HC-05 Bluetooth module for wireless communication and controls two motors via an H-bridge motor driver. The system is powered by a 9V battery, and the motors are driven by the H-bridge based on commands received through the Bluetooth module.
Explore Projects Built with Puente H carrito
Arduino UNO-Based Obstacle-Avoiding Robot with Ultrasonic Sensor and H-Bridge Motor Control
This circuit is a robotic car controlled by an Arduino UNO, which uses an ultrasonic sensor (HC-SR05) to measure distance and a motor driver (Puente H carrito) to control two DC motors. The Arduino reads the distance from the sensor and adjusts the motor movements to avoid obstacles, moving forward, backward, or turning based on the detected distance.
Arduino UNO-Based Autonomous Obstacle-Avoiding Robot with Ultrasonic Sensors
This circuit is a robotic car controlled by an Arduino UNO, which uses three HC-SR04 ultrasonic sensors for obstacle detection and a motor driver (Puente H) to control two DC motors. The Arduino processes distance measurements from the sensors to navigate the car by driving the motors forward, left, or right based on the detected obstacles.
Arduino Mega 2560-Based Motor Control System with Optical Encoder and Current/Voltage Sensing
This circuit is designed to control a motor using an Arduino Mega 2560, an H-bridge motor driver, and various sensors. The Arduino reads data from a current sensor, a voltage sensor, and an optical encoder to monitor and control the motor's operation. Power is supplied by an SMPS, and the motor's speed and direction are controlled via PWM signals from the Arduino to the H-bridge.
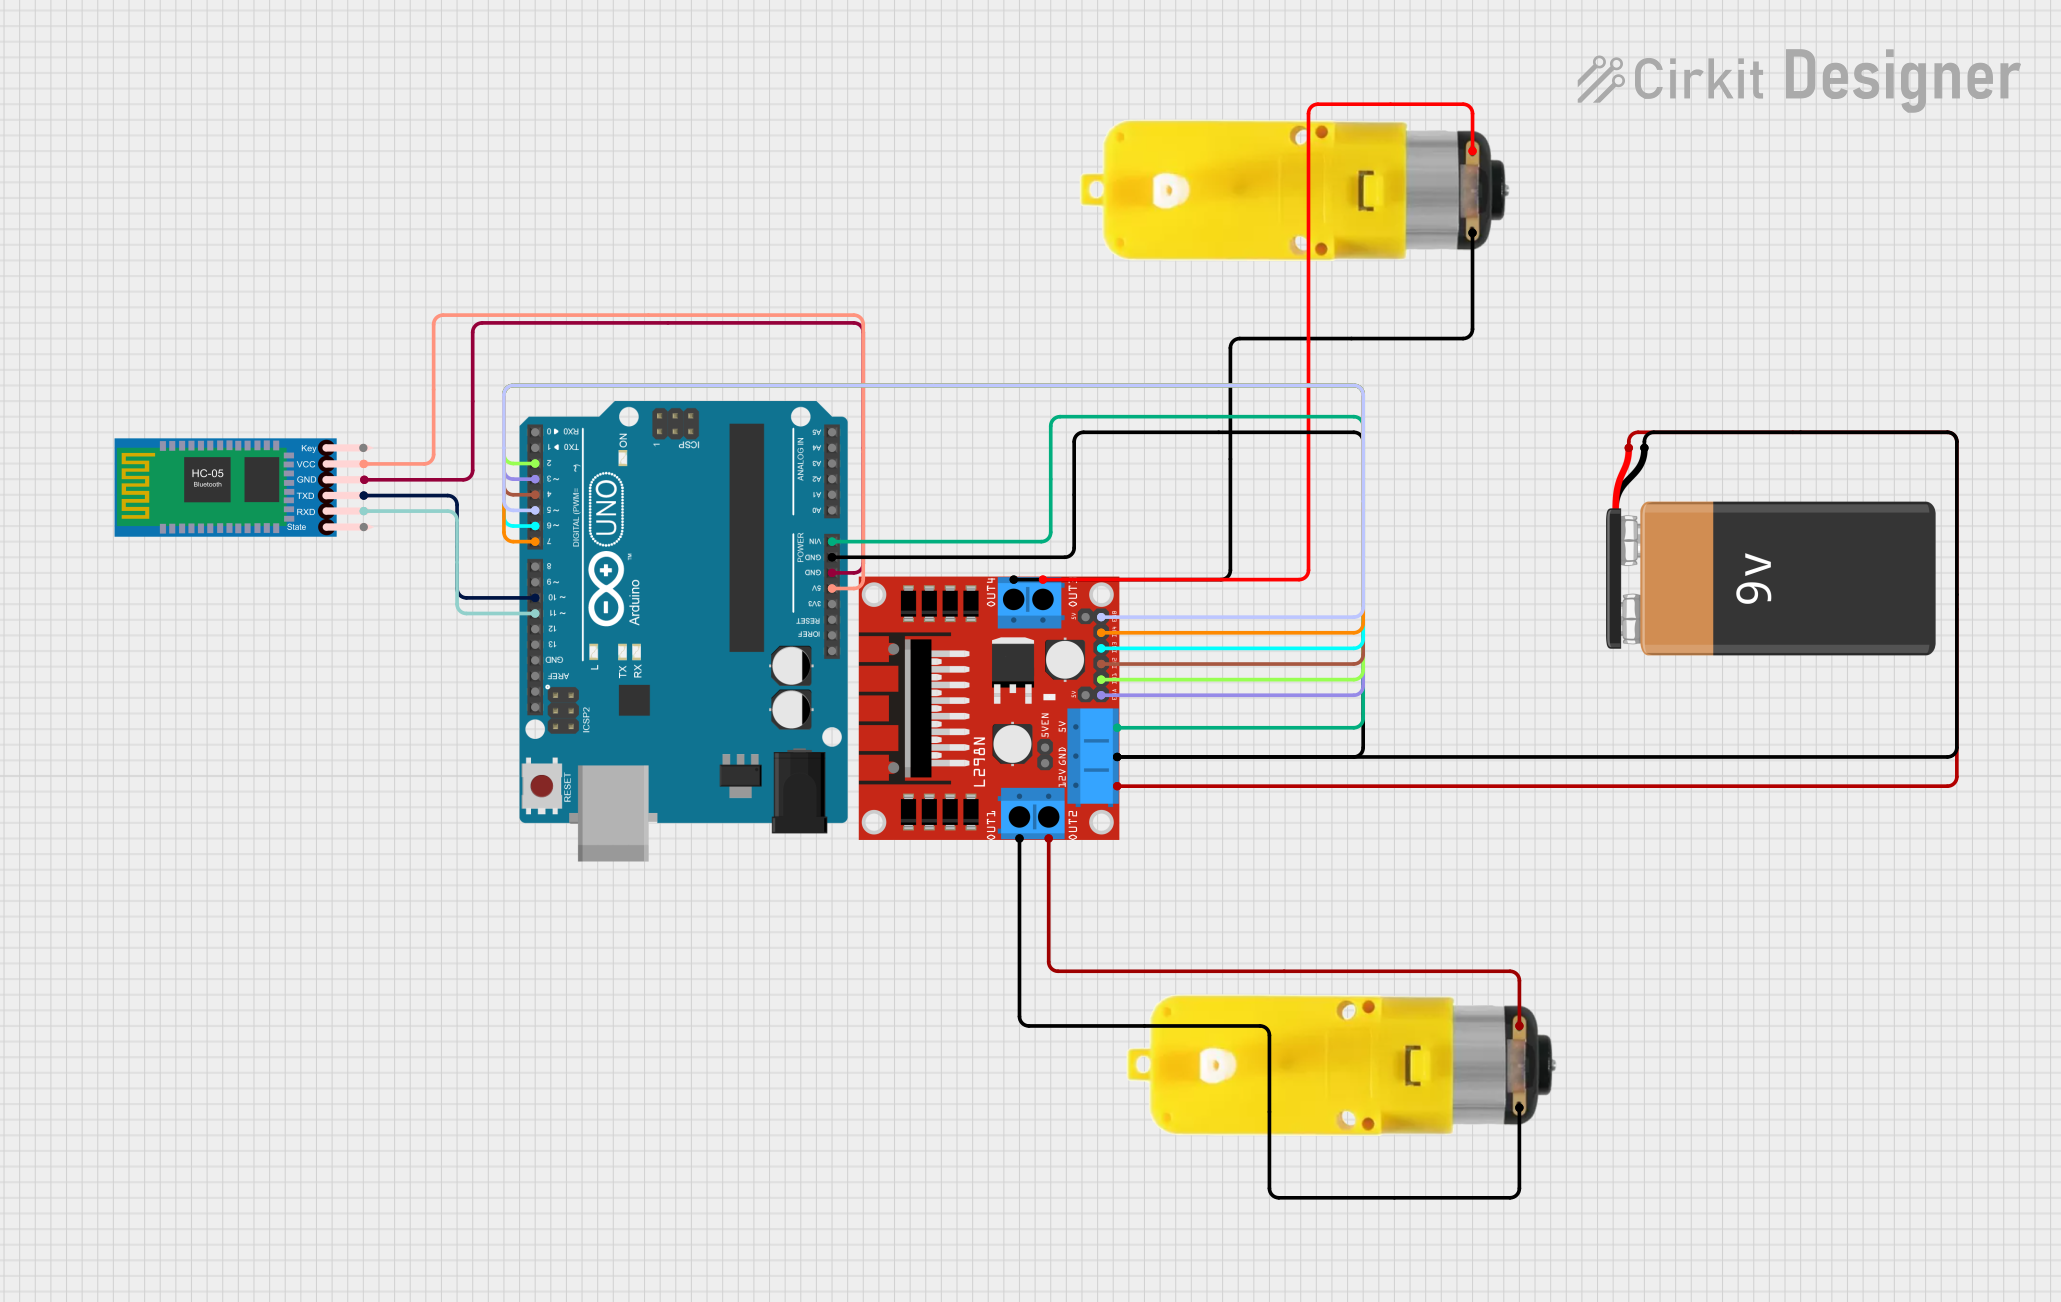
Arduino UNO Bluetooth-Controlled Motor Driver Circuit
This circuit is a Bluetooth-controlled motor driver system using an Arduino UNO. The Arduino UNO interfaces with an HC-05 Bluetooth module for wireless communication and controls two motors via an H-bridge motor driver. The system is powered by a 9V battery, and the motors are driven by the H-bridge based on commands received through the Bluetooth module.
Technical Specifications
Key Technical Details
| Parameter | Value |
|---|---|
| Operating Voltage | 5V - 12V |
| Maximum Current | 2A per channel |
| Power Dissipation | 25W |
| Control Logic | TTL compatible |
| Motor Channels | 2 (can control 2 motors) |
| PWM Frequency | Up to 20 kHz |
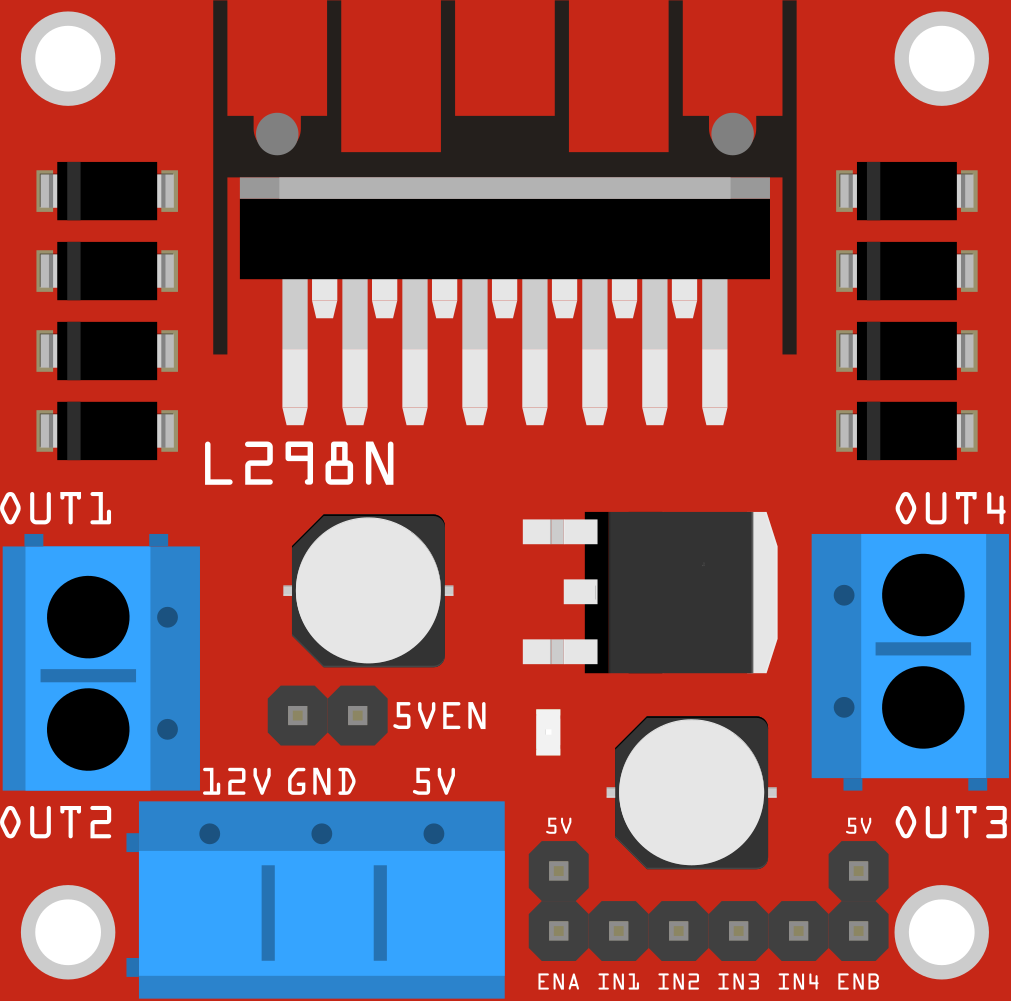
Pin Configuration and Descriptions
| Pin Number | Pin Name | Description |
|---|---|---|
| 1 | ENA | Enable pin for Motor A (High to enable) |
| 2 | IN1 | Input 1 for Motor A (High/Low to control direction) |
| 3 | IN2 | Input 2 for Motor A (High/Low to control direction) |
| 4 | GND | Ground |
| 5 | GND | Ground |
| 6 | VCC | Supply Voltage (5V - 12V) |
| 7 | OUT1 | Output 1 for Motor A |
| 8 | OUT2 | Output 2 for Motor A |
| 9 | OUT3 | Output 3 for Motor B |
| 10 | OUT4 | Output 4 for Motor B |
| 11 | VCC | Supply Voltage (5V - 12V) |
| 12 | GND | Ground |
| 13 | GND | Ground |
| 14 | IN3 | Input 3 for Motor B (High/Low to control direction) |
| 15 | IN4 | Input 4 for Motor B (High/Low to control direction) |
| 16 | ENB | Enable pin for Motor B (High to enable) |
Usage Instructions
How to Use the Component in a Circuit
- Power Supply: Connect the VCC pin to a power supply (5V - 12V) and the GND pins to the ground of the power supply.
- Motor Connections: Connect the motor terminals to the OUT1, OUT2 (for Motor A) and OUT3, OUT4 (for Motor B) pins.
- Control Pins: Connect the control pins (IN1, IN2, IN3, IN4) to the digital output pins of a microcontroller (e.g., Arduino UNO).
- Enable Pins: Connect the ENA and ENB pins to the PWM capable pins of the microcontroller to control the speed of the motors.
Important Considerations and Best Practices
- Heat Dissipation: Ensure proper heat dissipation as the H-Bridge can get hot during operation. Use a heat sink if necessary.
- Current Limiting: Make sure the current drawn by the motors does not exceed the maximum current rating of the H-Bridge.
- Decoupling Capacitors: Use decoupling capacitors close to the power supply pins to reduce noise and voltage spikes.
Example Code for Arduino UNO
// Define motor control pins
const int ENA = 9;  // PWM pin for Motor A
const int IN1 = 2;  // Control pin 1 for Motor A
const int IN2 = 3;  // Control pin 2 for Motor A
const int ENB = 10; // PWM pin for Motor B
const int IN3 = 4;  // Control pin 1 for Motor B
const int IN4 = 5;  // Control pin 2 for Motor B

void setup() {
  // Set control pins as outputs
  pinMode(ENA, OUTPUT);
  pinMode(IN1, OUTPUT);
  pinMode(IN2, OUTPUT);
  pinMode(ENB, OUTPUT);
  pinMode(IN3, OUTPUT);
  pinMode(IN4, OUTPUT);
}

void loop() {
  // Example: Move Motor A forward
  digitalWrite(IN1, HIGH);
  digitalWrite(IN2, LOW);
  analogWrite(ENA, 255); // Full speed

  // Example: Move Motor B backward
  digitalWrite(IN3, LOW);
  digitalWrite(IN4, HIGH);
  analogWrite(ENB, 255); // Full speed

  delay(2000); // Run motors for 2 seconds

  // Stop motors
  analogWrite(ENA, 0);
  analogWrite(ENB, 0);

  delay(2000); // Wait for 2 seconds
}
Troubleshooting and FAQs
Common Issues Users Might Face
- Motor Not Running: Ensure that the enable pins (ENA, ENB) are set high and the control pins (IN1, IN2, IN3, IN4) are correctly configured.
- Overheating: Check if the current drawn by the motors exceeds the H-Bridge's maximum current rating. Use a heat sink if necessary.
- Noise and Voltage Spikes: Use decoupling capacitors close to the power supply pins to reduce noise and voltage spikes.
Solutions and Tips for Troubleshooting
- Check Connections: Verify all connections, especially the power supply and ground connections.
- Use Proper Power Supply: Ensure the power supply voltage is within the specified range (5V - 12V).
- Monitor Current Draw: Use a multimeter to monitor the current draw of the motors and ensure it does not exceed the H-Bridge's rating.
- Use Heat Sinks: If the H-Bridge gets too hot, consider using heat sinks or active cooling methods.
By following this documentation, users should be able to effectively utilize the Puente H Carrito in their projects, ensuring proper motor control and avoiding common pitfalls.