Cirkit Designer Logo
Cirkit Designer
Your all-in-one circuit design IDE
Home / 
Component Documentation

How to Use LVD: Examples, Pinouts, and Specs

Image of LVD
Cirkit Designer LogoDesign with LVD in Cirkit Designer

Introduction

The Low Voltage Disconnect (LVD) is an electronic component designed to protect rechargeable batteries from being excessively discharged. When a battery's voltage drops below a preset threshold, the LVD automatically disconnects the load to prevent further discharge, thereby extending the battery's lifespan and maintaining its health. This component is commonly used in solar power systems, recreational vehicles, boats, and any application where battery health is critical.

Explore Projects Built with LVD

Use Cirkit Designer to design, explore, and prototype these projects online. Some projects support real-time simulation. Click "Open Project" to start designing instantly!
LDR-Controlled LED Lighting System
Image of automatic street light: A project utilizing LVD in a practical application
This circuit appears to be a simple light-detection system that uses an LDR (Light Dependent Resistor) to control the state of multiple green LEDs. The LDR's analog output (AO) is not connected, suggesting that the circuit uses the digital output (DO) to directly drive one LED, while the other LEDs are wired in parallel to the LDR's power supply (Vcc). The Pd (presumably a power distribution component) provides the necessary voltage levels to the LDR and LEDs.
Cirkit Designer LogoOpen Project in Cirkit Designer
LilyPad Arduino and Accelerometer-Based Wearable Fitness Tracker with Heart Rate Monitoring
Image of proj2: A project utilizing LVD in a practical application
This circuit is designed for wearable applications, featuring a LilyPad Arduino USB microcontroller that controls a chain of LED Pixel Boards and reads data from a Heart Pulse Sensor and a three-axis Accelerometer. It is capable of interactive LED displays synchronized with motion and heart rate data, suitable for dynamic wearable projects.
Cirkit Designer LogoOpen Project in Cirkit Designer
NodeMCU ESP8266-Based Smart Lift System with IR Sensors and Voice Commands
Image of IoT Ass: A project utilizing LVD in a practical application
This circuit is an IoT-based smart lift system designed for blind and disabled individuals. It uses IR sensors, pushbuttons, an LCD screen, a DFPlayer module, and a VC-02 module to detect floor selection via finger presence or voice commands, and announces the selected floor through a speaker while displaying it on the LCD.
Cirkit Designer LogoOpen Project in Cirkit Designer
ESP8266-Based Health Monitoring System with MAX30102 and LM35 Sensors
Image of patient health monitoring: A project utilizing LVD in a practical application
This circuit is a patient health monitoring system that uses an ESP8266 microcontroller to read data from a MAX30102 heart rate and oxygen sensor and an LM35 temperature sensor. The collected data is displayed on a 16x2 I2C LCD and sent to the Blynk app for remote monitoring.
Cirkit Designer LogoOpen Project in Cirkit Designer

Explore Projects Built with LVD

Use Cirkit Designer to design, explore, and prototype these projects online. Some projects support real-time simulation. Click "Open Project" to start designing instantly!
Image of automatic street light: A project utilizing LVD in a practical application
LDR-Controlled LED Lighting System
This circuit appears to be a simple light-detection system that uses an LDR (Light Dependent Resistor) to control the state of multiple green LEDs. The LDR's analog output (AO) is not connected, suggesting that the circuit uses the digital output (DO) to directly drive one LED, while the other LEDs are wired in parallel to the LDR's power supply (Vcc). The Pd (presumably a power distribution component) provides the necessary voltage levels to the LDR and LEDs.
Cirkit Designer LogoOpen Project in Cirkit Designer
Image of proj2: A project utilizing LVD in a practical application
LilyPad Arduino and Accelerometer-Based Wearable Fitness Tracker with Heart Rate Monitoring
This circuit is designed for wearable applications, featuring a LilyPad Arduino USB microcontroller that controls a chain of LED Pixel Boards and reads data from a Heart Pulse Sensor and a three-axis Accelerometer. It is capable of interactive LED displays synchronized with motion and heart rate data, suitable for dynamic wearable projects.
Cirkit Designer LogoOpen Project in Cirkit Designer
Image of IoT Ass: A project utilizing LVD in a practical application
NodeMCU ESP8266-Based Smart Lift System with IR Sensors and Voice Commands
This circuit is an IoT-based smart lift system designed for blind and disabled individuals. It uses IR sensors, pushbuttons, an LCD screen, a DFPlayer module, and a VC-02 module to detect floor selection via finger presence or voice commands, and announces the selected floor through a speaker while displaying it on the LCD.
Cirkit Designer LogoOpen Project in Cirkit Designer
Image of patient health monitoring: A project utilizing LVD in a practical application
ESP8266-Based Health Monitoring System with MAX30102 and LM35 Sensors
This circuit is a patient health monitoring system that uses an ESP8266 microcontroller to read data from a MAX30102 heart rate and oxygen sensor and an LM35 temperature sensor. The collected data is displayed on a 16x2 I2C LCD and sent to the Blynk app for remote monitoring.
Cirkit Designer LogoOpen Project in Cirkit Designer

Common Applications and Use Cases

  • Solar power systems to prevent battery over-discharge
  • Recreational vehicles and boats for battery management
  • Off-grid power systems as a safety mechanism
  • Portable electronic devices to ensure battery longevity

Technical Specifications

Key Technical Details

  • Operating Voltage Range: Typically 9V to 32V (varies by model)
  • Current Rating: Up to 20A continuous (varies by model)
  • Disconnection Threshold: Adjustable (commonly 10.5V for 12V systems)
  • Reconnection Threshold: Adjustable (commonly 12.5V for 12V systems)
  • Power Consumption: Low quiescent current draw

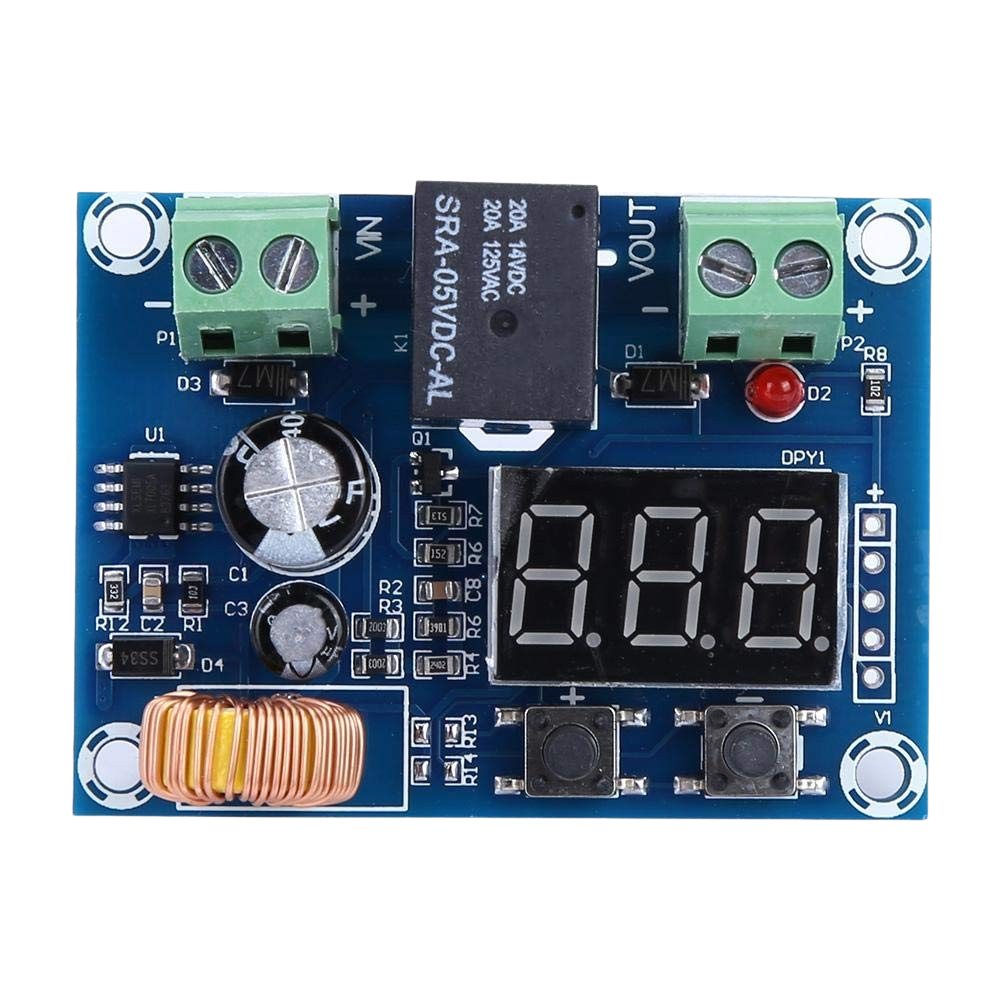
Pin Configuration and Descriptions

Pin Number Description Notes
1 Battery Positive (+) Input Connect to positive battery terminal
2 Load Positive (+) Output Connect to positive load terminal
3 Battery Negative (-) Common Shared negative for battery and load

Usage Instructions

How to Use the LVD in a Circuit

  1. Connect the Battery:

    • Connect the battery's positive terminal to the LVD's Battery Positive (+) Input (Pin 1).
    • Connect the battery's negative terminal to the LVD's Battery Negative (-) Common (Pin 3).
  2. Connect the Load:

    • Connect the load's positive terminal to the LVD's Load Positive (+) Output (Pin 2).
    • The load's negative terminal should be connected to the common negative (Pin 3).
  3. Adjust Thresholds:

    • Set the disconnection and reconnection voltage thresholds according to your battery specifications and requirements.
  4. Power On:

    • Once all connections are secure, power on the system. The LVD will monitor the battery voltage and disconnect the load if the voltage falls below the set threshold.

Important Considerations and Best Practices

  • Ensure that the LVD's current rating exceeds the maximum expected load current to prevent overheating and potential failure.
  • Use appropriate wire sizes for the current to minimize voltage drop and power loss.
  • Regularly check and maintain the correct threshold settings to match the battery's specifications.
  • Protect the LVD from extreme environmental conditions such as moisture and dust.

Troubleshooting and FAQs

Common Issues and Solutions

  • Load Does Not Power On:

    • Check battery voltage to ensure it is above the disconnection threshold.
    • Verify all connections are secure and properly wired.
    • Ensure the LVD is not damaged and is functioning correctly.
  • Frequent Disconnects/Reconnects:

    • Adjust the voltage thresholds to better suit the battery's discharge curve.
    • Check for loose or corroded connections that may cause intermittent contact.

FAQs

  • Q: Can the LVD be used with any battery type?

    • A: The LVD is compatible with most rechargeable battery types, but always verify compatibility with the manufacturer's specifications.
  • Q: What happens if the load current exceeds the LVD's rating?

    • A: Exceeding the current rating can cause the LVD to overheat and potentially fail. Always use an LVD with a suitable current rating for your application.
  • Q: How do I adjust the voltage thresholds on the LVD?

    • A: Threshold adjustments can typically be made via potentiometers or switches on the LVD. Refer to the specific model's manual for detailed instructions.

Example Arduino UNO Connection (If Applicable)

// Note: This example assumes the use of an external LVD with an Arduino system.
// The Arduino is used to monitor the battery voltage and simulate the LVD logic.

const int batterySensePin = A0; // Battery voltage sense pin
const float voltageDividerRatio = 5.0; // Ratio based on voltage divider resistors
const float lowVoltageThreshold = 10.5; // Low voltage disconnect threshold

void setup() {
  Serial.begin(9600);
}

void loop() {
  int sensorValue = analogRead(batterySensePin);
  float batteryVoltage = sensorValue * (5.0 / 1023.0) * voltageDividerRatio;

  Serial.print("Battery Voltage: ");
  Serial.println(batteryVoltage);

  if (batteryVoltage < lowVoltageThreshold) {
    // Logic to disconnect the load would be implemented here
    Serial.println("Disconnecting load due to low voltage.");
  }

  delay(1000); // Delay for stability and readability
}

Note: This code is for demonstration purposes and does not directly control an LVD. It simulates the logic that an LVD would perform in a real-world scenario. An actual LVD would be a standalone hardware device and would not require an Arduino for its basic operation.