How to Use ESP32-S3-Touch-LCD-4.3: Examples, Pinouts, and Specs
Introduction
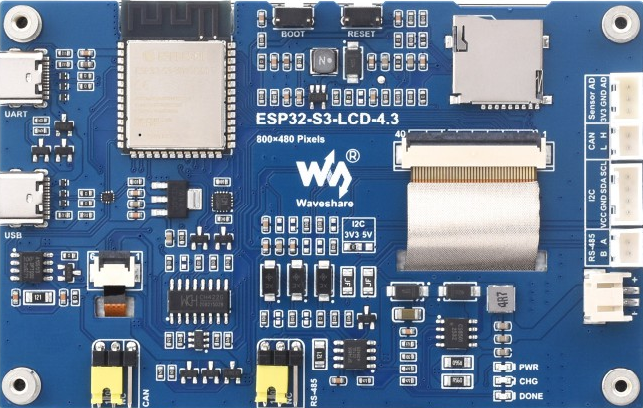
The ESP32-S3-Touch-LCD-4.3 by Waveshare is a 4.3-inch touchscreen display module integrated with the powerful ESP32-S3 microcontroller. This module combines a high-resolution touchscreen with the advanced capabilities of the ESP32-S3, including Wi-Fi and Bluetooth connectivity, making it an excellent choice for IoT applications, smart home devices, and custom user interface designs.
With its compact design and versatile features, the ESP32-S3-Touch-LCD-4.3 is ideal for projects requiring a responsive graphical interface and wireless communication. It is particularly suited for applications such as:
- Smart home control panels
- Industrial automation displays
- IoT dashboards
- Portable monitoring devices
- Educational and prototyping projects
Explore Projects Built with ESP32-S3-Touch-LCD-4.3


Explore Projects Built with ESP32-S3-Touch-LCD-4.3
Technical Specifications
Key Features
| Feature | Specification |
|---|---|
| Microcontroller | ESP32-S3 (Xtensa® 32-bit LX7 dual-core processor) |
| Display Size | 4.3 inches |
| Resolution | 800 × 480 pixels |
| Touchscreen Type | Capacitive touchscreen |
| Connectivity | Wi-Fi 802.11 b/g/n, Bluetooth 5.0 (LE) |
| Flash Memory | 16 MB |
| PSRAM | 8 MB |
| Operating Voltage | 5V (via USB-C) |
| GPIO Pins | 20 (available for user applications) |
| Communication Interfaces | UART, SPI, I2C, PWM, ADC, DAC |
| Dimensions | 120 mm × 75 mm × 12 mm |
| Weight | 85 g |
Pin Configuration and Descriptions
The ESP32-S3-Touch-LCD-4.3 features a 20-pin GPIO header for interfacing with external components. Below is the pinout description:
| Pin Number | Pin Name | Function | Notes |
|---|---|---|---|
| 1 | 3V3 | 3.3V Power Output | Provides 3.3V for external components |
| 2 | GND | Ground | Common ground for the circuit |
| 3 | GPIO0 | General Purpose I/O | Configurable as input/output |
| 4 | GPIO1 | General Purpose I/O | Configurable as input/output |
| 5 | GPIO2 | General Purpose I/O | Configurable as input/output |
| 6 | GPIO3 | General Purpose I/O | Configurable as input/output |
| 7 | TXD | UART Transmit | Serial communication TX pin |
| 8 | RXD | UART Receive | Serial communication RX pin |
| 9 | SCL | I2C Clock Line | For I2C communication |
| 10 | SDA | I2C Data Line | For I2C communication |
| 11 | MOSI | SPI Master Out Slave In | SPI data output |
| 12 | MISO | SPI Master In Slave Out | SPI data input |
| 13 | SCK | SPI Clock | SPI clock signal |
| 14 | CS | SPI Chip Select | SPI chip select signal |
| 15 | ADC1 | Analog-to-Digital Converter 1 | For analog input signals |
| 16 | ADC2 | Analog-to-Digital Converter 2 | For analog input signals |
| 17 | PWM1 | Pulse Width Modulation Output 1 | For controlling motors, LEDs, etc. |
| 18 | PWM2 | Pulse Width Modulation Output 2 | For controlling motors, LEDs, etc. |
| 19 | DAC1 | Digital-to-Analog Converter 1 | For analog output signals |
| 20 | DAC2 | Digital-to-Analog Converter 2 | For analog output signals |
Usage Instructions
How to Use the Component in a Circuit
Powering the Module:
- Connect the module to a 5V power source using the USB-C port.
- Alternatively, use the 3V3 and GND pins to power the module externally.
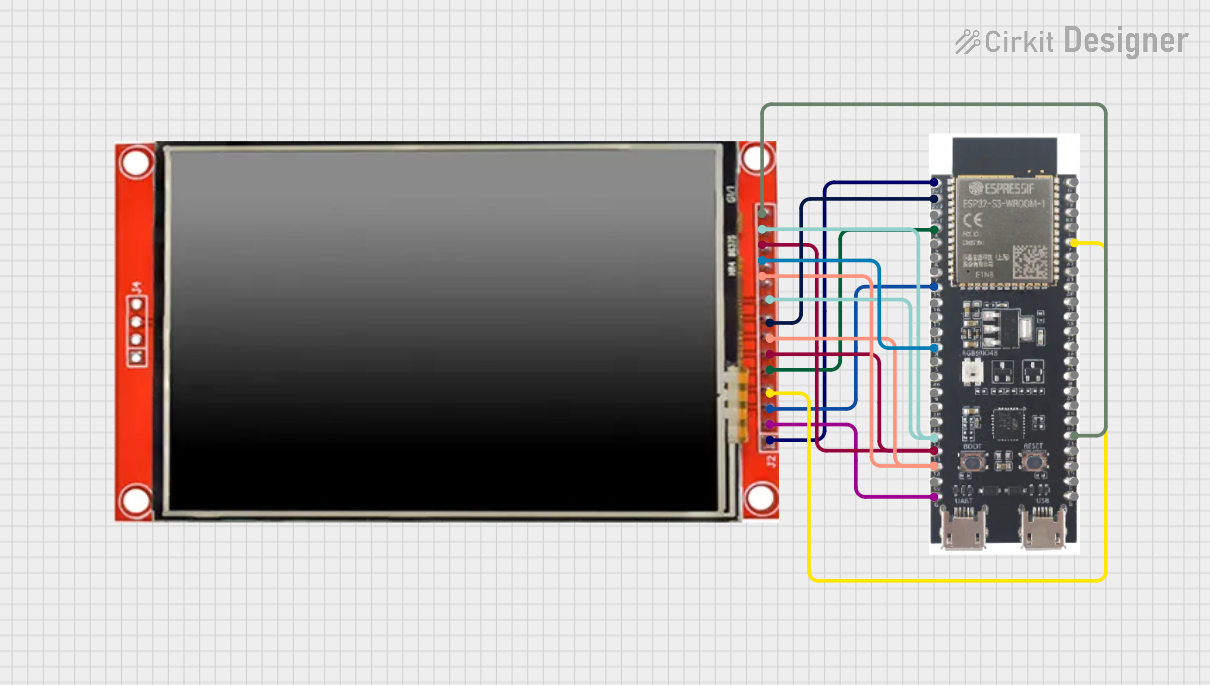
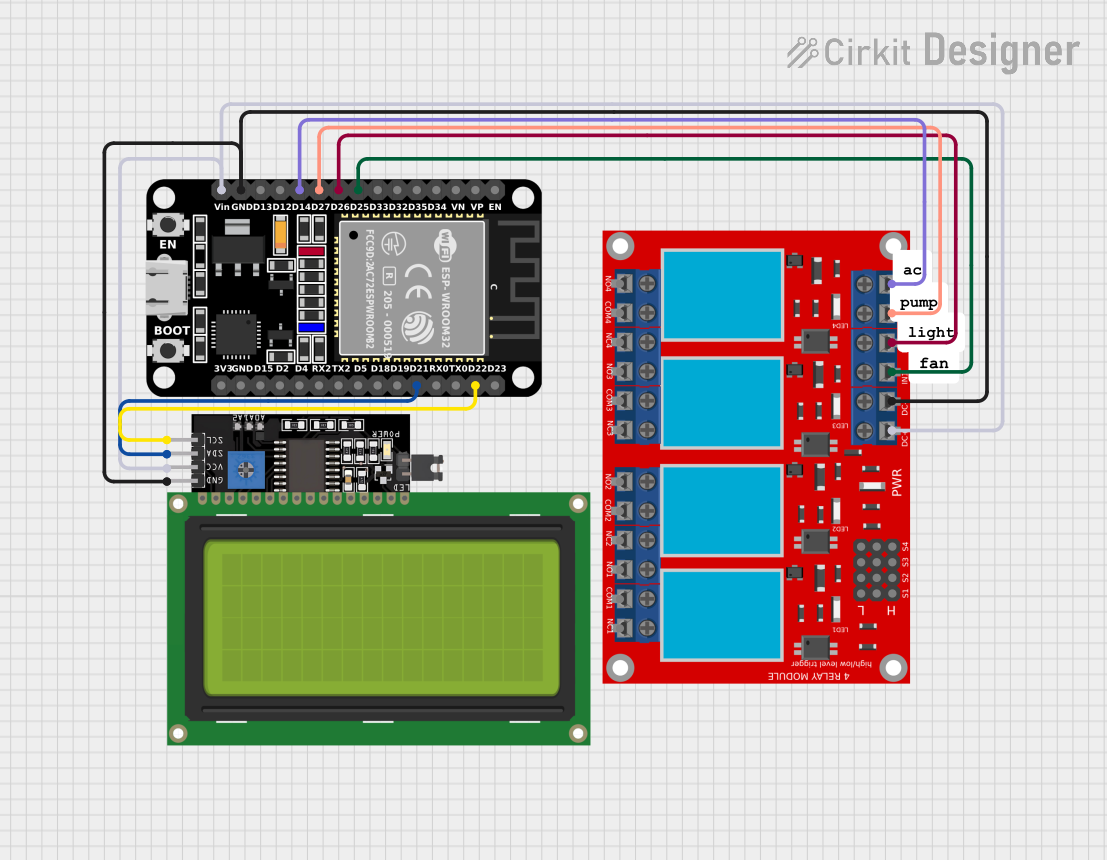
Connecting Peripherals:
- Use the GPIO pins to connect sensors, actuators, or other peripherals.
- For I2C devices, connect to the SCL and SDA pins.
- For SPI devices, connect to MOSI, MISO, SCK, and CS.
Programming the ESP32-S3:
- Install the Arduino IDE or ESP-IDF (Espressif IoT Development Framework).
- Select the appropriate board settings for the ESP32-S3.
- Connect the module to your computer via USB-C and upload your code.
Using the Touchscreen:
- The touchscreen can be controlled using libraries such as TFT_eSPI or LVGL.
- Ensure the correct pin mappings are configured in your code.
Important Considerations and Best Practices
- Power Supply: Ensure a stable 5V power source to avoid unexpected resets or malfunctions.
- Pin Usage: Avoid using reserved pins for custom applications. Refer to the ESP32-S3 datasheet for details.
- Touchscreen Calibration: Some applications may require touchscreen calibration for accurate input.
- Heat Management: If the module operates in high-temperature environments, consider adding a heatsink.
Example Code for Arduino UNO Integration
Below is an example of how to display text on the touchscreen using the TFT_eSPI library:
#include <TFT_eSPI.h> // Include the TFT_eSPI library

TFT_eSPI tft = TFT_eSPI(); // Create an instance of the display

void setup() {
  tft.init();               // Initialize the display
  tft.setRotation(1);       // Set display orientation
  tft.fillScreen(TFT_BLACK); // Clear the screen with black color

  tft.setTextColor(TFT_WHITE, TFT_BLACK); // Set text color (white on black)
  tft.setTextSize(2);       // Set text size

  tft.setCursor(10, 10);    // Set cursor position
  tft.println("Hello, ESP32!"); // Print text to the display
}

void loop() {
  // Add your code here for additional functionality
}
Note: Ensure the
User_Setup.hfile in the TFT_eSPI library is configured for the ESP32-S3-Touch-LCD-4.3.
Troubleshooting and FAQs
Common Issues and Solutions
The display does not turn on:
- Verify the power supply is connected and providing 5V.
- Check the USB-C cable for any damage or loose connections.
Touchscreen is unresponsive:
- Ensure the touchscreen library is correctly installed and configured.
- Check for loose connections or damaged cables.
Wi-Fi or Bluetooth is not working:
- Verify the ESP32-S3 firmware is up-to-date.
- Ensure the correct Wi-Fi credentials are provided in your code.
Code upload fails:
- Ensure the correct board and port are selected in the Arduino IDE.
- Press and hold the BOOT button on the module while uploading the code.
FAQs
Q: Can I use this module with a battery?
A: Yes, you can use a 3.7V LiPo battery with a suitable voltage regulator to provide 5V.Q: What is the maximum Wi-Fi range?
A: The Wi-Fi range depends on environmental factors but typically extends up to 50 meters indoors.Q: Is the touchscreen multi-touch capable?
A: No, the touchscreen supports single-touch input only.Q: Can I use this module with MicroPython?
A: Yes, the ESP32-S3 is compatible with MicroPython. You can flash the MicroPython firmware and use it for development.
This concludes the documentation for the ESP32-S3-Touch-LCD-4.3. For further assistance, refer to the official Waveshare documentation or community forums.