Cirkit Designer Logo
Cirkit Designer
Your all-in-one circuit design IDE
Home / 
Component Documentation

How to Use SparkFun Micro OLED Breakout: Examples, Pinouts, and Specs

Image of SparkFun Micro OLED Breakout
Cirkit Designer LogoDesign with SparkFun Micro OLED Breakout in Cirkit Designer

Introduction

The SparkFun Micro OLED Breakout is a compact and versatile display module that provides a high-contrast, high-resolution OLED display for a variety of electronics projects. With its 64x48 pixel resolution, this module is perfect for displaying text, graphics, and animations. Common applications include wearable devices, status indicators, user interfaces, and any project where visual feedback is beneficial.

Explore Projects Built with SparkFun Micro OLED Breakout

Use Cirkit Designer to design, explore, and prototype these projects online. Some projects support real-time simulation. Click "Open Project" to start designing instantly!
Arduino 101 OLED Display Animation Project
Image of wokwi animater test: A project utilizing SparkFun Micro OLED Breakout in a practical application
This circuit consists of an Arduino 101 microcontroller connected to a 0.96" OLED display via I2C communication. The Arduino runs a program that initializes the OLED and continuously displays an animated sequence of frames on the screen.
Cirkit Designer LogoOpen Project in Cirkit Designer
ESP32 Devkit V1 and OLED Display Bitmap Viewer
Image of Esp32_monochromeimage: A project utilizing SparkFun Micro OLED Breakout in a practical application
This circuit consists of an ESP32 Devkit V1 microcontroller connected to a 1.3" OLED display via I2C communication. The ESP32 initializes the OLED display and renders a predefined bitmap image on it.
Cirkit Designer LogoOpen Project in Cirkit Designer
Arduino Leonardo Controlled OLED Display with Pushbutton Interaction
Image of game and gain: A project utilizing SparkFun Micro OLED Breakout in a practical application
This circuit features an Arduino Leonardo microcontroller connected to a 0.96" OLED display and a pushbutton with a pull-up resistor. The OLED display communicates with the Arduino via I2C (SDA and SCL lines), and the pushbutton, when pressed, changes the display content on the OLED screen. The microcontroller's code suggests the display alternates between showing an overview with speed and experience points and a player stats screen, likely for a game or interactive application.
Cirkit Designer LogoOpen Project in Cirkit Designer
STM32 and Arduino Pro Mini Based Wireless Data Logger with OLED Display
Image of R8 Controller: A project utilizing SparkFun Micro OLED Breakout in a practical application
This circuit integrates multiple microcontrollers (Maple Mini STM32F1, nRF52840 ProMicro, and Arduino Pro Mini) to interface with various peripherals including an SSD1306 OLED display, an SD card module, and a Si4463 RF module. The circuit is designed for data acquisition, storage, and wireless communication, with power supplied through a USB Serial TTL module.
Cirkit Designer LogoOpen Project in Cirkit Designer

Explore Projects Built with SparkFun Micro OLED Breakout

Use Cirkit Designer to design, explore, and prototype these projects online. Some projects support real-time simulation. Click "Open Project" to start designing instantly!
Image of wokwi animater test: A project utilizing SparkFun Micro OLED Breakout in a practical application
Arduino 101 OLED Display Animation Project
This circuit consists of an Arduino 101 microcontroller connected to a 0.96" OLED display via I2C communication. The Arduino runs a program that initializes the OLED and continuously displays an animated sequence of frames on the screen.
Cirkit Designer LogoOpen Project in Cirkit Designer
Image of Esp32_monochromeimage: A project utilizing SparkFun Micro OLED Breakout in a practical application
ESP32 Devkit V1 and OLED Display Bitmap Viewer
This circuit consists of an ESP32 Devkit V1 microcontroller connected to a 1.3" OLED display via I2C communication. The ESP32 initializes the OLED display and renders a predefined bitmap image on it.
Cirkit Designer LogoOpen Project in Cirkit Designer
Image of game and gain: A project utilizing SparkFun Micro OLED Breakout in a practical application
Arduino Leonardo Controlled OLED Display with Pushbutton Interaction
This circuit features an Arduino Leonardo microcontroller connected to a 0.96" OLED display and a pushbutton with a pull-up resistor. The OLED display communicates with the Arduino via I2C (SDA and SCL lines), and the pushbutton, when pressed, changes the display content on the OLED screen. The microcontroller's code suggests the display alternates between showing an overview with speed and experience points and a player stats screen, likely for a game or interactive application.
Cirkit Designer LogoOpen Project in Cirkit Designer
Image of R8 Controller: A project utilizing SparkFun Micro OLED Breakout in a practical application
STM32 and Arduino Pro Mini Based Wireless Data Logger with OLED Display
This circuit integrates multiple microcontrollers (Maple Mini STM32F1, nRF52840 ProMicro, and Arduino Pro Mini) to interface with various peripherals including an SSD1306 OLED display, an SD card module, and a Si4463 RF module. The circuit is designed for data acquisition, storage, and wireless communication, with power supplied through a USB Serial TTL module.
Cirkit Designer LogoOpen Project in Cirkit Designer

Technical Specifications

General Specifications

  • Display Type: Monochrome OLED
  • Resolution: 64x48 pixels
  • Color Depth: 1-bit (black & white)
  • Communication: I2C or SPI
  • Operating Voltage: 3.3V to 5V
  • Current Draw: 10mA (typical)
  • Dimensions: 10.5mm x 10.5mm x 5.2mm
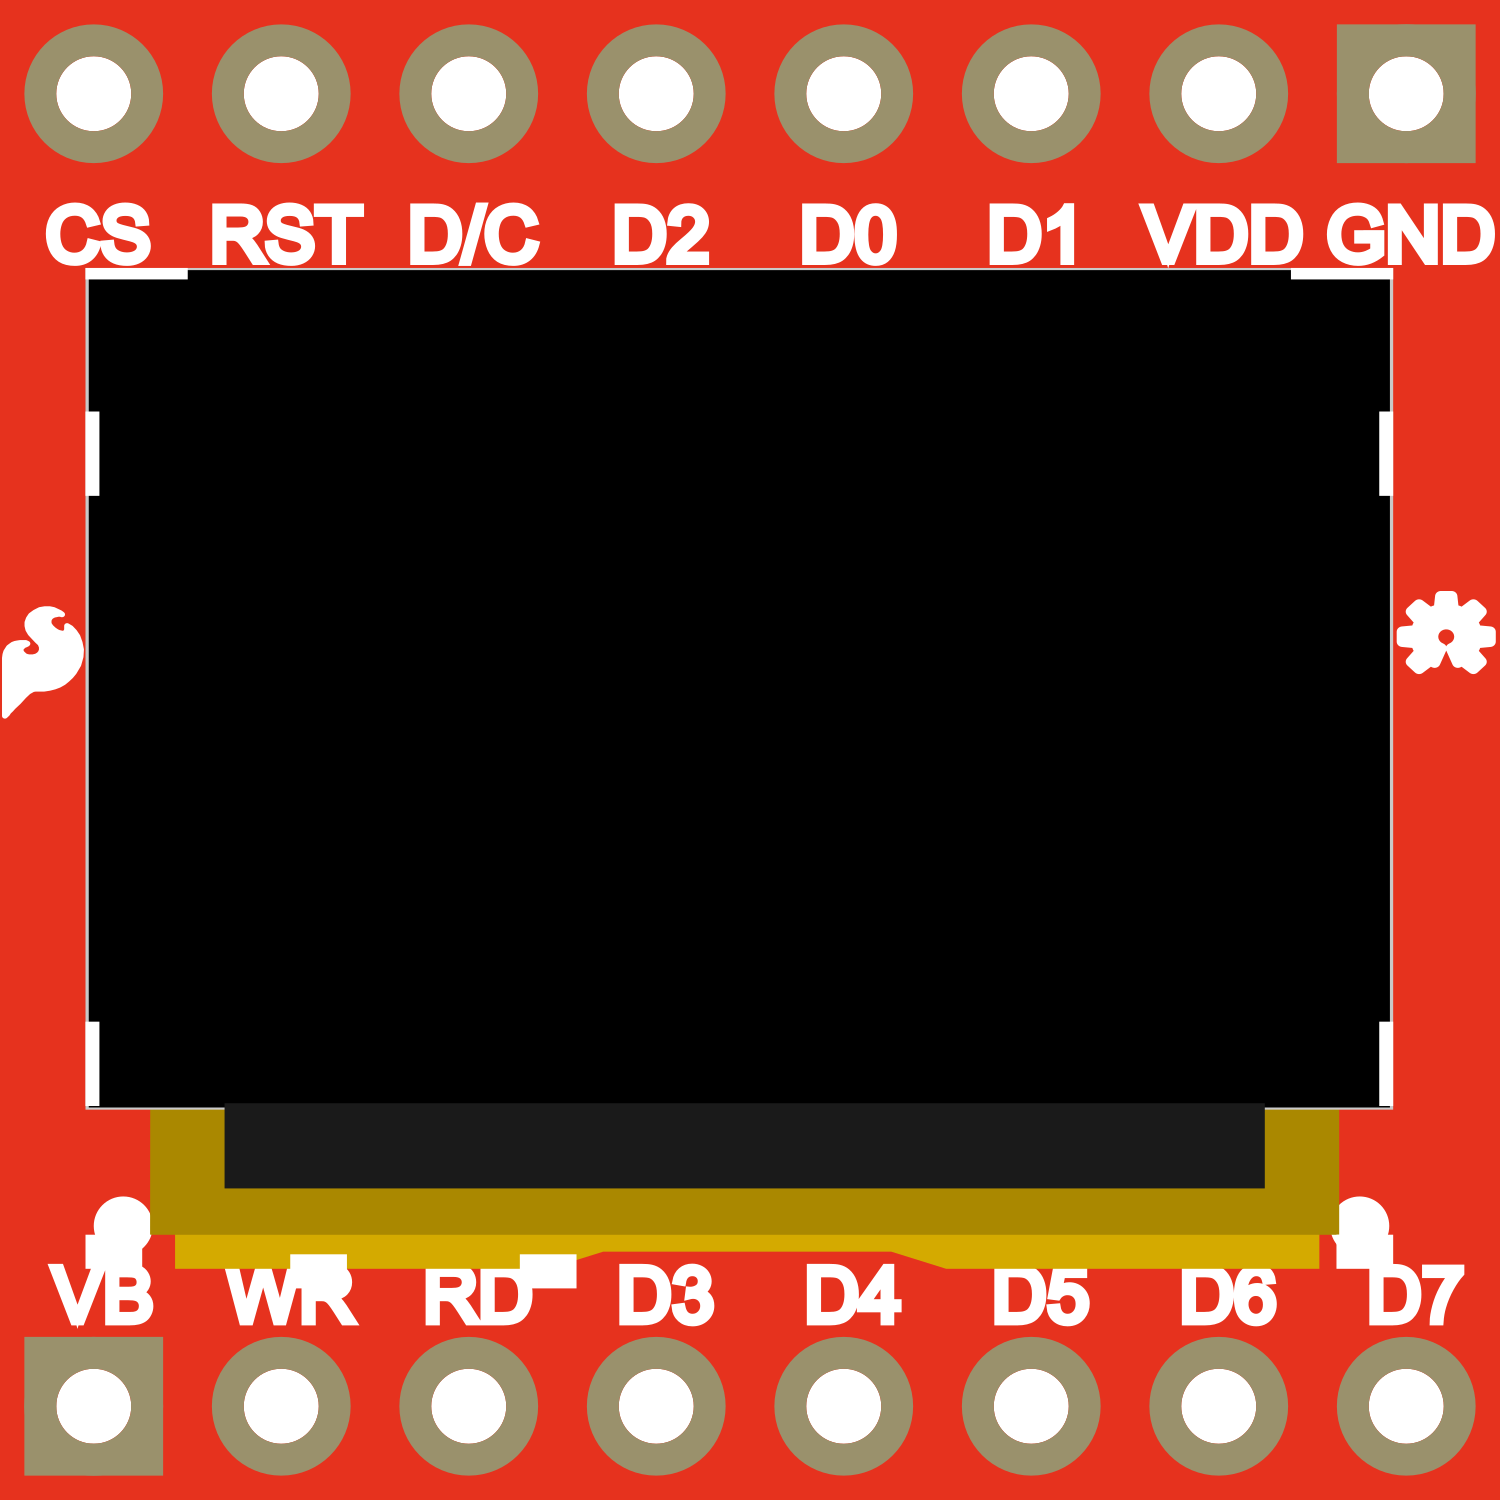
Pin Configuration

Pin Number Name Description
1 GND Ground connection
2 VCC Power supply (3.3V - 5V)
3 D0 Clock for SPI / I2C serial clock (SCL)
4 D1 Data for SPI / I2C serial data (SDA)
5 RES Reset pin
6 DC Data/Command control pin (SPI mode only)
7 CS Chip Select (SPI mode only)

Usage Instructions

Integration with a Circuit

To use the SparkFun Micro OLED Breakout in your project, follow these steps:

  1. Powering the Module: Connect the VCC pin to a 3.3V or 5V power supply, and the GND pin to the ground of your system.
  2. Communication: Choose between I2C or SPI for communication:
    • For I2C, connect D0 to SCL and D1 to SDA on your microcontroller.
    • For SPI, connect D0 to SCK, D1 to MOSI, DC to a digital I/O pin for data/command selection, CS to a digital I/O pin for chip selection, and RES to a digital I/O pin for resetting the display.
  3. Initialization: Initialize the display in your code, setting the correct communication protocol and display parameters.

Best Practices

  • Use a level shifter if your microcontroller operates at a voltage higher than 5V.
  • Avoid exposing the display to direct sunlight or high temperatures to prevent damage.
  • Implement proper ESD precautions when handling the module to avoid electrostatic damage.

Example Code for Arduino UNO

Here is a sample code snippet for initializing and displaying text on the Micro OLED using an Arduino UNO with I2C communication:

#include <Wire.h>
#include <SFE_MicroOLED.h>  // Include the SFE_MicroOLED library

#define PIN_RESET 9  // Connect RST to pin 9 (modifiable)
#define PIN_DC    8  // Connect DC to pin 8 (modifiable, only for SPI)
#define PIN_CS    10 // Connect CS to pin 10 (modifiable, only for SPI)

// Declare a MicroOLED object. The parameters include:
// 1. The reset pin
// 2. The DC pin (only for SPI)
// 3. The CS pin (only for SPI)
MicroOLED oled(PIN_RESET, PIN_DC, PIN_CS);

void setup() {
  oled.begin();    // Initialize the OLED
  oled.clear(ALL); // Clear the display's internal memory
  oled.display();  // Display what's in the buffer (splashscreen)
  delay(1000);     // Delay 1000 ms
  oled.clear(PAGE); // Clear the buffer.
}

void loop() {
  oled.setFontType(0);       // Set font to type 0
  oled.setCursor(0, 0);      // Set cursor to top-left
  oled.print("Hello, OLED!"); // Print "Hello, OLED!"
  oled.display();            // Display what's in the buffer
  delay(1000);               // Delay 1000 ms
}

Ensure you have installed the SFE_MicroOLED library in the Arduino IDE before uploading this code to your Arduino UNO.

Troubleshooting and FAQs

Common Issues

  • Display Not Turning On: Check the power connections and ensure the voltage is within the specified range. Also, verify that the I2C/SPI connections are correctly made.
  • Garbled or No Output: Ensure that the display is correctly initialized in your code and that the correct communication protocol is selected.
  • Dim Display: Adjust the contrast settings in your code or check if the power supply is adequate.

FAQs

Q: Can the Micro OLED Breakout be used with 5V systems? A: Yes, the module can be directly connected to a 5V power supply.

Q: How do I control the brightness of the display? A: Brightness (contrast) can be controlled through software using the library's functions.

Q: Is the display readable in direct sunlight? A: OLED displays are typically not as visible in direct sunlight as backlit LCDs. It is best to use this display in shaded or indoor environments.

For further assistance, consult the SparkFun Micro OLED Breakout forums and the community for additional support and resources.