Cirkit Designer Logo
Cirkit Designer
Your all-in-one circuit design IDE
Home / 
Component Documentation

How to Use BMP180: Examples, Pinouts, and Specs

Image of BMP180
Cirkit Designer LogoDesign with BMP180 in Cirkit Designer

Introduction

The BMP180 is a high-precision, ultra-low power digital barometer designed for use in a wide range of applications, particularly those involving weather monitoring, GPS navigation, and altitude control systems. It measures atmospheric pressure and temperature, which can be used to calculate altitude. Its small form factor and low power consumption make it ideal for mobile applications.

Explore Projects Built with BMP180

Use Cirkit Designer to design, explore, and prototype these projects online. Some projects support real-time simulation. Click "Open Project" to start designing instantly!
Arduino Nano Weather Station with BMP180 Sensor and MicroSD Data Logging
Image of circuito: A project utilizing BMP180 in a practical application
This circuit features an Arduino Nano microcontroller interfaced with an Adafruit BMP180 sensor for measuring atmospheric pressure and a MicroSD card socket for data storage. The BMP180 communicates with the Arduino via I2C, while the MicroSD card uses SPI for data transfer.
Cirkit Designer LogoOpen Project in Cirkit Designer
ESP-8266 Based Environmental Monitoring System
Image of PHD: A project utilizing BMP180 in a practical application
This circuit features an ESP-8266 microcontroller connected to a BMP180 barometric pressure sensor, a BH1750 light intensity sensor, and a DHT22 temperature and humidity sensor. The ESP-8266 uses its I2C interface, with pins D1 and D2 connected to the SCL and SDA lines of both the BMP180 and BH1750, to communicate with the sensors. The DHT22 sensor is connected to a digital pin (D4) for direct signal reading, and all sensors share common power (3V3) and ground (GND) connections with the microcontroller.
Cirkit Designer LogoOpen Project in Cirkit Designer
Arduino Nano-Based Sensor Data Logger with Alert System
Image of model rocket flight computer: A project utilizing BMP180 in a practical application
This circuit features an Arduino Nano microcontroller interfaced with BMP180 and MPU-6050 sensors via I2C communication for environmental and motion sensing. It includes a piezo buzzer and three LEDs (red, yellow, blue) for audio-visual feedback, controlled by digital pins on the Arduino. A pushbutton with a pull-up resistor, a micro SD card module for data logging, and a 9V battery for power supply are also part of the circuit.
Cirkit Designer LogoOpen Project in Cirkit Designer
Arduino BMP180 Tire Pressure Monitoring System with LCD Display and NRF24L01 Wireless Transmission
Image of TPMS: A project utilizing BMP180 in a practical application
This circuit is designed for a Tire Pressure Monitoring System using an ATmega328P microcontroller. It reads temperature and pressure data from BMP180 sensors, displays the readings on a 16x2 LCD, and transmits the data wirelessly via an NRF24L01 module. The circuit is powered by a 5V battery, with a 3.3V battery specifically for the NRF24L01, and includes a resistor for the LCD backlight.
Cirkit Designer LogoOpen Project in Cirkit Designer

Explore Projects Built with BMP180

Use Cirkit Designer to design, explore, and prototype these projects online. Some projects support real-time simulation. Click "Open Project" to start designing instantly!
Image of circuito: A project utilizing BMP180 in a practical application
Arduino Nano Weather Station with BMP180 Sensor and MicroSD Data Logging
This circuit features an Arduino Nano microcontroller interfaced with an Adafruit BMP180 sensor for measuring atmospheric pressure and a MicroSD card socket for data storage. The BMP180 communicates with the Arduino via I2C, while the MicroSD card uses SPI for data transfer.
Cirkit Designer LogoOpen Project in Cirkit Designer
Image of PHD: A project utilizing BMP180 in a practical application
ESP-8266 Based Environmental Monitoring System
This circuit features an ESP-8266 microcontroller connected to a BMP180 barometric pressure sensor, a BH1750 light intensity sensor, and a DHT22 temperature and humidity sensor. The ESP-8266 uses its I2C interface, with pins D1 and D2 connected to the SCL and SDA lines of both the BMP180 and BH1750, to communicate with the sensors. The DHT22 sensor is connected to a digital pin (D4) for direct signal reading, and all sensors share common power (3V3) and ground (GND) connections with the microcontroller.
Cirkit Designer LogoOpen Project in Cirkit Designer
Image of model rocket flight computer: A project utilizing BMP180 in a practical application
Arduino Nano-Based Sensor Data Logger with Alert System
This circuit features an Arduino Nano microcontroller interfaced with BMP180 and MPU-6050 sensors via I2C communication for environmental and motion sensing. It includes a piezo buzzer and three LEDs (red, yellow, blue) for audio-visual feedback, controlled by digital pins on the Arduino. A pushbutton with a pull-up resistor, a micro SD card module for data logging, and a 9V battery for power supply are also part of the circuit.
Cirkit Designer LogoOpen Project in Cirkit Designer
Image of TPMS: A project utilizing BMP180 in a practical application
Arduino BMP180 Tire Pressure Monitoring System with LCD Display and NRF24L01 Wireless Transmission
This circuit is designed for a Tire Pressure Monitoring System using an ATmega328P microcontroller. It reads temperature and pressure data from BMP180 sensors, displays the readings on a 16x2 LCD, and transmits the data wirelessly via an NRF24L01 module. The circuit is powered by a 5V battery, with a 3.3V battery specifically for the NRF24L01, and includes a resistor for the LCD backlight.
Cirkit Designer LogoOpen Project in Cirkit Designer

Common Applications and Use Cases

  • Personal weather stations
  • GPS navigation systems
  • Altitude control for drones and other RC aircraft
  • Indoor navigation (floor detection)
  • Fitness and health monitoring (e.g., smartwatches)

Technical Specifications

Key Technical Details

  • Supply Voltage: 1.8V - 3.6V
  • Average Current Consumption: 0.5 µA (at 1Hz sampling rate)
  • Pressure Range: 300 to 1100 hPa (equivalent to +9000m to -500m above/below sea level)
  • Temperature Range: -40 to +85°C
  • Interface: I2C
  • Resolution: 0.01 hPa (pressure), 0.1°C (temperature)

Pin Configuration and Descriptions

Pin Number Name Description
1 VCC Power supply (1.8V to 3.6V)
2 GND Ground connection
3 SCL I2C clock line
4 SDA I2C data line
5 XCLR Master clear input (active low, optional use)
6 EOC End of conversion output signal (optional use)

Usage Instructions

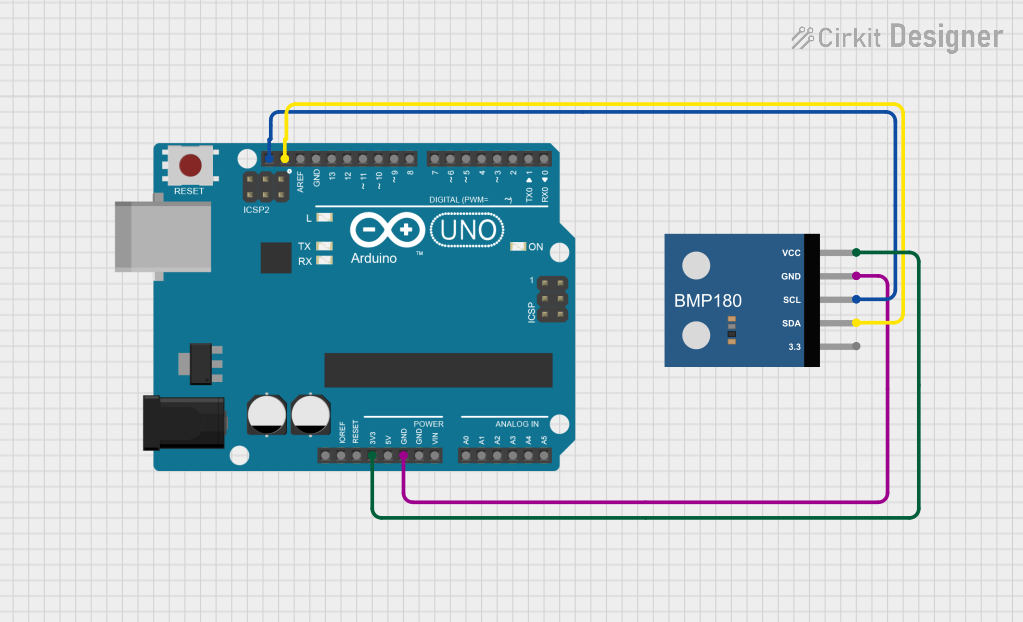
How to Use the BMP180 in a Circuit

  1. Connect the VCC pin to the power supply (1.8V to 3.6V).
  2. Connect the GND pin to the ground of the power supply.
  3. Connect the SCL and SDA pins to the I2C clock and data lines, respectively.
  4. (Optional) Connect the XCLR pin to a digital output on your microcontroller if you wish to reset the sensor via software.
  5. (Optional) Connect the EOC pin to a digital input on your microcontroller if you wish to use the end of conversion signal.

Important Considerations and Best Practices

  • Ensure that the power supply is stable and within the specified voltage range.
  • Use pull-up resistors on the I2C lines (typically 4.7kΩ to 10kΩ).
  • Avoid placing the sensor near heat sources to prevent inaccurate temperature readings.
  • For accurate pressure readings, calibrate the sensor at a known altitude.

Example Code for Arduino UNO

#include <Wire.h>
#include <Adafruit_BMP085.h>

Adafruit_BMP085 bmp;

void setup() {
  Serial.begin(9600);
  if (!bmp.begin()) {
    Serial.println("Could not find a valid BMP180 sensor, check wiring!");
    while (1) {}
  }
}

void loop() {
  float temperature = bmp.readTemperature();
  long pressure = bmp.readPressure();
  float altitude = bmp.readAltitude();

  Serial.print("Temperature = ");
  Serial.print(temperature);
  Serial.println(" *C");

  Serial.print("Pressure = ");
  Serial.print(pressure);
  Serial.println(" Pa");

  Serial.print("Altitude = ");
  Serial.print(altitude);
  Serial.println(" meters");

  delay(1000);
}

Troubleshooting and FAQs

Common Issues

  • Inaccurate Readings: Ensure the sensor is not subjected to sudden temperature changes and is calibrated correctly.
  • No Data on I2C: Check the wiring, ensure pull-up resistors are in place, and verify that the power supply is within the specified range.
  • Sensor Not Detected: Make sure the sensor is correctly wired to the I2C bus and that there are no shorts or open circuits.

Solutions and Tips for Troubleshooting

  • Double-check all connections and solder joints.
  • Use a multimeter to verify the voltage at the VCC pin.
  • Implement a check in your code to confirm the sensor is initialized correctly.
  • If using long wires for I2C, consider using shielded cables or twisted pairs to reduce noise.

FAQs

Q: Can the BMP180 be used to measure altitude? A: Yes, the BMP180 can calculate altitude based on atmospheric pressure changes.

Q: What is the accuracy of the BMP180 sensor? A: The BMP180 can measure pressure with an accuracy of ±0.03 hPa and temperature with an accuracy of ±0.1°C.

Q: How do I calibrate the BMP180 sensor? A: Calibration typically involves taking a reading at a known altitude and temperature, then using these values to adjust subsequent readings.

Q: Is the BMP180 sensor waterproof? A: No, the BMP180 is not waterproof and should be protected from moisture and water exposure.