How to Use Waveshare TTL-ETH: Examples, Pinouts, and Specs
Introduction
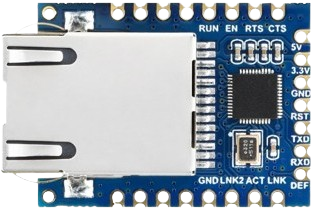
The Waveshare TTL-ETH (Manufacturer Part ID: 24276) is a TTL to Ethernet module designed to enable serial communication over an Ethernet network. This module is ideal for applications requiring reliable and fast data transmission between microcontrollers and Ethernet-based systems. It simplifies the process of connecting embedded devices to the internet, making it a versatile choice for IoT projects, industrial automation, and remote monitoring systems.
Explore Projects Built with Waveshare TTL-ETH

Explore Projects Built with Waveshare TTL-ETH
Common Applications and Use Cases
- Internet of Things (IoT) devices
- Remote data logging and monitoring
- Industrial automation and control systems
- Home automation projects
- Serial-to-Ethernet communication for microcontrollers
Technical Specifications
The following table outlines the key technical details of the Waveshare TTL-ETH module:
| Parameter | Value |
|---|---|
| Supply Voltage | 3.3V to 5V |
| Communication Protocol | UART (TTL level) |
| Baud Rate | 1200 bps to 115200 bps |
| Ethernet Standard | 10/100 Mbps Ethernet |
| Operating Temperature | -40°C to 85°C |
| Dimensions | 48mm × 28mm |
| Weight | 10g |
Pin Configuration and Descriptions
The Waveshare TTL-ETH module has a 7-pin interface. The pin configuration is as follows:
| Pin | Name | Description |
|---|---|---|
| 1 | VCC | Power input (3.3V to 5V) |
| 2 | GND | Ground |
| 3 | TXD | Transmit data (UART output, TTL level) |
| 4 | RXD | Receive data (UART input, TTL level) |
| 5 | CFG | Configuration pin (used to enter configuration mode when pulled low) |
| 6 | RST | Reset pin (active low, used to reset the module) |
| 7 | LINK | Ethernet link status indicator (active high when Ethernet connection is active) |
Usage Instructions
How to Use the Component in a Circuit
- Power Supply: Connect the
VCCpin to a 3.3V or 5V power source and theGNDpin to ground. - UART Communication: Connect the
TXDpin of the module to the RX pin of your microcontroller and theRXDpin to the TX pin of your microcontroller. - Ethernet Connection: Plug an Ethernet cable into the RJ45 port of the module to establish a network connection.
- Configuration Mode: To configure the module, pull the
CFGpin low during power-up. Use the provided configuration software or send AT commands via UART to set parameters such as IP address, baud rate, and communication mode. - Reset: Use the
RSTpin to reset the module if needed.
Important Considerations and Best Practices
- Ensure the power supply voltage is within the specified range (3.3V to 5V) to avoid damaging the module.
- Use a level shifter if your microcontroller operates at 1.8V or 2.5V logic levels, as the module operates at TTL levels (3.3V or 5V).
- Keep the Ethernet cable length within the recommended range for reliable communication (typically less than 100 meters for CAT5e or CAT6 cables).
- Avoid placing the module near high-frequency noise sources to maintain signal integrity.
Example: Connecting to an Arduino UNO
Below is an example of how to use the Waveshare TTL-ETH module with an Arduino UNO to send data over Ethernet.
Circuit Connections
- Connect
VCCto the 5V pin of the Arduino. - Connect
GNDto the GND pin of the Arduino. - Connect
TXDto the Arduino's RX (pin 0). - Connect
RXDto the Arduino's TX (pin 1). - Connect an Ethernet cable to the module's RJ45 port.
Arduino Code
#include <SoftwareSerial.h>

// Define RX and TX pins for software serial communication
SoftwareSerial ethSerial(10, 11); // RX = pin 10, TX = pin 11

void setup() {
  // Initialize serial communication with the module
  Serial.begin(9600); // For debugging via Serial Monitor
  ethSerial.begin(9600); // Communication with TTL-ETH module

  Serial.println("Waveshare TTL-ETH Module Test");
  ethSerial.println("Hello, Ethernet!"); // Send data to the module
}

void loop() {
  // Check if data is available from the module
  if (ethSerial.available()) {
    String data = ethSerial.readString();
    Serial.print("Received from Ethernet: ");
    Serial.println(data); // Print received data to Serial Monitor
  }

  // Check if data is available from Serial Monitor
  if (Serial.available()) {
    String data = Serial.readString();
    ethSerial.print(data); // Send data to the Ethernet module
  }
}
Troubleshooting and FAQs
Common Issues and Solutions
No Ethernet Connection Detected:
- Ensure the Ethernet cable is securely connected to the module and the network.
- Verify that the
LINKpin is high, indicating an active Ethernet connection. - Check the network configuration (IP address, subnet mask, etc.) using the configuration software.
No Data Transmission:
- Verify the UART connections (TXD and RXD) between the module and the microcontroller.
- Ensure the baud rate of the module matches the baud rate set in your microcontroller code.
- Check for any loose or incorrect wiring.
Module Not Entering Configuration Mode:
- Ensure the
CFGpin is pulled low during power-up. - Verify the power supply voltage is stable and within the specified range.
- Ensure the
Module Not Responding to Commands:
- Reset the module using the
RSTpin and try again. - Confirm that the module is powered on and the UART connections are correct.
- Reset the module using the
FAQs
Q: Can the module operate at 1.8V logic levels?
A: No, the module operates at TTL levels (3.3V or 5V). Use a level shifter for compatibility with 1.8V systems.
Q: What is the maximum baud rate supported by the module?
A: The module supports baud rates up to 115200 bps.
Q: Can I use the module with a Raspberry Pi?
A: Yes, the module can be used with a Raspberry Pi. Connect the UART pins to the Raspberry Pi's GPIO pins and configure the serial port accordingly.
Q: How do I update the firmware of the module?
A: Refer to the manufacturer's documentation for firmware update instructions, as this process may require specific tools or software.
Q: Is the module compatible with DHCP?
A: Yes, the module supports both static IP and DHCP configurations. Use the configuration software or AT commands to enable DHCP.