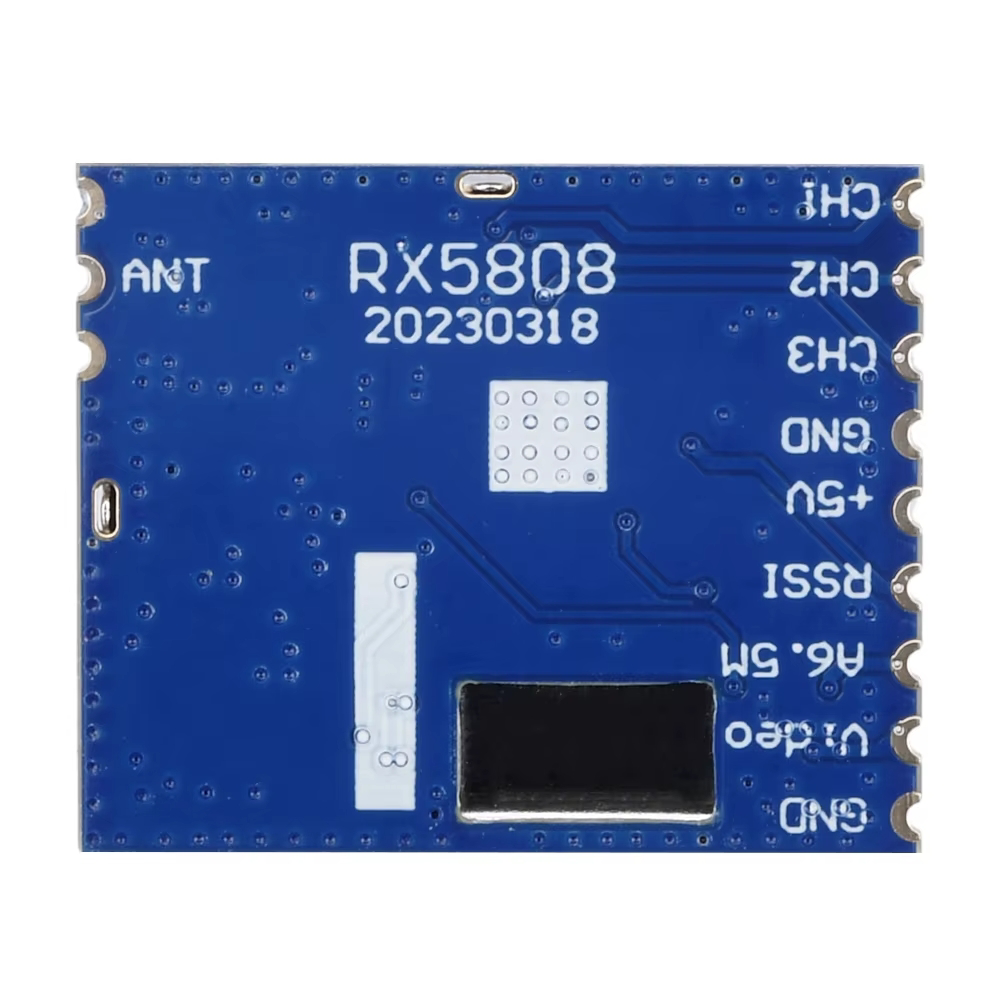
How to Use RX5808: Examples, Pinouts, and Specs
Introduction
The RX5808 is a high-performance 5.8GHz video receiver module widely used in FPV (First Person View) drone systems. It is designed to receive video signals from compatible 5.8GHz video transmitters, enabling real-time video feeds for drone pilots. The module supports multiple channels, allowing users to switch between different video sources with ease. Known for its reliability, low latency, and compact design, the RX5808 is a popular choice for hobbyists and professionals in the drone and RC (Radio Control) communities.
Explore Projects Built with RX5808


Explore Projects Built with RX5808
Common Applications and Use Cases
- FPV drone systems for real-time video transmission
- RC vehicles and aircraft for live video monitoring
- Wireless video transmission systems
- DIY FPV goggles and ground stations
- Multi-channel video monitoring setups
Technical Specifications
The RX5808 module is designed to deliver reliable performance in a compact form factor. Below are its key technical specifications:
| Parameter | Value |
|---|---|
| Operating Frequency | 5.8GHz |
| Number of Channels | 48 |
| Input Voltage | 3.3V to 5.5V |
| Current Consumption | ~70mA |
| Sensitivity | -90dBm |
| Video Output Impedance | 75Ω |
| Dimensions | 25mm x 25mm x 5mm |
| Weight | ~5g |
Pin Configuration and Descriptions
The RX5808 module typically has a 5-pin interface. Below is the pinout and description:
| Pin | Name | Description |
|---|---|---|
| 1 | GND | Ground connection for power and signal reference. |
| 2 | VCC | Power supply input (3.3V to 5.5V). |
| 3 | VIDEO_OUT | Analog video output signal. Connect to a display or video processing circuit. |
| 4 | RSSI | Received Signal Strength Indicator output (analog voltage proportional to signal strength). |
| 5 | SPI_DATA | SPI data input for channel selection and configuration. |
Usage Instructions
The RX5808 is straightforward to use in FPV and video transmission systems. Follow the steps below to integrate it into your project:
Basic Circuit Connection
- Power Supply: Connect the
VCCpin to a regulated 3.3V to 5.5V power source and theGNDpin to ground. - Video Output: Connect the
VIDEO_OUTpin to the video input of your display or video processing device. - Channel Selection: Use the
SPI_DATApin to configure the desired channel. This can be done using an external microcontroller or a pre-configured SPI controller. - RSSI Monitoring: Optionally, connect the
RSSIpin to an analog input on a microcontroller to monitor signal strength.
Important Considerations
- Antenna Selection: Use a high-quality 5.8GHz antenna for optimal performance. Circularly polarized antennas are recommended for FPV applications.
- Heat Management: The RX5808 can generate heat during operation. Ensure proper ventilation or add a small heatsink if necessary.
- Channel Interference: Avoid using channels that overlap with other devices operating in the 5.8GHz band to minimize interference.
- Power Supply: Use a stable and noise-free power source to prevent video signal distortion.
Example: Using RX5808 with Arduino UNO
The RX5808 can be controlled via SPI using an Arduino UNO. Below is an example code snippet to set the RX5808 to a specific channel:
#include <SPI.h>

// Define SPI pins for RX5808
const int SPI_CS = 10; // Chip Select pin
const int SPI_CLK = 13; // Clock pin
const int SPI_MOSI = 11; // Master Out Slave In pin

void setup() {
  // Initialize SPI communication
  SPI.begin();
  pinMode(SPI_CS, OUTPUT);
  digitalWrite(SPI_CS, HIGH); // Set CS pin high to disable RX5808

  // Set the desired channel (example: Channel 1)
  setChannel(0x00); // Replace 0x00 with the desired channel code
}

void loop() {
  // Main loop does nothing in this example
}

// Function to set RX5808 channel
void setChannel(byte channelCode) {
  digitalWrite(SPI_CS, LOW); // Enable RX5808
  SPI.transfer(channelCode); // Send channel code via SPI
  digitalWrite(SPI_CS, HIGH); // Disable RX5808
}
Note: Replace
channelCodewith the appropriate value for your desired channel. Refer to the RX5808 datasheet for channel codes.
Troubleshooting and FAQs
Common Issues and Solutions
No Video Output:
- Ensure the
VIDEO_OUTpin is properly connected to the display. - Verify that the RX5808 is powered correctly (3.3V to 5.5V).
- Check the antenna connection and ensure it is compatible with 5.8GHz.
- Ensure the
Poor Signal Quality:
- Use a high-quality antenna and ensure it is securely connected.
- Avoid operating in areas with heavy 5.8GHz interference.
- Monitor the
RSSIpin to check signal strength and adjust the antenna orientation.
Channel Selection Not Working:
- Verify the SPI connections and ensure the microcontroller is sending the correct channel code.
- Check for loose or damaged wires in the SPI interface.
Overheating:
- Ensure proper ventilation around the RX5808 module.
- Add a small heatsink if the module becomes excessively hot during operation.
FAQs
Q: Can the RX5808 be used without an SPI controller?
A: Yes, some RX5808 modules come with pre-configured channel buttons or DIP switches for manual channel selection. Check your module's specific features.
Q: What is the range of the RX5808?
A: The range depends on the transmitter power, antenna quality, and environmental conditions. With a good setup, it can achieve ranges of several hundred meters to a few kilometers.
Q: Can I use the RX5808 for audio transmission?
A: No, the RX5808 is designed for video transmission only and does not support audio signals.
Q: Is the RX5808 compatible with all 5.8GHz transmitters?
A: The RX5808 is compatible with most 5.8GHz transmitters that use standard FPV channel frequencies. Always verify compatibility with your specific transmitter.