Cirkit Designer
Your all-in-one circuit design IDE
Home /
Component Documentation
How to Use AI模块: Examples, Pinouts, and Specs
Introduction
AI模块是用于实现人工智能功能的电路组件,通常包括处理器、传感器和算法,以便进行数据分析和决策。它能够处理复杂的数据输入,执行机器学习模型,并输出智能化的结果。AI模块广泛应用于物联网设备、机器人、智能家居、自动驾驶汽车以及工业自动化等领域。
Explore Projects Built with AI模块
ESP8266 NodeMCU-Based Environmental Monitoring System with SIM900A GSM Communication
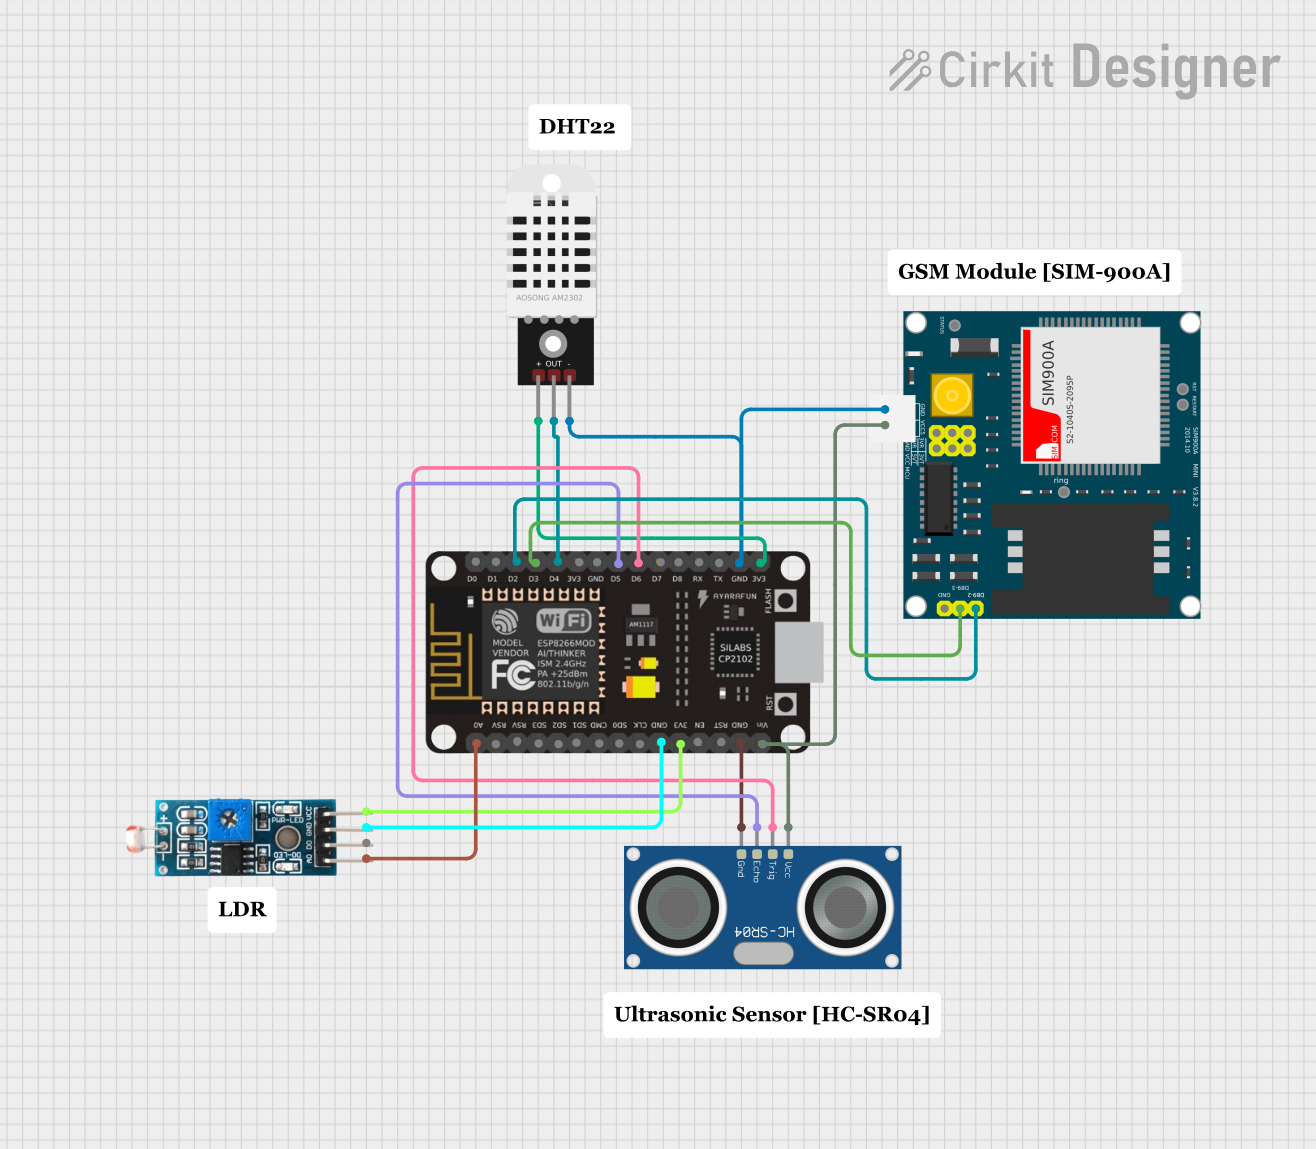
This is a sensor-based data acquisition system with GSM communication capability. It uses an ESP8266 NodeMCU to collect environmental data from a DHT22 sensor and light levels from an LDR, as well as distance measurements from an HC-SR04 ultrasonic sensor. The SIM900A GSM module enables the system to transmit the collected data over a cellular network.
Solar-Powered GSM/GPRS+GPS Tracker with Seeeduino XIAO

This circuit features an Ai Thinker A9G development board for GSM/GPRS and GPS/BDS connectivity, interfaced with a Seeeduino XIAO microcontroller for control and data processing. A solar cell, coupled with a TP4056 charging module, charges a 3.3V battery, which powers the system through a 3.3V regulator ensuring stable operation. The circuit likely serves for remote data communication and location tracking, with the capability to be powered by renewable energy and interfaced with additional sensors or input devices via the Seeeduino XIAO.
NodeMCU ESP8266-Based Smart Lift System with IR Sensors and Voice Commands

This circuit is an IoT-based smart lift system designed for blind and disabled individuals. It uses IR sensors, pushbuttons, an LCD screen, a DFPlayer module, and a VC-02 module to detect floor selection via finger presence or voice commands, and announces the selected floor through a speaker while displaying it on the LCD.
ESP32-Based Voice Assistant with Battery-Powered Microphone and Speaker

This circuit is a voice-controlled system that uses an ESP32 microcontroller to process audio input from a microphone, send the data to a Gemini API for speech-to-text conversion, and output responses through a speaker. It includes an IR sensor for additional input, an LED for status indication, and a battery with a charging module for power management.
Explore Projects Built with AI模块
ESP8266 NodeMCU-Based Environmental Monitoring System with SIM900A GSM Communication
This is a sensor-based data acquisition system with GSM communication capability. It uses an ESP8266 NodeMCU to collect environmental data from a DHT22 sensor and light levels from an LDR, as well as distance measurements from an HC-SR04 ultrasonic sensor. The SIM900A GSM module enables the system to transmit the collected data over a cellular network.
Solar-Powered GSM/GPRS+GPS Tracker with Seeeduino XIAO
This circuit features an Ai Thinker A9G development board for GSM/GPRS and GPS/BDS connectivity, interfaced with a Seeeduino XIAO microcontroller for control and data processing. A solar cell, coupled with a TP4056 charging module, charges a 3.3V battery, which powers the system through a 3.3V regulator ensuring stable operation. The circuit likely serves for remote data communication and location tracking, with the capability to be powered by renewable energy and interfaced with additional sensors or input devices via the Seeeduino XIAO.
NodeMCU ESP8266-Based Smart Lift System with IR Sensors and Voice Commands
This circuit is an IoT-based smart lift system designed for blind and disabled individuals. It uses IR sensors, pushbuttons, an LCD screen, a DFPlayer module, and a VC-02 module to detect floor selection via finger presence or voice commands, and announces the selected floor through a speaker while displaying it on the LCD.
ESP32-Based Voice Assistant with Battery-Powered Microphone and Speaker
This circuit is a voice-controlled system that uses an ESP32 microcontroller to process audio input from a microphone, send the data to a Gemini API for speech-to-text conversion, and output responses through a speaker. It includes an IR sensor for additional input, an LED for status indication, and a battery with a charging module for power management.
Common Applications and Use Cases
- 物联网设备:用于智能监控、预测性维护和数据分析。
- 机器人:实现路径规划、物体识别和语音交互。
- 智能家居:支持语音助手、面部识别和环境感知。
- 自动驾驶:用于图像处理、传感器融合和实时决策。
- 工业自动化:优化生产流程、检测缺陷和预测设备故障。
Technical Specifications
以下是AI模块的关键技术参数和引脚配置:
Key Technical Details
| Parameter | Specification |
|---|---|
| Processor | ARM Cortex-A系列或定制AI处理器 |
| Operating Voltage | 3.3V 或 5V |
| Power Consumption | 1W ~ 5W(取决于工作负载) |
| Communication Protocols | UART, I2C, SPI, Wi-Fi, Bluetooth |
| Memory | 512MB ~ 4GB(RAM) |
| Storage | 4GB ~ 64GB(eMMC或SD卡支持) |
| Operating Temperature | -20°C ~ 85°C |
| Dimensions | 40mm x 40mm x 10mm |
Pin Configuration and Descriptions
| Pin Number | Pin Name | Description |
|---|---|---|
| 1 | VCC | 电源输入(3.3V 或 5V) |
| 2 | GND | 地线 |
| 3 | TX | UART发送端口 |
| 4 | RX | UART接收端口 |
| 5 | SDA | I2C数据线 |
| 6 | SCL | I2C时钟线 |
| 7 | GPIO1 | 通用输入/输出端口,可配置为数字信号 |
| 8 | GPIO2 | 通用输入/输出端口,可配置为数字信号 |
| 9 | AI_IN | 模拟输入,用于传感器数据采集 |
| 10 | AI_OUT | 模拟输出,用于控制外部设备 |
Usage Instructions
How to Use the Component in a Circuit
- 电源连接:将VCC引脚连接到3.3V或5V电源,GND引脚连接到地。
- 通信接口:根据需求选择UART、I2C或SPI接口进行通信。
- UART接口:连接TX和RX引脚到主控设备的对应引脚。
- I2C接口:连接SDA和SCL引脚到主控设备的I2C总线。
- 传感器连接:将传感器的输出连接到AI_IN引脚,用于数据采集。
- 输出设备连接:将AI_OUT引脚连接到外部设备(如电机或LED),用于控制。
Important Considerations and Best Practices
- 确保电源电压与模块的工作电压匹配,避免损坏组件。
- 在通信接口中使用适当的电平转换器(如主控设备工作在不同电压)。
- 使用屏蔽线或滤波电容减少噪声干扰,特别是在模拟信号输入时。
- 定期更新模块的固件以获得最新的功能和性能优化。
Example: Connecting AI模块 to Arduino UNO
以下是通过UART接口将AI模块连接到Arduino UNO的示例代码:
#include <SoftwareSerial.h>

// 定义AI模块的RX和TX引脚
SoftwareSerial aiModule(10, 11); // RX = Pin 10, TX = Pin 11

void setup() {
  Serial.begin(9600); // 初始化Arduino的串口通信
  aiModule.begin(9600); // 初始化AI模块的串口通信

  Serial.println("AI模块初始化...");
  aiModule.println("Hello AI Module!"); // 向AI模块发送数据
}

void loop() {
  // 检查AI模块是否有数据发送
  if (aiModule.available()) {
    String data = aiModule.readString(); // 读取AI模块发送的数据
    Serial.println("从AI模块接收到的数据: " + data);
  }

  // 向AI模块发送测试数据
  if (Serial.available()) {
    String command = Serial.readString();
    aiModule.println(command); // 将命令发送到AI模块
  }
}
Troubleshooting and FAQs
Common Issues and Solutions
模块无法启动
- 原因:电源电压不足或接线错误。
- 解决方案:检查电源电压是否为3.3V或5V,确保VCC和GND正确连接。
通信失败
- 原因:波特率设置错误或引脚连接不正确。
- 解决方案:确认主控设备和AI模块的波特率一致,检查通信引脚连接。
数据读取异常
- 原因:信号干扰或传感器故障。
- 解决方案:使用屏蔽线或滤波电容减少干扰,检查传感器是否正常工作。
模块过热
- 原因:长时间高负载运行或散热不良。
- 解决方案:减少模块的工作负载,增加散热措施(如散热片或风扇)。
FAQs
Q: AI模块支持哪些编程语言?
A: AI模块通常支持Python、C++和Java等语言,具体取决于模块的开发环境。Q: 是否可以同时使用多个通信接口?
A: 是的,但需要确保每个接口的资源不会冲突,并正确配置引脚。Q: 如何更新AI模块的固件?
A: 使用模块提供的工具或通过串口连接到PC进行固件更新,具体步骤请参考模块的用户手册。Q: AI模块是否支持边缘计算?
A: 是的,大多数AI模块支持边缘计算,可以在本地处理数据而无需依赖云端。