
How to Use 4 Point Terminal Block: Examples, Pinouts, and Specs
 Design with 4 Point Terminal Block in Cirkit Designer
Introduction
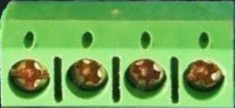
A 4 Point Terminal Block is a type of electrical connector designed to facilitate the secure and organized connection of multiple wires to a single point. It features four terminals, each capable of accommodating a wire, making it an essential component in electrical and electronic systems. Terminal blocks are widely used in control panels, electrical junctions, and industrial automation systems due to their reliability and ease of use.
Explore Projects Built with 4 Point Terminal Block
 Open Project in Cirkit Designer
 Open Project in Cirkit Designer
 Open Project in Cirkit Designer
 Open Project in Cirkit Designer
Explore Projects Built with 4 Point Terminal Block
Open Project in Cirkit DesignerOpen Project in Cirkit DesignerOpen Project in Cirkit DesignerOpen Project in Cirkit DesignerCommon Applications and Use Cases
- Control Panels: Used to connect and organize wiring for switches, relays, and other components.
- Electrical Junctions: Provides a secure connection point for multiple wires in electrical systems.
- Industrial Automation: Facilitates wiring in PLCs (Programmable Logic Controllers) and other automation equipment.
- Prototyping and Testing: Allows for quick and temporary connections during circuit development.
Technical Specifications
Key Technical Details
- Number of Terminals: 4
- Rated Voltage: Typically 300V (varies by model)
- Rated Current: 10A to 30A (depending on the terminal block type)
- Wire Gauge Compatibility: 22 AWG to 12 AWG
- Material: Insulating body made of polyamide or thermoplastic; terminals made of brass or copper alloy.
- Mounting Type: Screw mount or DIN rail mount (varies by model)
- Operating Temperature: -40°C to 105°C (varies by material)
Pin Configuration and Descriptions
The 4 Point Terminal Block does not have traditional "pins" like an IC but instead features screw terminals for wire connections. Below is a description of the terminal layout:
| Terminal Number | Description | Notes |
|---|---|---|
| 1 | Wire connection point 1 | Connect the first wire here. |
| 2 | Wire connection point 2 | Connect the second wire here. |
| 3 | Wire connection point 3 | Connect the third wire here. |
| 4 | Wire connection point 4 | Connect the fourth wire here. |
Usage Instructions
How to Use the Component in a Circuit
- Prepare the Wires: Strip the insulation from the ends of the wires you intend to connect. Ensure the exposed conductor length matches the terminal block's specifications (typically 5-7mm).
- Insert the Wires: Loosen the screws on the terminal block using a screwdriver. Insert the stripped wire ends into the corresponding terminal slots.
- Secure the Connection: Tighten the screws to clamp the wires securely in place. Avoid overtightening, as this may damage the wire or terminal.
- Connect to the Circuit: Mount the terminal block in your circuit (e.g., on a DIN rail or panel) and connect the other ends of the wires to the appropriate components.
Important Considerations and Best Practices
- Wire Gauge: Ensure the wire gauge is compatible with the terminal block to avoid loose connections or damage.
- Tightening Torque: Use the recommended torque for tightening screws to ensure a secure connection without damaging the terminal.
- Insulation: Verify that no exposed conductor is visible outside the terminal to prevent short circuits.
- Mounting: If using a DIN rail mount terminal block, ensure it is securely clipped onto the rail.
- Polarity: For circuits with polarity (e.g., DC circuits), label the terminals to avoid wiring errors.
Example: Connecting to an Arduino UNO
While a 4 Point Terminal Block is not directly connected to an Arduino UNO, it can be used to organize and distribute power or signals to multiple components in an Arduino-based project. Below is an example of how to use a terminal block to distribute power from the Arduino's 5V pin:
// Example: Distributing 5V power using a 4 Point Terminal Block
// Connect the Arduino's 5V pin to one terminal of the block.
// Use the remaining terminals to power multiple components.

void setup() {
  // No specific code is required for the terminal block itself.
  // Ensure proper wiring and secure connections.
}

void loop() {
  // Your main code logic goes here.
  // For example, controlling LEDs or sensors powered via the terminal block.
}
Wiring Notes:
- Connect the Arduino's 5V pin to Terminal 1 of the block.
- Use Terminals 2, 3, and 4 to distribute power to LEDs, sensors, or other components.
- Ensure all ground connections are properly shared.
Troubleshooting and FAQs
Common Issues and Solutions
Loose Connections:
- Issue: Wires are not securely clamped, leading to intermittent connections.
- Solution: Ensure screws are tightened to the recommended torque. Check that the wire gauge matches the terminal block's specifications.
Overheating:
- Issue: Terminal block becomes hot during operation.
- Solution: Verify that the current passing through the terminal block does not exceed its rated current. Use thicker wires if necessary.
Short Circuits:
- Issue: Exposed conductor causes a short circuit.
- Solution: Ensure all wires are properly stripped and inserted, with no exposed conductor outside the terminal.
Wire Slippage:
- Issue: Wires slip out of the terminal block.
- Solution: Reinsert the wires and tighten the screws securely. Use ferrules for stranded wires to improve grip.
FAQs
Q: Can I use a 4 Point Terminal Block for high-frequency signals?
A: Terminal blocks are generally suitable for low-frequency signals and power distribution. For high-frequency signals, consider using specialized connectors.Q: How do I mount the terminal block?
A: Depending on the model, you can screw it onto a panel or clip it onto a DIN rail.Q: Can I connect wires of different gauges to the same terminal block?
A: Yes, as long as the wire gauges are within the terminal block's specified range. However, ensure each wire is securely clamped.Q: Is the terminal block reusable?
A: Yes, terminal blocks are reusable. Simply loosen the screws to remove the wires and reuse the block in another application.
This concludes the documentation for the 4 Point Terminal Block.