Cirkit Designer Logo
Cirkit Designer
Your all-in-one circuit design IDE
Home / 
Component Documentation

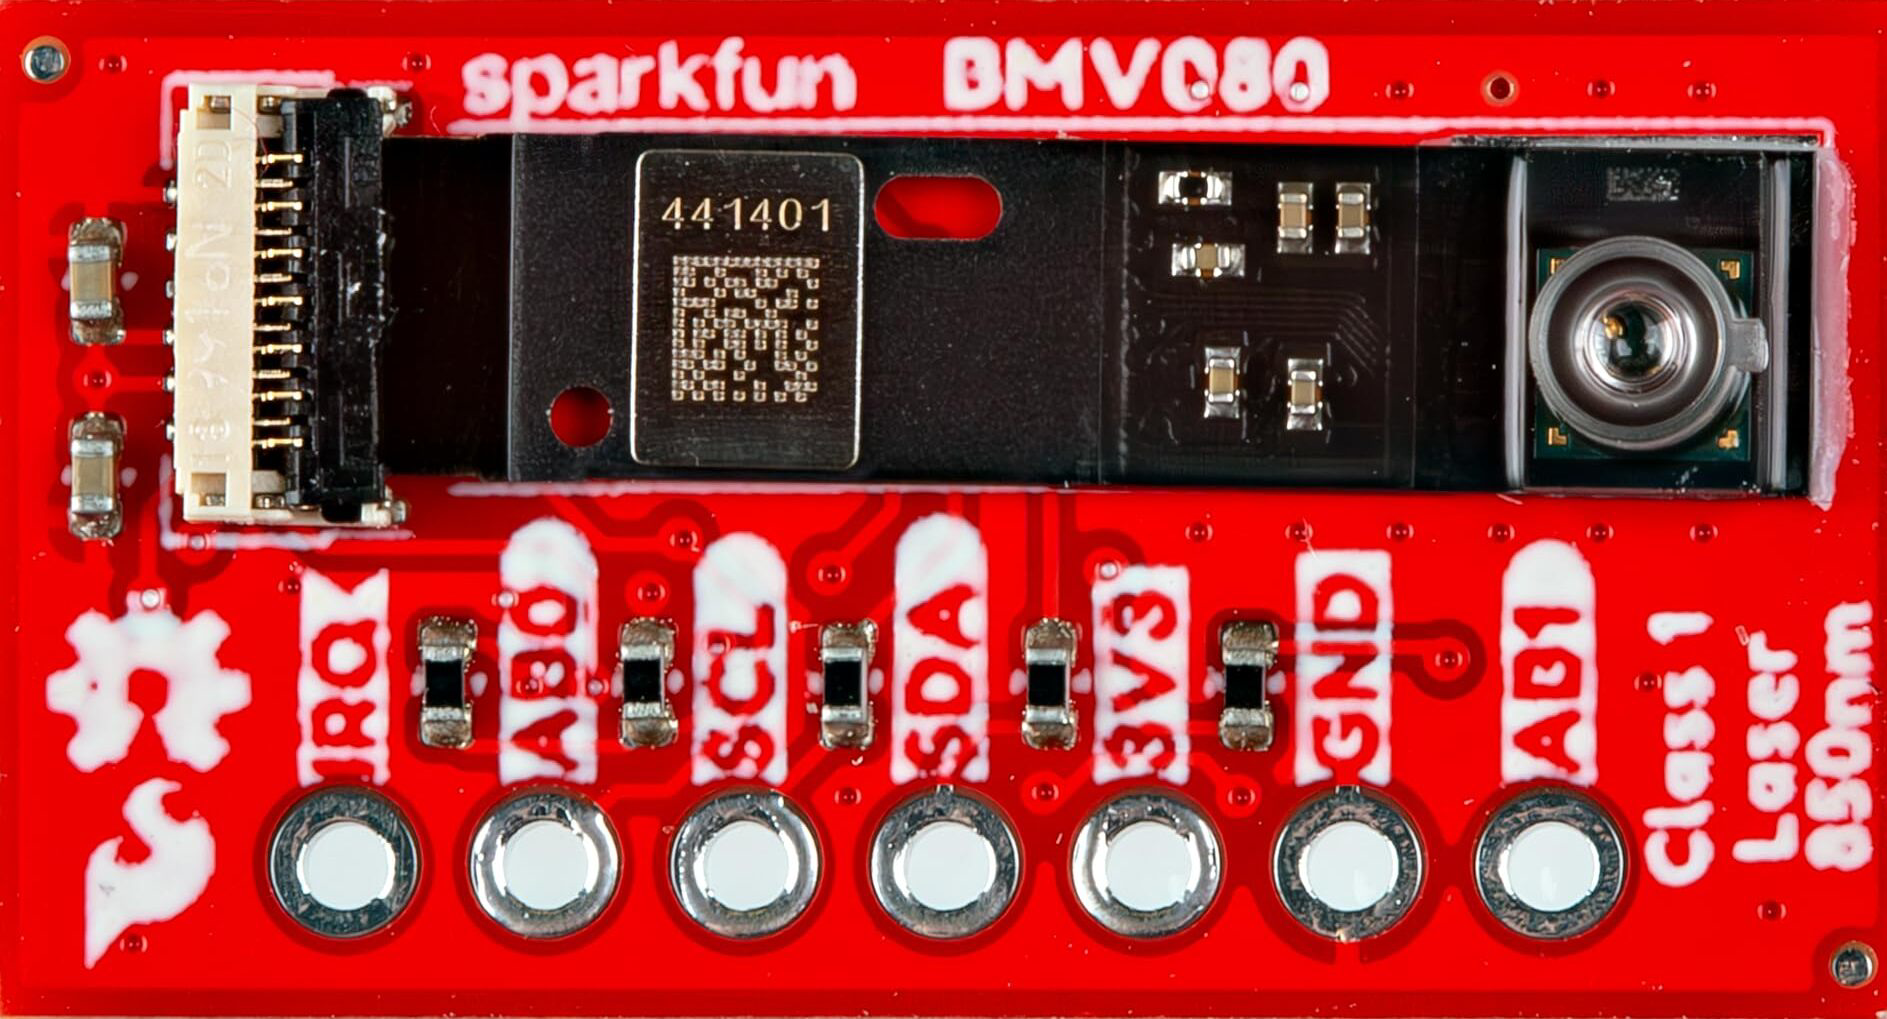
How to Use BOSCH BMV080 Particle Sensor: Examples, Pinouts, and Specs

Image of BOSCH BMV080 Particle Sensor
Cirkit Designer LogoDesign with BOSCH BMV080 Particle Sensor in Cirkit Designer

Introduction

The BOSCH BMV080 is a compact and highly accurate air quality sensor designed to detect particulate matter (PM) in the air. It provides real-time data on air pollution levels, making it ideal for applications such as air purifiers, HVAC systems, smart home devices, and environmental monitoring systems. The sensor is capable of detecting fine particles, including PM2.5 and PM10, which are critical indicators of air quality.

Explore Projects Built with BOSCH BMV080 Particle Sensor

Use Cirkit Designer to design, explore, and prototype these projects online. Some projects support real-time simulation. Click "Open Project" to start designing instantly!
ESP32-Based Air Quality Monitoring Station with BMP280, SGP41, and PMS5003 Sensors
Image of indoor-sensors-v6: A project utilizing BOSCH BMV080 Particle Sensor in a practical application
This circuit is designed for environmental sensing and monitoring, featuring multiple sensors including a BMP280 for barometric pressure and temperature, a SenseAir S8 for CO2 levels, a PMS5003 for particulate matter, and an SGP41 for VOC and NOx levels. These sensors are interfaced with an ESP32 microcontroller, which likely serves as the central processing unit to collect, process, and possibly transmit sensor data. The ESP32 is connected to the sensors using I2C (SDA/SCL lines) and serial communication (RX/TX lines), and it provides power to the sensors (3V3/VIN lines).
Cirkit Designer LogoOpen Project in Cirkit Designer
Arduino Nano-Based Wearable Gesture Control Interface with Bluetooth Connectivity
Image of spine: A project utilizing BOSCH BMV080 Particle Sensor in a practical application
This is a battery-powered sensor system with Bluetooth communication, featuring an Arduino Nano for control, an MPU-6050 for motion sensing, and an HC-05 module for wireless data transmission. It includes a vibration motor for haptic feedback, a flex resistor as an additional sensor, and a piezo speaker and LED for alerts or status indication.
Cirkit Designer LogoOpen Project in Cirkit Designer
Arduino BMP180 Tire Pressure Monitoring System with LCD Display and NRF24L01 Wireless Transmission
Image of TPMS: A project utilizing BOSCH BMV080 Particle Sensor in a practical application
This circuit is designed for a Tire Pressure Monitoring System using an ATmega328P microcontroller. It reads temperature and pressure data from BMP180 sensors, displays the readings on a 16x2 LCD, and transmits the data wirelessly via an NRF24L01 module. The circuit is powered by a 5V battery, with a 3.3V battery specifically for the NRF24L01, and includes a resistor for the LCD backlight.
Cirkit Designer LogoOpen Project in Cirkit Designer
ESP32-Based Environmental Monitoring System with Multiple Sensors and OLED Display
Image of meat_spoilage: A project utilizing BOSCH BMV080 Particle Sensor in a practical application
This circuit is an environmental monitoring system that uses an ESP32 microcontroller to collect data from various sensors, including gas sensors (MQ-135, MQ-136), a humidity and temperature sensor (DHT11), a VOC and NOx sensor (SGP41), and a color sensor (TCS230). The collected data is displayed on an OLED screen and can be transmitted via Bluetooth, with the ESP32 also handling RF signal decoding and transmission.
Cirkit Designer LogoOpen Project in Cirkit Designer

Explore Projects Built with BOSCH BMV080 Particle Sensor

Use Cirkit Designer to design, explore, and prototype these projects online. Some projects support real-time simulation. Click "Open Project" to start designing instantly!
Image of indoor-sensors-v6: A project utilizing BOSCH BMV080 Particle Sensor in a practical application
ESP32-Based Air Quality Monitoring Station with BMP280, SGP41, and PMS5003 Sensors
This circuit is designed for environmental sensing and monitoring, featuring multiple sensors including a BMP280 for barometric pressure and temperature, a SenseAir S8 for CO2 levels, a PMS5003 for particulate matter, and an SGP41 for VOC and NOx levels. These sensors are interfaced with an ESP32 microcontroller, which likely serves as the central processing unit to collect, process, and possibly transmit sensor data. The ESP32 is connected to the sensors using I2C (SDA/SCL lines) and serial communication (RX/TX lines), and it provides power to the sensors (3V3/VIN lines).
Cirkit Designer LogoOpen Project in Cirkit Designer
Image of spine: A project utilizing BOSCH BMV080 Particle Sensor in a practical application
Arduino Nano-Based Wearable Gesture Control Interface with Bluetooth Connectivity
This is a battery-powered sensor system with Bluetooth communication, featuring an Arduino Nano for control, an MPU-6050 for motion sensing, and an HC-05 module for wireless data transmission. It includes a vibration motor for haptic feedback, a flex resistor as an additional sensor, and a piezo speaker and LED for alerts or status indication.
Cirkit Designer LogoOpen Project in Cirkit Designer
Image of TPMS: A project utilizing BOSCH BMV080 Particle Sensor in a practical application
Arduino BMP180 Tire Pressure Monitoring System with LCD Display and NRF24L01 Wireless Transmission
This circuit is designed for a Tire Pressure Monitoring System using an ATmega328P microcontroller. It reads temperature and pressure data from BMP180 sensors, displays the readings on a 16x2 LCD, and transmits the data wirelessly via an NRF24L01 module. The circuit is powered by a 5V battery, with a 3.3V battery specifically for the NRF24L01, and includes a resistor for the LCD backlight.
Cirkit Designer LogoOpen Project in Cirkit Designer
Image of meat_spoilage: A project utilizing BOSCH BMV080 Particle Sensor in a practical application
ESP32-Based Environmental Monitoring System with Multiple Sensors and OLED Display
This circuit is an environmental monitoring system that uses an ESP32 microcontroller to collect data from various sensors, including gas sensors (MQ-135, MQ-136), a humidity and temperature sensor (DHT11), a VOC and NOx sensor (SGP41), and a color sensor (TCS230). The collected data is displayed on an OLED screen and can be transmitted via Bluetooth, with the ESP32 also handling RF signal decoding and transmission.
Cirkit Designer LogoOpen Project in Cirkit Designer

Common Applications and Use Cases

  • Air purifiers and air quality monitors
  • HVAC systems for smart buildings
  • IoT-based environmental monitoring
  • Wearable air quality devices
  • Industrial and outdoor air quality measurement

Technical Specifications

The BMV080 is designed for low power consumption and high precision, making it suitable for battery-powered and compact devices. Below are the key technical details:

Key Technical Details

Parameter Value
Supply Voltage 3.3V to 5.0V
Operating Current 15 mA (typical)
Standby Current < 1 mA
Particle Size Detection PM1.0, PM2.5, PM10
Measurement Range 0 to 1,000 µg/m³
Communication Interface I²C, UART
Operating Temperature -10°C to +60°C
Dimensions 30 mm x 20 mm x 10 mm

Pin Configuration and Descriptions

The BMV080 has a simple pinout for easy integration into various systems. Below is the pin configuration:

Pin Number Pin Name Description
1 VCC Power supply input (3.3V to 5.0V)
2 GND Ground
3 SDA I²C data line or UART TX
4 SCL I²C clock line or UART RX
5 INT Interrupt pin for data-ready signal (optional)

Usage Instructions

The BMV080 is straightforward to use in a circuit. It supports both I²C and UART communication protocols, allowing flexibility in interfacing with microcontrollers like the Arduino UNO.

Steps to Use the BMV080

  1. Power the Sensor: Connect the VCC pin to a 3.3V or 5.0V power source and the GND pin to ground.
  2. Choose Communication Protocol: Decide whether to use I²C or UART. For I²C, connect the SDA and SCL pins to the corresponding pins on your microcontroller. For UART, connect SDA to TX and SCL to RX.
  3. Initialize Communication: Configure your microcontroller to communicate with the sensor using the chosen protocol.
  4. Read Data: Use the appropriate commands to read PM1.0, PM2.5, and PM10 values from the sensor.
  5. Process Data: Convert the raw data into meaningful air quality metrics for your application.

Important Considerations and Best Practices

  • Power Supply: Ensure a stable power supply to avoid measurement inaccuracies.
  • Placement: Place the sensor in an area with good airflow for accurate readings.
  • Avoid Contamination: Keep the sensor away from dust and debris to maintain long-term accuracy.
  • Protocol Selection: Use I²C for short-distance communication and UART for longer distances.

Example Code for Arduino UNO (I²C)

Below is an example of how to interface the BMV080 with an Arduino UNO using the I²C protocol:

#include <Wire.h>

// BMV080 I²C address
#define BMV080_I2C_ADDR 0x76

void setup() {
  Serial.begin(9600); // Initialize serial communication for debugging
  Wire.begin();       // Initialize I²C communication

  // Check sensor connection
  Wire.beginTransmission(BMV080_I2C_ADDR);
  if (Wire.endTransmission() == 0) {
    Serial.println("BMV080 connected successfully!");
  } else {
    Serial.println("Failed to connect to BMV080.");
    while (1); // Halt execution if sensor is not detected
  }
}

void loop() {
  // Request data from the sensor
  Wire.beginTransmission(BMV080_I2C_ADDR);
  Wire.write(0x00); // Command to read PM data (example command)
  Wire.endTransmission();
  
  Wire.requestFrom(BMV080_I2C_ADDR, 6); // Request 6 bytes of data
  if (Wire.available() == 6) {
    uint16_t pm1_0 = (Wire.read() << 8) | Wire.read(); // PM1.0 value
    uint16_t pm2_5 = (Wire.read() << 8) | Wire.read(); // PM2.5 value
    uint16_t pm10  = (Wire.read() << 8) | Wire.read(); // PM10 value

    // Print the values to the serial monitor
    Serial.print("PM1.0: ");
    Serial.print(pm1_0);
    Serial.print(" µg/m³, PM2.5: ");
    Serial.print(pm2_5);
    Serial.print(" µg/m³, PM10: ");
    Serial.print(pm10);
    Serial.println(" µg/m³");
  } else {
    Serial.println("Failed to read data from BMV080.");
  }

  delay(1000); // Wait 1 second before the next reading
}

Troubleshooting and FAQs

Common Issues and Solutions

  1. Sensor Not Detected:

    • Cause: Incorrect wiring or power supply.
    • Solution: Double-check the connections and ensure the sensor is powered correctly.
  2. Inaccurate Readings:

    • Cause: Poor placement or contamination.
    • Solution: Place the sensor in a well-ventilated area and clean it periodically.
  3. Communication Errors:

    • Cause: Incorrect I²C address or protocol mismatch.
    • Solution: Verify the I²C address and ensure the microcontroller is configured for the correct protocol.

FAQs

Q: Can the BMV080 detect gases like CO2 or VOCs?
A: No, the BMV080 is specifically designed to detect particulate matter (PM1.0, PM2.5, PM10). For gas detection, consider using a dedicated gas sensor.

Q: Is the BMV080 suitable for outdoor use?
A: Yes, but it should be housed in a protective enclosure to shield it from extreme weather conditions and direct exposure to contaminants.

Q: Can I use the BMV080 with a 5V microcontroller?
A: Yes, the BMV080 supports a supply voltage range of 3.3V to 5.0V, making it compatible with both 3.3V and 5V systems.