Cirkit Designer Logo
Cirkit Designer
Your all-in-one circuit design IDE
Home / 
Component Documentation

How to Use WiFi LoRa 32 V3: Examples, Pinouts, and Specs

Image of WiFi LoRa 32 V3
Cirkit Designer LogoDesign with WiFi LoRa 32 V3 in Cirkit Designer

Introduction

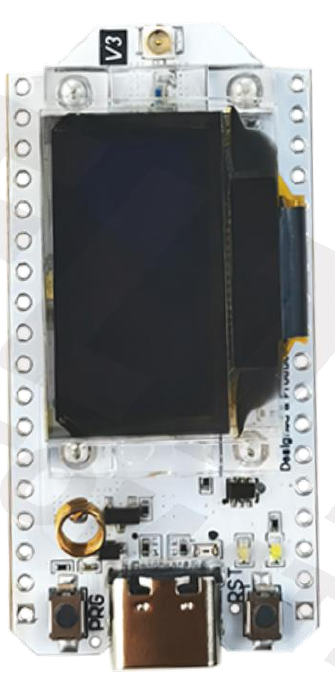
The WiFi LoRa 32 V3 is a versatile and powerful development board that combines the features of the ESP32 microcontroller with LoRa (Long Range) wireless communication technology. This board is designed by Heltec and is ideal for IoT applications due to its low-power consumption, long-range wireless capabilities, and multiple communication interfaces. Common applications include remote sensors, home automation, and other IoT projects where wireless connectivity is essential.

Explore Projects Built with WiFi LoRa 32 V3

Use Cirkit Designer to design, explore, and prototype these projects online. Some projects support real-time simulation. Click "Open Project" to start designing instantly!
WiFi LoRa Environmental Monitoring System with INMP441 Mic and Multiple Sensors
Image of ba_sensing: A project utilizing WiFi LoRa 32 V3 in a practical application
This circuit is a solar-powered environmental monitoring system that uses a WiFi LoRa 32V3 microcontroller to collect data from various sensors, including a microphone, UV light sensor, air quality sensor, and temperature/humidity/pressure sensor. The collected data is processed and transmitted via LoRa communication, making it suitable for remote environmental data logging and monitoring applications.
Cirkit Designer LogoOpen Project in Cirkit Designer
ESP32 and LoRa SX1278 Based Wireless Communication Module
Image of Esp 32 as Receiver or Sender: A project utilizing WiFi LoRa 32 V3 in a practical application
This circuit integrates an ESP32 microcontroller with a LoRa Ra-02 SX1278 module to enable long-range wireless communication. The ESP32 handles the control and data processing, while the LoRa module provides the communication link. The connections include SPI interface and control signals between the ESP32 and the LoRa module, as well as shared power and ground lines.
Cirkit Designer LogoOpen Project in Cirkit Designer
ESP32-Based LoRa Communication Module
Image of Receptor_Proyect_Of_Grade: A project utilizing WiFi LoRa 32 V3 in a practical application
This circuit integrates an ESP32 microcontroller with a LoRa Ra-02 SX1278 module for long-range wireless communication. The ESP32's digital pins are connected to the LoRa module's SPI interface (MOSI, MISO, SCK, NSS) and control lines (RST, DI00) to enable data transmission and reception. The circuit is likely designed for IoT applications requiring low-power, wide-area network connectivity.
Cirkit Designer LogoOpen Project in Cirkit Designer
ESP32 and LoRa Communication Module for IoT Applications
Image of ESP32 LoRa: A project utilizing WiFi LoRa 32 V3 in a practical application
This circuit integrates an ESP32 microcontroller with a LoRa module for wireless communication, powered by an MB102 breadboard power supply. The ESP32 handles the control signals and data exchange with the LoRa module, enabling long-range, low-power data transmission.
Cirkit Designer LogoOpen Project in Cirkit Designer

Explore Projects Built with WiFi LoRa 32 V3

Use Cirkit Designer to design, explore, and prototype these projects online. Some projects support real-time simulation. Click "Open Project" to start designing instantly!
Image of ba_sensing: A project utilizing WiFi LoRa 32 V3 in a practical application
WiFi LoRa Environmental Monitoring System with INMP441 Mic and Multiple Sensors
This circuit is a solar-powered environmental monitoring system that uses a WiFi LoRa 32V3 microcontroller to collect data from various sensors, including a microphone, UV light sensor, air quality sensor, and temperature/humidity/pressure sensor. The collected data is processed and transmitted via LoRa communication, making it suitable for remote environmental data logging and monitoring applications.
Cirkit Designer LogoOpen Project in Cirkit Designer
Image of Esp 32 as Receiver or Sender: A project utilizing WiFi LoRa 32 V3 in a practical application
ESP32 and LoRa SX1278 Based Wireless Communication Module
This circuit integrates an ESP32 microcontroller with a LoRa Ra-02 SX1278 module to enable long-range wireless communication. The ESP32 handles the control and data processing, while the LoRa module provides the communication link. The connections include SPI interface and control signals between the ESP32 and the LoRa module, as well as shared power and ground lines.
Cirkit Designer LogoOpen Project in Cirkit Designer
Image of Receptor_Proyect_Of_Grade: A project utilizing WiFi LoRa 32 V3 in a practical application
ESP32-Based LoRa Communication Module
This circuit integrates an ESP32 microcontroller with a LoRa Ra-02 SX1278 module for long-range wireless communication. The ESP32's digital pins are connected to the LoRa module's SPI interface (MOSI, MISO, SCK, NSS) and control lines (RST, DI00) to enable data transmission and reception. The circuit is likely designed for IoT applications requiring low-power, wide-area network connectivity.
Cirkit Designer LogoOpen Project in Cirkit Designer
Image of ESP32 LoRa: A project utilizing WiFi LoRa 32 V3 in a practical application
ESP32 and LoRa Communication Module for IoT Applications
This circuit integrates an ESP32 microcontroller with a LoRa module for wireless communication, powered by an MB102 breadboard power supply. The ESP32 handles the control signals and data exchange with the LoRa module, enabling long-range, low-power data transmission.
Cirkit Designer LogoOpen Project in Cirkit Designer

Technical Specifications

Key Features

  • Microcontroller: ESP32 (dual-core, 32-bit)
  • Wireless Connectivity: Wi-Fi (802.11 b/g/n), Bluetooth (v4.2 BR/EDR and BLE), LoRa
  • Frequency Range: 868/915MHz
  • Display: 0.96-inch OLED (128x64 pixels)
  • Operating Voltage: 3.3V
  • Input Voltage: 7-12V via micro USB or Li-Po battery
  • Digital I/O Pins: 22
  • Analog Input Pins: 3
  • Interfaces: I2C, SPI, UART
  • Flash Memory: 4MB
  • SRAM: 520KB
  • LoRa Chip: SX1276/SX1278

Pin Configuration

Pin Number Function Description
1 GND Ground
2 3V3 3.3V power supply
3 5V 5V power supply
4 VIN Input voltage for battery charging
5 G23 GPIO23, can be used as SCL for I2C
6 G22 GPIO22, can be used as SDA for I2C
... ... ...
N GND Ground

Note: This is a simplified representation. Please refer to the official datasheet for the complete pinout and alternate functions.

Usage Instructions

Basic Setup

  1. Powering the Board: The WiFi LoRa 32 V3 can be powered through the micro USB port or a Li-Po battery. Ensure that the input voltage does not exceed the recommended range to prevent damage.

  2. Installing Libraries: To use the board with Arduino IDE, you need to install the ESP32 board package and the libraries for LoRa and OLED display.

  3. Connecting to a Computer: Use a micro USB cable to connect the board to your computer. Select the appropriate board and port in the Arduino IDE.

Programming the Board

  1. Writing Code: Write your sketch in the Arduino IDE or your preferred development environment.

  2. Uploading Code: Click the upload button in the Arduino IDE to compile and upload your sketch to the board.

Best Practices

  • Always disconnect the board from power sources before making or altering connections.
  • Use proper ESD precautions when handling the board to avoid damaging sensitive components.
  • Ensure antenna is connected before transmitting LoRa signals to prevent damage to the LoRa transceiver.

Example Code

Here is a simple example of how to send a "Hello, World!" message over LoRa:

#include <SPI.h>
#include <LoRa.h>

// Replace with your network settings
const long frequency = 915E6; // LoRa Frequency

void setup() {
  LoRa.begin(frequency); // Initialize LoRa
}

void loop() {
  LoRa.beginPacket(); // Start a new packet
  LoRa.print("Hello, World!"); // Add payload
  LoRa.endPacket(); // Finish packet and send it
  delay(1000); // Wait for a second before next transmission
}

Note: Ensure you have the correct frequency for your region (868E6 for Europe, 915E6 for North America).

Troubleshooting and FAQs

Common Issues

  • Board not recognized by computer: Ensure the USB cable is properly connected and the board is powered on. Check your computer's device manager for any unrecognized devices.
  • LoRa transmission not working: Verify that the antenna is properly connected and the frequency settings match your region's regulations.
  • OLED not displaying: Check the connections and ensure the OLED library is correctly installed and initialized in your code.

FAQs

Q: Can I use the WiFi LoRa 32 V3 with a battery? A: Yes, the board has a provision for a Li-Po battery and includes charging circuitry.

Q: What is the range of the LoRa communication? A: LoRa can achieve a range of up to 10 km in rural areas with clear line of sight. Urban environments will have a reduced range due to interference.

Q: How do I connect the board to WiFi? A: Use the WiFi.h library included with the ESP32 board package to connect to WiFi networks. You can use the WiFi.begin(ssid, password) function to initiate a connection.

For more detailed troubleshooting, refer to the Heltec WiFi LoRa 32 V3 forums and community resources.