How to Use Mp3 module: Examples, Pinouts, and Specs
Introduction
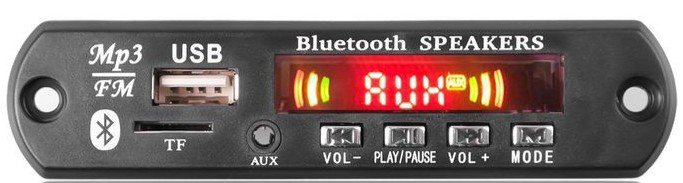
The MP3 module is a versatile electronic component designed to play MP3 audio files. It typically includes features such as audio output, control buttons, and storage for audio files. This module is widely used in various applications, including:
- DIY audio projects
- Interactive installations
- Voice announcements in embedded systems
- Portable audio players
- Educational projects
Explore Projects Built with Mp3 module
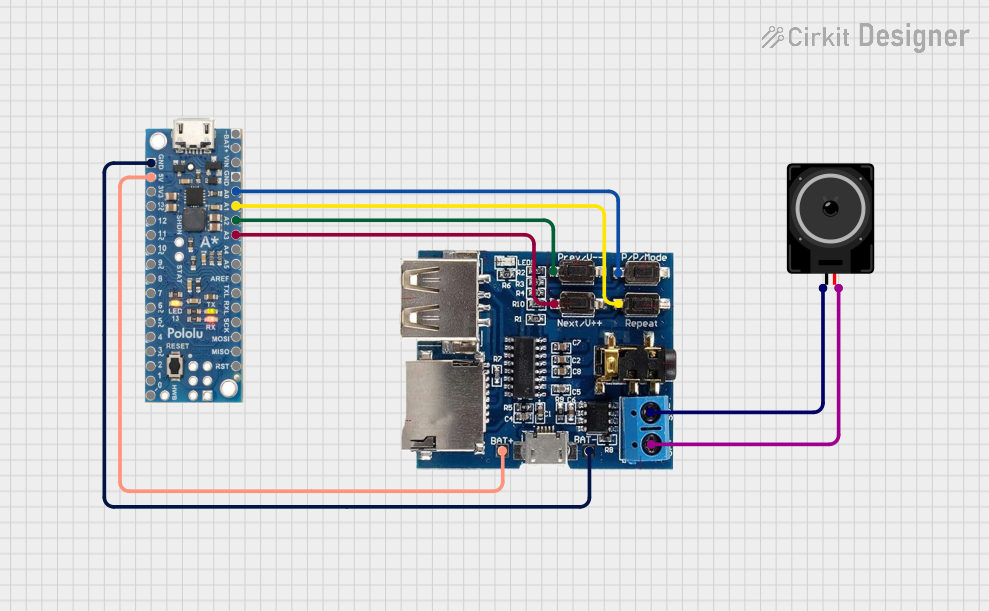


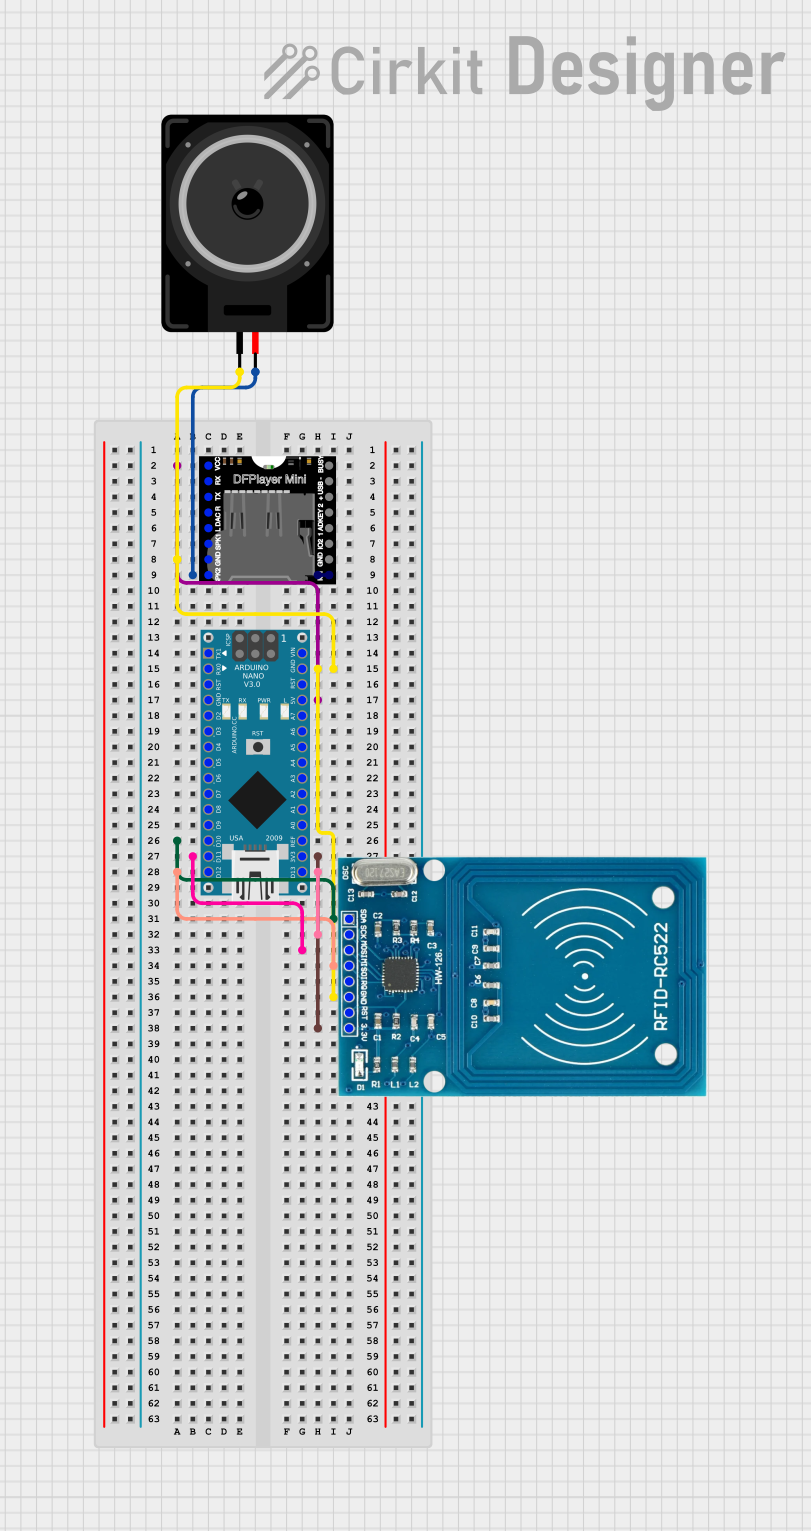
Explore Projects Built with Mp3 module
Technical Specifications
Below are the key technical details and pin configuration for a typical MP3 module:
Key Technical Details
| Parameter | Value |
|---|---|
| Operating Voltage | 3.3V - 5V |
| Operating Current | 20mA - 30mA |
| Audio Output | Stereo, 3.5mm jack or pins |
| Storage | MicroSD card, USB flash drive |
| Control Interface | UART, GPIO buttons |
| Supported Formats | MP3, WAV |
Pin Configuration and Descriptions
| Pin No. | Pin Name | Description |
|---|---|---|
| 1 | VCC | Power supply (3.3V - 5V) |
| 2 | GND | Ground |
| 3 | RX | UART Receive pin (for serial communication) |
| 4 | TX | UART Transmit pin (for serial communication) |
| 5 | SPK+ | Speaker positive terminal |
| 6 | SPK- | Speaker negative terminal |
| 7 | BTN1 | Control button 1 (e.g., Play/Pause) |
| 8 | BTN2 | Control button 2 (e.g., Next Track) |
| 9 | BTN3 | Control button 3 (e.g., Previous Track) |
| 10 | USB | USB interface for flash drive (if available) |
Usage Instructions
How to Use the MP3 Module in a Circuit
- Power Supply: Connect the VCC pin to a 3.3V or 5V power supply and the GND pin to the ground.
- Audio Output: Connect a speaker to the SPK+ and SPK- pins or use the 3.5mm audio jack if available.
- Control Interface:
- For UART control, connect the RX and TX pins to the corresponding pins on a microcontroller (e.g., Arduino).
- For button control, connect buttons to BTN1, BTN2, and BTN3 pins.
- Storage: Insert a MicroSD card or USB flash drive containing MP3 files into the appropriate slot.
Important Considerations and Best Practices
- Power Supply: Ensure the power supply voltage matches the module's requirements to avoid damage.
- Speaker Impedance: Use a speaker with an appropriate impedance (typically 4-8 ohms) for optimal performance.
- File Format: Ensure audio files are in supported formats (MP3, WAV) and properly named.
- Debouncing Buttons: If using physical buttons, consider debouncing to prevent multiple triggers.
Example: Connecting to an Arduino UNO
Wiring Diagram
| MP3 Module Pin | Arduino UNO Pin |
|---|---|
| VCC | 5V |
| GND | GND |
| RX | Pin 10 |
| TX | Pin 11 |
Sample Code
#include <SoftwareSerial.h>

SoftwareSerial mp3(10, 11); // RX, TX

void setup() {
  mp3.begin(9600); // Initialize serial communication with MP3 module
  Serial.begin(9600); // Initialize serial communication with PC
  delay(1000); // Wait for the module to initialize
  playTrack(1); // Play the first track
}

void loop() {
  // Add your code here to control the MP3 module
}

void playTrack(int trackNumber) {
  mp3.write(0x7E); // Start byte
  mp3.write(0xFF); // Version
  mp3.write(0x06); // Length
  mp3.write(0x03); // Command: Play track
  mp3.write(0x00); // No feedback
  mp3.write((trackNumber >> 8) & 0xFF); // Track number high byte
  mp3.write(trackNumber & 0xFF); // Track number low byte
  mp3.write(0xEF); // End byte
}
Troubleshooting and FAQs
Common Issues and Solutions
No Sound Output
- Check Connections: Ensure the speaker is properly connected to the SPK+ and SPK- pins.
- Volume Level: Verify that the volume is not set to zero.
- File Format: Ensure the audio files are in MP3 or WAV format.
Module Not Responding
- Power Supply: Confirm that the module is receiving the correct voltage.
- Serial Communication: Check the RX and TX connections and ensure the baud rate is correctly set.
Buttons Not Working
- Debouncing: Implement debouncing in your code to avoid multiple triggers.
- Connections: Verify that the buttons are correctly connected to the BTN pins.
FAQs
Q: Can I use the MP3 module with a 3.3V power supply?
- A: Yes, the module can operate with a 3.3V or 5V power supply.
Q: What is the maximum storage capacity supported?
- A: This depends on the specific module, but most support up to 32GB MicroSD cards or USB flash drives.
Q: How do I control the volume?
- A: Volume can be controlled via UART commands or dedicated volume control buttons if available.
By following this documentation, users can effectively integrate and troubleshoot the MP3 module in their projects. Whether you are a beginner or an experienced user, this guide provides the necessary information to get started and make the most of your MP3 module.