
How to Use Adafruit CH9328 UART to HID Keyboard Breakout: Examples, Pinouts, and Specs
 Design with Adafruit CH9328 UART to HID Keyboard Breakout in Cirkit Designer
Introduction
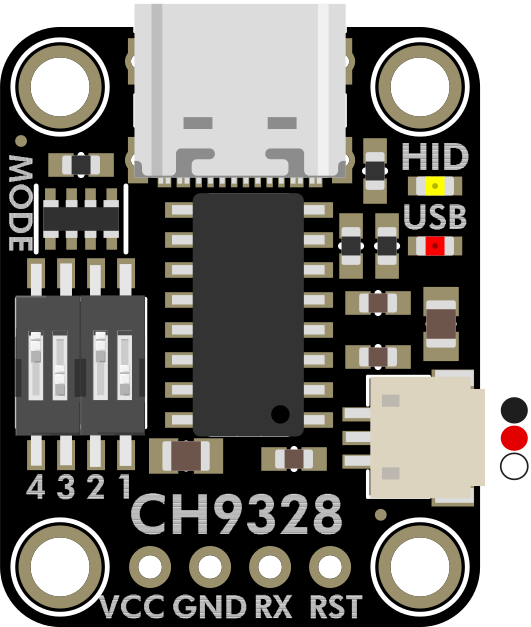
The Adafruit CH9328 UART to HID Keyboard Breakout (Manufacturer Part ID: 5973) is a compact and versatile breakout board designed to convert UART serial data into USB HID keyboard signals. This allows microcontrollers, such as Arduino boards, to emulate keyboard input over USB. The CH9328 chip on the breakout board simplifies the process of sending keystrokes to a computer, making it ideal for projects that require custom keyboard input or automation.
Explore Projects Built with Adafruit CH9328 UART to HID Keyboard Breakout
 Open Project in Cirkit Designer
 Open Project in Cirkit Designer
 Open Project in Cirkit Designer
 Open Project in Cirkit Designer
Explore Projects Built with Adafruit CH9328 UART to HID Keyboard Breakout
Open Project in Cirkit DesignerOpen Project in Cirkit DesignerOpen Project in Cirkit DesignerOpen Project in Cirkit DesignerCommon Applications and Use Cases
- Creating custom USB keyboards or keypads
- Automating repetitive keyboard tasks
- Building assistive technology devices
- Developing gaming macros or shortcuts
- Prototyping USB HID devices
Technical Specifications
The following table outlines the key technical details of the Adafruit CH9328 UART to HID Keyboard Breakout:
| Parameter | Value |
|---|---|
| Chipset | CH9328 |
| Input Voltage | 3.3V or 5V (logic level selectable) |
| Communication | UART (TX/RX pins) |
| USB Interface | USB 2.0 HID (Keyboard) |
| Baud Rate | Configurable (default: 9600 bps) |
| Operating Current | ~10mA |
| Dimensions | 25mm x 18mm x 4mm |
Pin Configuration and Descriptions
The breakout board has the following pin layout:
| Pin Name | Description |
|---|---|
| VIN | Power input (3.3V or 5V, depending on logic level) |
| GND | Ground connection |
| TX | UART Transmit pin (connect to RX of microcontroller) |
| RX | UART Receive pin (connect to TX of microcontroller) |
| 3V3 | 3.3V output (can power external devices) |
| USB | USB Type-C connector for HID keyboard output |
Usage Instructions
How to Use the Component in a Circuit
Power the Breakout Board:
- Connect the VIN pin to a 3.3V or 5V power source.
- Connect the GND pin to the ground of your circuit.
Connect UART Pins:
- Connect the TX pin of the breakout board to the RX pin of your microcontroller.
- Connect the RX pin of the breakout board to the TX pin of your microcontroller.
Connect USB:
- Use a USB Type-C cable to connect the breakout board to your computer. The board will enumerate as a USB HID keyboard.
Send Keystrokes:
- Send ASCII characters or keyboard commands via UART from your microcontroller. The breakout board will translate these into USB HID keyboard signals.
Important Considerations and Best Practices
- Logic Level Selection: Ensure that the UART logic level (3.3V or 5V) matches your microcontroller's logic level to avoid damage.
- Baud Rate Configuration: The default baud rate is 9600 bps. If needed, you can configure the baud rate using specific UART commands (refer to the CH9328 datasheet for details).
- USB HID Limitations: The board is designed for keyboard emulation only and does not support other HID device types (e.g., mouse or joystick).
- Avoid Overloading: Do not exceed the current output of the 3V3 pin if powering external devices.
Example Code for Arduino UNO
Below is an example of how to send keystrokes using the Adafruit CH9328 breakout board with an Arduino UNO:
// Example: Sending "Hello, World!" via the CH9328 UART to HID Keyboard Breakout
// Ensure the TX/RX pins of the breakout are connected to RX/TX of the Arduino UNO.

#include <SoftwareSerial.h>

// Define the TX and RX pins for SoftwareSerial
SoftwareSerial mySerial(10, 11); // RX, TX

void setup() {
  // Start the hardware serial for debugging
  Serial.begin(9600);
  while (!Serial) {
    ; // Wait for the serial port to connect
  }
  Serial.println("Adafruit CH9328 UART to HID Keyboard Example");

  // Start the software serial for the CH9328
  mySerial.begin(9600); // Default baud rate for CH9328
}

void loop() {
  // Send a string to the CH9328 breakout board
  mySerial.println("Hello, World!"); // Sends "Hello, World!" as keystrokes

  // Add a delay to avoid spamming the keyboard
  delay(2000);
}
Troubleshooting and FAQs
Common Issues and Solutions
The board is not recognized as a USB device:
- Ensure the USB cable is properly connected and functional.
- Verify that the board is powered correctly (check the VIN and GND connections).
Keystrokes are not being sent:
- Check the UART connections (TX/RX) between the breakout board and the microcontroller.
- Ensure the baud rate of the microcontroller matches the breakout board's baud rate (default: 9600 bps).
Incorrect or garbled keystrokes:
- Verify that the UART logic level matches the microcontroller's logic level (3.3V or 5V).
- Check for noise or interference on the UART lines.
The board is drawing too much current:
- Avoid powering high-current devices from the 3V3 pin. Use an external power source if needed.
FAQs
Q: Can I use this board with a Raspberry Pi?
A: Yes, the CH9328 breakout board can be used with a Raspberry Pi. Connect the UART pins (TX/RX) to the Pi's GPIO UART pins and ensure the logic levels are compatible.
Q: Can I send special keys like "Ctrl" or "Alt"?
A: Yes, the CH9328 supports sending special keys and key combinations. Refer to the CH9328 datasheet for the specific UART commands required.
Q: Is it possible to change the default baud rate?
A: Yes, the baud rate can be configured using specific UART commands. Refer to the CH9328 datasheet for details on how to change the baud rate.
Q: Does the board support USB-C power delivery?
A: No, the USB Type-C connector is used only for USB HID communication and does not support power delivery features.