
How to Use ip5306: Examples, Pinouts, and Specs
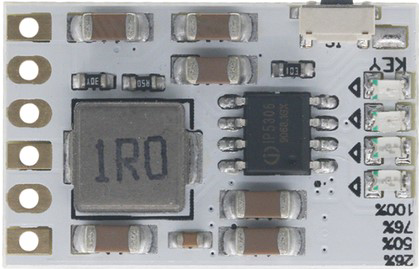
 Design with ip5306 in Cirkit Designer
Introduction
The IP5306 is a highly integrated power management IC designed for lithium-ion battery charging and protection. It combines a battery charger, power path management system, and multiple safety features into a single package, making it ideal for portable and battery-powered devices. The IP5306 ensures efficient charging, reliable power delivery, and enhanced battery safety, making it a popular choice for applications requiring compact and robust power management solutions.
Explore Projects Built with ip5306
 Open Project in Cirkit Designer
 Open Project in Cirkit Designer
 Open Project in Cirkit Designer
 Open Project in Cirkit Designer
Explore Projects Built with ip5306
Open Project in Cirkit DesignerOpen Project in Cirkit DesignerOpen Project in Cirkit DesignerOpen Project in Cirkit DesignerCommon Applications
- Power banks
- Portable electronic devices
- Wearable technology
- IoT devices
- Battery-powered embedded systems
Technical Specifications
Key Technical Details
| Parameter | Value |
|---|---|
| Input Voltage Range | 4.5V to 6.0V |
| Battery Voltage Range | 2.9V to 4.2V |
| Charging Current | Up to 2.4A |
| Output Voltage (Boost Mode) | 5.0V |
| Output Current (Boost Mode) | Up to 2.1A |
| Efficiency (Boost Mode) | Up to 92% |
| Quiescent Current | < 50µA |
| Operating Temperature | -40°C to +85°C |
| Package Type | ESOP-8 |
Pin Configuration and Descriptions
| Pin Number | Pin Name | Description |
|---|---|---|
| 1 | VIN | Input voltage for charging (4.5V to 6.0V). |
| 2 | GND | Ground connection. |
| 3 | BAT | Battery connection pin. Connect to the positive terminal of the lithium battery. |
| 4 | SW | Switching node for the boost converter. |
| 5 | VOUT | Boost converter output voltage (5.0V). |
| 6 | EN | Enable pin for controlling the IC. High to enable, low to disable. |
| 7 | FB | Feedback pin for voltage regulation. |
| 8 | STAT | Status indicator pin for charging and fault conditions. |
Usage Instructions
How to Use the IP5306 in a Circuit
- Power Input: Connect a 5V power source to the
VINpin. Ensure the input voltage is within the specified range (4.5V to 6.0V). - Battery Connection: Connect the positive terminal of the lithium-ion battery to the
BATpin and the negative terminal toGND. - Output Voltage: The
VOUTpin provides a regulated 5V output in boost mode. Connect your load to this pin. - Enable Control: Use the
ENpin to enable or disable the IC. Pull the pin high to enable and low to disable. - Status Monitoring: Use the
STATpin to monitor the charging status or detect faults.
Important Considerations
- Heat Dissipation: Ensure proper heat dissipation by using a PCB with adequate thermal management, especially for high-current applications.
- Battery Protection: Use a lithium-ion battery with built-in protection circuitry to prevent overcharging, over-discharging, and short circuits.
- Capacitor Selection: Place appropriate input and output capacitors close to the IC to ensure stable operation and reduce noise.
- Boost Mode Efficiency: For optimal efficiency in boost mode, minimize the resistance of the PCB traces connected to the
SWandVOUTpins.
Example: Using the IP5306 with an Arduino UNO
The IP5306 can be used to power an Arduino UNO via its 5V output. Below is an example of how to monitor the charging status using the STAT pin.
// Example code to monitor IP5306 charging status with Arduino UNO

const int statPin = 2; // Connect the STAT pin of IP5306 to digital pin 2

void setup() {
  pinMode(statPin, INPUT); // Set STAT pin as input
  Serial.begin(9600);      // Initialize serial communication
}

void loop() {
  int stat = digitalRead(statPin); // Read the status pin
  if (stat == HIGH) {
    Serial.println("Battery is charging or fully charged.");
  } else {
    Serial.println("No charging or fault detected.");
  }
  delay(1000); // Wait for 1 second before checking again
}
Notes:
- Ensure the
STATpin is properly connected to the Arduino UNO with a pull-up resistor if required. - The
STATpin behavior may vary depending on the specific configuration of the IP5306.
Troubleshooting and FAQs
Common Issues and Solutions
| Issue | Possible Cause | Solution |
|---|---|---|
No output voltage on VOUT |
IC is disabled or no input power | Check the EN pin and ensure VIN is connected. |
| Battery not charging | Input voltage too low or battery fault | Verify VIN is within range and check battery connections. |
| Overheating during operation | Excessive load or poor thermal design | Reduce load current and improve PCB thermal dissipation. |
| Low efficiency in boost mode | High resistance in PCB traces | Use wider traces for SW and VOUT connections. |
FAQs
Can the IP5306 charge multiple batteries in series?
No, the IP5306 is designed for single-cell lithium-ion batteries only.What happens if the input voltage exceeds 6.0V?
The IC may be damaged. Always ensure the input voltage is within the specified range.Can I use the IP5306 without a battery?
Yes, but the IC is optimized for use with a battery. Without a battery, the output may be less stable.How do I know if the battery is fully charged?
TheSTATpin can be used to monitor the charging status. Refer to the datasheet for specific behavior.
By following this documentation, users can effectively integrate the IP5306 into their projects and troubleshoot common issues.