How to Use Adafruit Metro Without Headers: Examples, Pinouts, and Specs
Introduction
The Adafruit Metro Without Headers is a powerful, flexible development board designed for hobbyists, educators, and professionals alike. Based on the ATmega328 microcontroller, it is a robust platform for developing electronics projects and prototypes. With its compatibility with the Arduino Integrated Development Environment (IDE), users can easily write, upload, and run custom code, making it ideal for a wide range of applications from simple LED blinkers to more complex robotic controllers.
Explore Projects Built with Adafruit Metro Without Headers


Explore Projects Built with Adafruit Metro Without Headers
Common Applications and Use Cases
- Educational projects and learning platforms
- DIY electronics and home automation systems
- Prototyping for product development
- Robotics and control systems
- Sensor interfacing and data logging
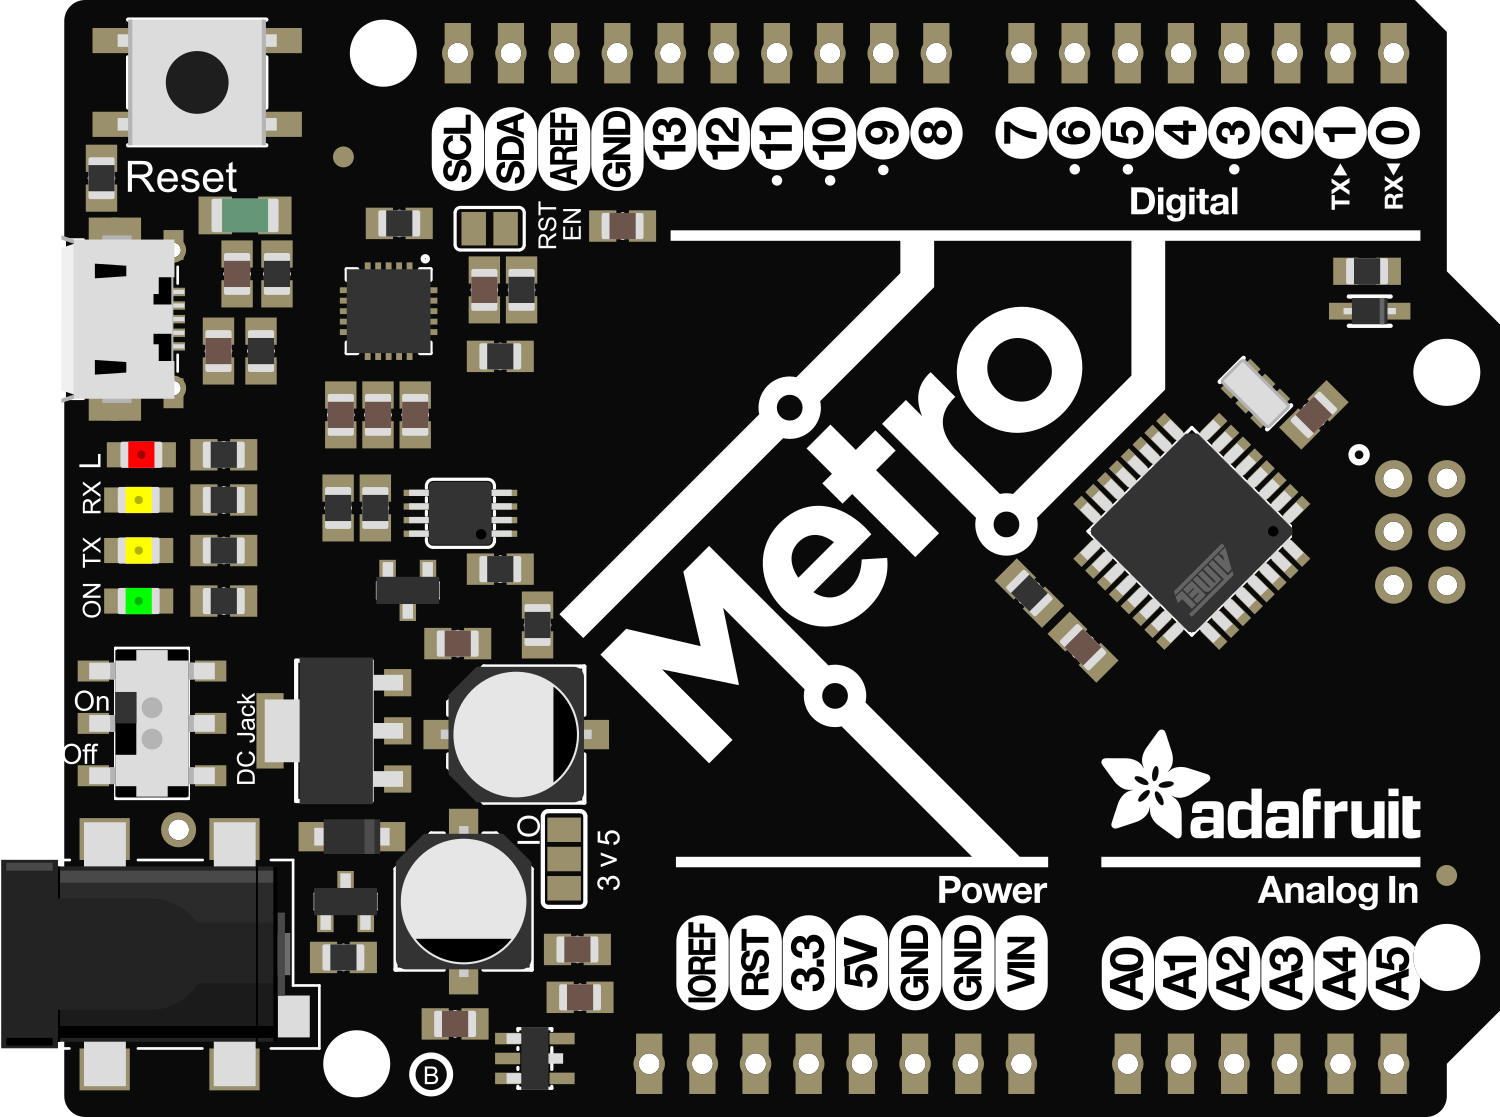
Technical Specifications
Key Technical Details
- Microcontroller: ATmega328
- Operating Voltage: 5V
- Input Voltage (recommended): 7-12V
- Input Voltage (limits): 6-20V
- Digital I/O Pins: 20 (of which 6 provide PWM output)
- Analog Input Pins: 6
- DC Current per I/O Pin: 20 mA
- DC Current for 3.3V Pin: 50 mA
- Flash Memory: 32 KB (ATmega328) of which 0.5 KB used by bootloader
- SRAM: 2 KB (ATmega328)
- EEPROM: 1 KB (ATmega328)
- Clock Speed: 16 MHz
Pin Configuration and Descriptions
| Pin Number | Function | Description |
|---|---|---|
| 1 | RESET | Resets the microcontroller |
| 2-7 | Digital I/O | General-purpose digital input/output pins |
| 8-13 | Digital I/O | General-purpose digital input/output pins |
| 14 (A0) | Analog Input | Analog input pin 0 |
| 15 (A1) | Analog Input | Analog input pin 1 |
| ... | ... | ... |
| 19 (A5) | Analog Input | Analog input pin 5 |
| 20 (AREF) | Analog REF | Reference voltage for the analog inputs |
| 21 (GND) | Ground | Ground |
| 22 (RESET) | Reset | Additional reset pin |
| 23-28 | Digital I/O | General-purpose digital input/output pins |
| ... | ... | ... |
| 29 (VIN) | Voltage Input | Input voltage to the board |
Note: This table is not exhaustive and only includes a selection of the available pins.
Usage Instructions
How to Use the Component in a Circuit
Powering the Board:
- Connect a 7-12V power supply to the VIN and GND pins, or plug in a USB cable to provide power.
Connecting I/O:
- Digital pins can be used as inputs or outputs. Set the pin mode in your code using
pinMode(pin, mode);. - Analog pins are primarily used for input but can also serve as digital I/O.
- Digital pins can be used as inputs or outputs. Set the pin mode in your code using
Programming the Board:
- Connect the board to a computer using a USB cable.
- Open the Arduino IDE, select the correct board and port.
- Write your sketch and upload it to the board using the IDE.
Important Considerations and Best Practices
- Always ensure the power supply is within the specified limits to prevent damage.
- When connecting external components, consider the current limits of the I/O pins.
- Use a current-limiting resistor when connecting LEDs to digital pins.
- Avoid making connections or disconnections to the board while it is powered.
Troubleshooting and FAQs
Common Issues
Board not recognized by the computer:
- Check the USB cable and connections.
- Ensure the correct drivers are installed.
Sketch not uploading:
- Verify the correct board and port are selected in the Arduino IDE.
- Press the reset button on the board just before uploading.
Unexpected behavior in circuits:
- Double-check wiring and connections.
- Ensure power supply is stable and within the recommended range.
FAQs
Can I use the Adafruit Metro Without Headers with Arduino shields?
- Yes, it is compatible with many Arduino shields. However, since it comes without headers, you will need to solder headers or use jumper wires.
What is the difference between the Metro with headers and without headers?
- The functionality is the same; the only difference is the presence of pre-soldered headers, which can be an advantage for breadboarding but may be less flexible for custom projects.
How do I reset the board?
- You can reset the board by pressing the onboard reset button or by connecting the RESET pin to GND briefly.
For further assistance, consult the Adafruit forums or the extensive online community resources.
Example Code for Arduino UNO
// Blink an LED connected to pin 13

void setup() {
  pinMode(13, OUTPUT); // Set pin 13 as an output
}

void loop() {
  digitalWrite(13, HIGH); // Turn the LED on
  delay(1000);            // Wait for a second
  digitalWrite(13, LOW);  // Turn the LED off
  delay(1000);            // Wait for a second
}
Note: The Adafruit Metro Without Headers is compatible with Arduino UNO code, so this example will work as is. Ensure you have selected the correct board in the Arduino IDE before uploading.
Remember to keep your code comments concise and within the 80 character line length limit.