How to Use RunCam Thumb Pro: Examples, Pinouts, and Specs
Introduction
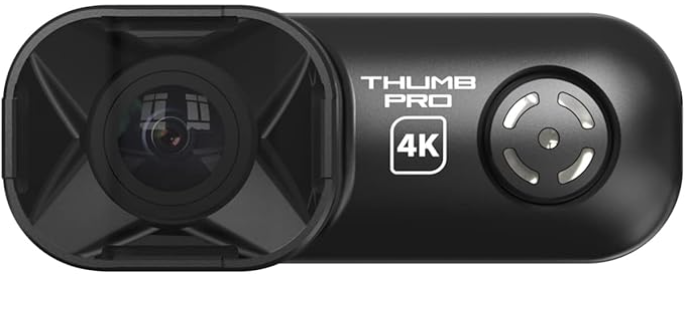
The RunCam Thumb Pro is a compact and lightweight FPV (First-Person View) camera designed specifically for drone racing and aerial photography. It offers high-resolution video capture, low latency, and adjustable settings to ensure optimal performance in various lighting conditions. Its small form factor and durable design make it an excellent choice for hobbyists and professionals seeking high-quality video recording without adding significant weight to their drones.
Explore Projects Built with RunCam Thumb Pro


Explore Projects Built with RunCam Thumb Pro
Common Applications and Use Cases
- FPV drone racing for real-time video feedback
- Aerial photography and videography
- Lightweight camera setups for micro drones
- Recording high-definition footage for post-flight analysis
- Use in robotics and other lightweight, mobile platforms
Technical Specifications
The following table outlines the key technical details of the RunCam Thumb Pro:
| Specification | Details |
|---|---|
| Resolution | 4K @ 30fps, 2.7K @ 60fps, 1080p @ 120fps |
| Lens | Wide-angle lens (150° FOV) |
| Video Format | MP4 (H.264 codec) |
| Input Voltage | 5V - 20V |
| Power Consumption | ~1.5W |
| Weight | 16 grams |
| Dimensions | 61mm x 18mm x 19mm |
| Storage | MicroSD card (up to 256GB, U3 recommended) |
| Connector | USB-C for power and data transfer |
| Mounting | Standard M2 screw holes |
Pin Configuration and Descriptions
The RunCam Thumb Pro uses a USB-C connector for power and data transfer. Below is the pinout for the USB-C interface:
| Pin | Function | Description |
|---|---|---|
| 1 | VBUS (Power Input) | Accepts 5V - 20V input for powering the camera. |
| 2 | GND | Ground connection. |
| 3 | D+ | USB data line for video transfer and settings. |
| 4 | D- | USB data line for video transfer and settings. |
| 5 | ID | Used for accessory detection (optional). |
Usage Instructions
How to Use the RunCam Thumb Pro in a Circuit
Powering the Camera:
- Connect the USB-C port to a 5V - 20V power source. Ensure the power source can supply at least 1.5W to avoid interruptions during operation.
- Alternatively, use a compatible flight controller with a 5V output to power the camera directly.
Mounting the Camera:
- Use the provided M2 screw holes to securely mount the camera to your drone or platform.
- Ensure the lens is unobstructed and positioned for optimal field of view.
Inserting the MicroSD Card:
- Insert a U3-rated MicroSD card (up to 256GB) into the slot. Ensure the card is properly formatted (FAT32 or exFAT).
Adjusting Settings:
- Connect the camera to a computer via USB-C to access the configuration interface.
- Use the RunCam app or software to adjust resolution, frame rate, and other settings.
Recording Video:
- Press the power button to start recording. The LED indicator will flash to confirm recording is in progress.
- Press the button again to stop recording.
Important Considerations and Best Practices
- Heat Management: The camera may become warm during extended use. Ensure proper airflow around the camera to prevent overheating.
- Vibration Isolation: Use vibration-dampening mounts to reduce jello effects in recorded footage.
- Firmware Updates: Regularly check for firmware updates on the RunCam website to access new features and improvements.
- MicroSD Card Compatibility: Use high-speed U3-rated cards to avoid recording interruptions or corrupted files.
Example: Connecting to an Arduino UNO
While the RunCam Thumb Pro is not typically used with an Arduino UNO, it can be powered and controlled via the Arduino's 5V output and digital pins. Below is an example of how to power the camera and toggle recording using a digital pin:
// Example: Controlling RunCam Thumb Pro with Arduino UNO
// This code toggles the camera's recording state using a digital pin.

const int cameraPowerPin = 7; // Pin connected to the camera's power control
const int buttonPin = 2;      // Pin connected to a push button for toggling

void setup() {
  pinMode(cameraPowerPin, OUTPUT); // Set camera power pin as output
  pinMode(buttonPin, INPUT_PULLUP); // Set button pin as input with pull-up
  digitalWrite(cameraPowerPin, LOW); // Ensure camera is off initially
}

void loop() {
  if (digitalRead(buttonPin) == LOW) { // Check if button is pressed
    digitalWrite(cameraPowerPin, HIGH); // Turn on the camera
    delay(1000); // Wait for the camera to initialize
    digitalWrite(cameraPowerPin, LOW); // Turn off the camera
    delay(500); // Debounce delay
  }
}
Troubleshooting and FAQs
Common Issues and Solutions
Camera Not Powering On:
- Ensure the power source provides 5V - 20V and at least 1.5W.
- Check the USB-C cable and connector for damage.
Video Not Recording:
- Verify that a compatible MicroSD card is inserted and properly formatted.
- Ensure the card has sufficient free space.
Overheating:
- Avoid prolonged use in high-temperature environments.
- Ensure proper airflow around the camera.
Corrupted Video Files:
- Use a high-speed U3-rated MicroSD card.
- Avoid abruptly disconnecting power during recording.
Low-Quality Video:
- Check and adjust the resolution and frame rate settings in the RunCam app.
- Clean the lens to remove dust or smudges.
FAQs
Q: Can the RunCam Thumb Pro be used in low-light conditions?
A: Yes, the camera features adjustable settings to optimize performance in various lighting conditions, including low light.
Q: How do I update the firmware?
A: Download the latest firmware from the RunCam website, copy it to the MicroSD card, and follow the update instructions provided in the manual.
Q: Is the camera waterproof?
A: No, the RunCam Thumb Pro is not waterproof. Avoid exposing it to water or moisture.
Q: Can I use the camera without a MicroSD card?
A: No, a MicroSD card is required for recording video. Ensure the card meets the recommended specifications.
Q: What is the maximum recording time?
A: The recording time depends on the resolution, frame rate, and MicroSD card capacity. For example, a 256GB card can store several hours of 4K footage.