How to Use ESP32-C6-Touch-LCD-1.47: Examples, Pinouts, and Specs
Introduction
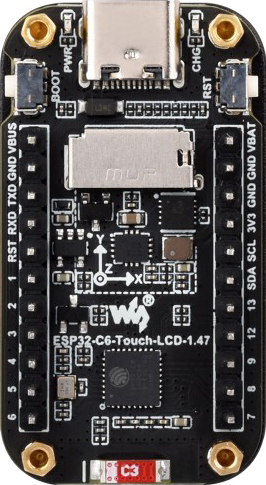
The ESP32-C6-Touch-LCD-1.47 by Waveshare is a versatile microcontroller module that combines the power of the ESP32-C6 chip with integrated Wi-Fi 6 and Bluetooth 5.0 capabilities. It features a 1.47-inch touch-enabled LCD display, making it ideal for applications requiring user interaction and visual output. This compact and powerful module is well-suited for IoT devices, smart home systems, portable displays, and interactive control panels.
Explore Projects Built with ESP32-C6-Touch-LCD-1.47


Explore Projects Built with ESP32-C6-Touch-LCD-1.47
Common Applications and Use Cases
- IoT devices with graphical user interfaces
- Smart home automation systems
- Wearable devices with touch interaction
- Portable monitoring and control panels
- Educational and prototyping projects
Technical Specifications
Key Technical Details
| Parameter | Specification |
|---|---|
| Microcontroller | ESP32-C6 |
| Wireless Connectivity | Wi-Fi 6, Bluetooth 5.0 |
| Display | 1.47-inch touch-enabled LCD |
| Resolution | 172 x 320 pixels |
| Touch Technology | Capacitive |
| Operating Voltage | 3.3V |
| Power Supply | 5V via USB-C or external source |
| GPIO Pins | 14 (configurable for various functions) |
| Flash Memory | 4MB |
| RAM | 512KB |
| Communication Interfaces | UART, SPI, I2C, PWM |
| Dimensions | 60mm x 30mm |
Pin Configuration and Descriptions
| Pin Number | Pin Name | Description |
|---|---|---|
| 1 | 3.3V | Power input (3.3V) |
| 2 | GND | Ground |
| 3 | GPIO0 | General-purpose I/O pin |
| 4 | GPIO1 | General-purpose I/O pin |
| 5 | GPIO2 | General-purpose I/O pin |
| 6 | GPIO3 | General-purpose I/O pin |
| 7 | TXD | UART Transmit |
| 8 | RXD | UART Receive |
| 9 | SCL | I2C Clock |
| 10 | SDA | I2C Data |
| 11 | SPI_CLK | SPI Clock |
| 12 | SPI_MOSI | SPI Master Out Slave In |
| 13 | SPI_MISO | SPI Master In Slave Out |
| 14 | RESET | Reset pin |
Usage Instructions
How to Use the Component in a Circuit
Powering the Module:
- Connect the 3.3V pin to a regulated 3.3V power source or use the USB-C port for 5V input.
- Ensure the GND pin is connected to the ground of your circuit.
Connecting the Display:
- The 1.47-inch touch LCD is pre-integrated and does not require additional connections.
- Use the GPIO pins to interface with external sensors or actuators.
Programming the ESP32-C6:
- Use the USB-C port to connect the module to your computer.
- Install the ESP32 board package in the Arduino IDE or use the ESP-IDF framework for advanced development.
- Select the appropriate board and port in the IDE before uploading your code.
Interfacing with Peripherals:
- Use the I2C, SPI, or UART pins to connect external devices like sensors, displays, or communication modules.
- Configure the pins in your code as needed.
Important Considerations and Best Practices
- Power Supply: Ensure a stable 3.3V or 5V power source to avoid damage to the module.
- Touch Calibration: The touch screen is pre-calibrated, but you may need to fine-tune it in software for specific applications.
- GPIO Usage: Avoid exceeding the maximum current rating of the GPIO pins (12mA per pin).
- Firmware Updates: Regularly update the firmware to ensure compatibility with the latest features and bug fixes.
Example Code for Arduino UNO Integration
Below is an example of how to display text on the touch LCD using the Arduino IDE:
#include <TFT_eSPI.h> // Include the TFT library for ESP32

TFT_eSPI tft = TFT_eSPI(); // Create an instance of the TFT library

void setup() {
  tft.init(); // Initialize the display
  tft.setRotation(1); // Set display orientation
  tft.fillScreen(TFT_BLACK); // Clear the screen with black color

  tft.setTextColor(TFT_WHITE, TFT_BLACK); // Set text color and background
  tft.setTextSize(2); // Set text size

  tft.setCursor(10, 10); // Set cursor position
  tft.println("Hello, ESP32!"); // Print text to the display
}

void loop() {
  // Add your code here for additional functionality
}
Troubleshooting and FAQs
Common Issues and Solutions
The module does not power on:
- Ensure the power source provides the correct voltage (3.3V or 5V).
- Check the USB-C cable and port for proper connection.
The touch screen is unresponsive:
- Verify that the touch screen is not physically damaged.
- Check your code to ensure the touch functionality is properly initialized.
Wi-Fi or Bluetooth is not working:
- Ensure the correct credentials and configurations are set in your code.
- Check for interference from other devices operating on the same frequency.
The display shows incorrect or no output:
- Verify the display initialization code in your program.
- Ensure the module is receiving sufficient power.
FAQs
Q: Can I use this module with a 5V logic microcontroller?
A: Yes, but you will need level shifters to safely interface the 5V logic with the 3.3V GPIO pins of the ESP32-C6.
Q: Is the touch screen multi-touch capable?
A: No, the touch screen supports single-touch input only.
Q: Can I use this module for battery-powered applications?
A: Yes, the module is suitable for battery-powered projects. Use a 3.7V LiPo battery with a proper voltage regulator.
Q: How do I update the firmware?
A: Use the ESP-IDF or Arduino IDE to flash the latest firmware via the USB-C port.
This concludes the documentation for the ESP32-C6-Touch-LCD-1.47. For further assistance, refer to the official Waveshare documentation or community forums.