Cirkit Designer Logo
Cirkit Designer
Your all-in-one circuit design IDE
Home / 
Component Documentation

How to Use EZ-SFX: Examples, Pinouts, and Specs

Image of EZ-SFX
Cirkit Designer LogoDesign with EZ-SFX in Cirkit Designer

Introduction

The EZ-SFX is a compact power supply module designed to convert alternating current (AC) to direct current (DC), providing a stable and efficient power source for electronic circuits. This module is ideal for hobbyists, engineers, and professionals who require a reliable DC power supply for their projects. Common applications include powering microcontrollers, LED lighting systems, and small motors in devices such as DIY electronics, home automation systems, and custom-built gadgets.

Explore Projects Built with EZ-SFX

Use Cirkit Designer to design, explore, and prototype these projects online. Some projects support real-time simulation. Click "Open Project" to start designing instantly!
ESP32-Based Smart Environmental Monitoring System with Relay Control
Image of SOCOTECO: A project utilizing EZ-SFX in a practical application
This is a smart environmental monitoring and control system featuring an ESP32 microcontroller interfaced with a PZEM004T for power monitoring, relay modules for actuating bulbs and a fan, and an LCD for user interface. It includes flame, gas, and vibration sensors for safety monitoring purposes.
Cirkit Designer LogoOpen Project in Cirkit Designer
ESP32-Based Portable Smart Speaker with Audio Input Processing
Image of talkAI: A project utilizing EZ-SFX in a practical application
This circuit features two ESP32 microcontrollers configured for serial communication, with one ESP32's TX0 connected to the other's RX2, and vice versa. An INMP441 microphone is interfaced with one ESP32 for audio input, using I2S protocol with connections for serial clock (SCK), word select (WS), and serial data (SD). A Max98357 audio amplifier is connected to the other ESP32 to drive a loudspeaker, receiving I2S data (DIN), bit clock (BLCK), and left-right clock (LRC), and is powered by a lipo battery charger module.
Cirkit Designer LogoOpen Project in Cirkit Designer
ESP32-S3 Based Vibration Detection System with TFT Display and Power Backup
Image of IOT Thesis: A project utilizing EZ-SFX in a practical application
This circuit features an ESP32-S3 microcontroller connected to various peripherals including an ADXL355 accelerometer, an SW-420 vibration sensor, a buzzer module, and an ILI9341 TFT display. The ESP32-S3 manages sensor inputs and provides output to the display and buzzer. Power management is handled by a 12V to 5V step-down converter, and a UPS ensures uninterrupted power supply, with a rocker switch to control the power flow.
Cirkit Designer LogoOpen Project in Cirkit Designer
ESP32-Based Wi-Fi Controlled Robotic Car with OLED Display and Laser Shooting
Image of 123: A project utilizing EZ-SFX in a practical application
This circuit is a remote-controlled shooting game system using an ESP32 microcontroller, which interfaces with a PS3 controller to control two DC motors via a TB6612FNG motor driver, and a laser for shooting. The system includes an OLED display for game status, a photocell for detecting laser hits, and a piezo buzzer for sound feedback.
Cirkit Designer LogoOpen Project in Cirkit Designer

Explore Projects Built with EZ-SFX

Use Cirkit Designer to design, explore, and prototype these projects online. Some projects support real-time simulation. Click "Open Project" to start designing instantly!
Image of SOCOTECO: A project utilizing EZ-SFX in a practical application
ESP32-Based Smart Environmental Monitoring System with Relay Control
This is a smart environmental monitoring and control system featuring an ESP32 microcontroller interfaced with a PZEM004T for power monitoring, relay modules for actuating bulbs and a fan, and an LCD for user interface. It includes flame, gas, and vibration sensors for safety monitoring purposes.
Cirkit Designer LogoOpen Project in Cirkit Designer
Image of talkAI: A project utilizing EZ-SFX in a practical application
ESP32-Based Portable Smart Speaker with Audio Input Processing
This circuit features two ESP32 microcontrollers configured for serial communication, with one ESP32's TX0 connected to the other's RX2, and vice versa. An INMP441 microphone is interfaced with one ESP32 for audio input, using I2S protocol with connections for serial clock (SCK), word select (WS), and serial data (SD). A Max98357 audio amplifier is connected to the other ESP32 to drive a loudspeaker, receiving I2S data (DIN), bit clock (BLCK), and left-right clock (LRC), and is powered by a lipo battery charger module.
Cirkit Designer LogoOpen Project in Cirkit Designer
Image of IOT Thesis: A project utilizing EZ-SFX in a practical application
ESP32-S3 Based Vibration Detection System with TFT Display and Power Backup
This circuit features an ESP32-S3 microcontroller connected to various peripherals including an ADXL355 accelerometer, an SW-420 vibration sensor, a buzzer module, and an ILI9341 TFT display. The ESP32-S3 manages sensor inputs and provides output to the display and buzzer. Power management is handled by a 12V to 5V step-down converter, and a UPS ensures uninterrupted power supply, with a rocker switch to control the power flow.
Cirkit Designer LogoOpen Project in Cirkit Designer
Image of 123: A project utilizing EZ-SFX in a practical application
ESP32-Based Wi-Fi Controlled Robotic Car with OLED Display and Laser Shooting
This circuit is a remote-controlled shooting game system using an ESP32 microcontroller, which interfaces with a PS3 controller to control two DC motors via a TB6612FNG motor driver, and a laser for shooting. The system includes an OLED display for game status, a photocell for detecting laser hits, and a piezo buzzer for sound feedback.
Cirkit Designer LogoOpen Project in Cirkit Designer

Technical Specifications

Key Technical Details

  • Input Voltage Range: 85VAC to 264VAC
  • Output Voltage: 5VDC (typical)
  • Output Current: Up to 2A (max)
  • Power Rating: 10W (max)
  • Efficiency: >80% at full load
  • Isolation Voltage: 3000VAC / 1 min
  • Operating Temperature: -40°C to +85°C

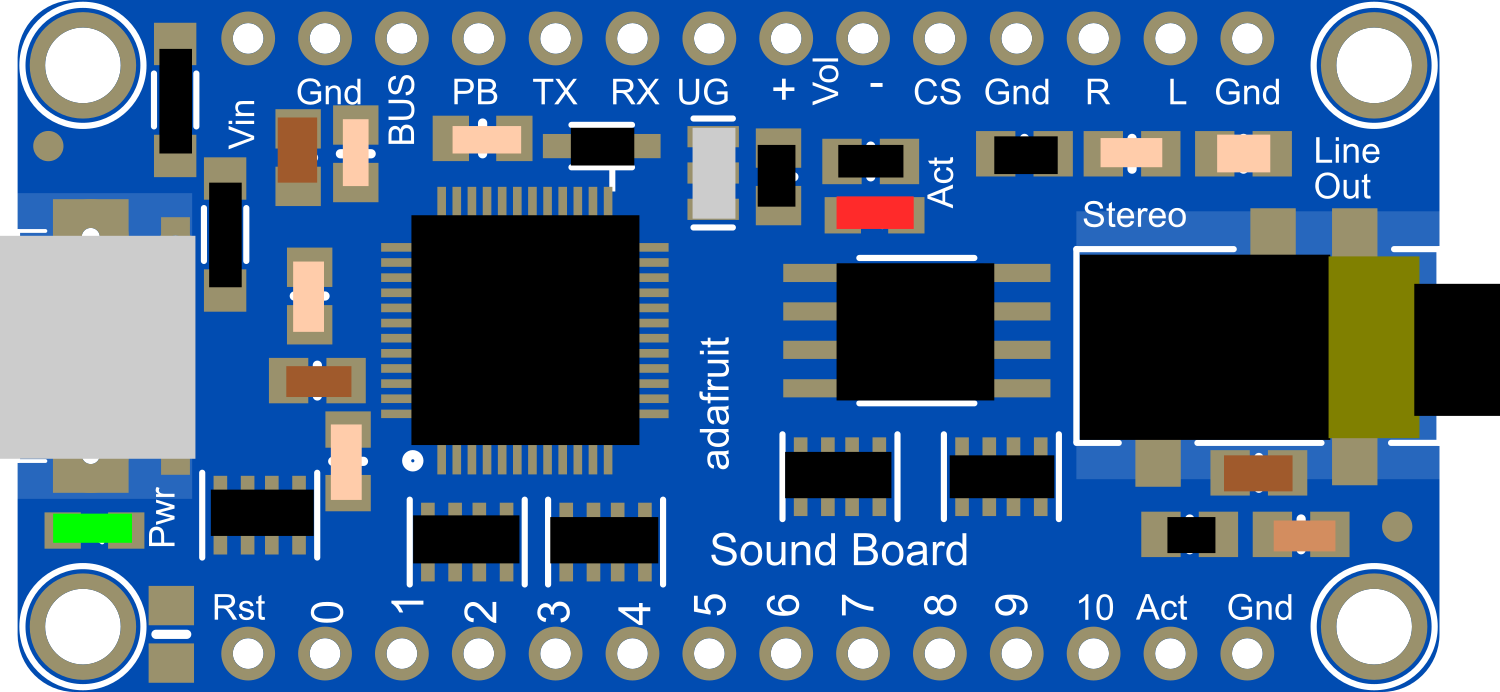
Pin Configuration and Descriptions

Pin Number Name Description
1 AC-L AC line input (live)
2 AC-N AC line input (neutral)
3 GND Ground connection
4 Vout+ Positive DC output
5 Vout- Negative DC output

Usage Instructions

Integrating the EZ-SFX into a Circuit

  1. Connecting AC Input:

    • Connect the AC live wire to pin 1 (AC-L) and the neutral wire to pin 2 (AC-N).
    • Ensure that the input voltage is within the specified range to avoid damage.
  2. DC Output Connection:

    • Connect your device's positive input to pin 4 (Vout+) and the negative input to pin 5 (Vout-).
    • Verify that the device's input current does not exceed the EZ-SFX's maximum output current rating.
  3. Grounding:

    • Connect pin 3 (GND) to the earth ground if required for your application.

Important Considerations and Best Practices

  • Safety: Always ensure the power is off before making connections to avoid electric shock.
  • Heat Dissipation: Provide adequate ventilation around the module to prevent overheating.
  • Isolation: Maintain proper isolation between the AC input and low-voltage DC output to ensure user safety and circuit protection.
  • Load Regulation: Test the output voltage under different load conditions to ensure it remains within acceptable limits for your application.

Troubleshooting and FAQs

Common Issues and Solutions

  • No Output Voltage:

    • Check AC input connections for proper contact.
    • Verify that the AC input voltage is within the specified range.
    • Inspect the module for any visible damage or burn marks.
  • Output Voltage Fluctuations:

    • Ensure that the load does not exceed the maximum current rating.
    • Check for loose connections at the output terminals.
    • Evaluate the ambient temperature to ensure it is within operational limits.
  • Module Overheating:

    • Reduce the load if it is near the maximum power rating.
    • Improve airflow around the module or add a heat sink if necessary.

FAQs

  • Q: Can the EZ-SFX be used with input voltages lower than 85VAC?

    • A: The module is designed to operate within the specified input voltage range. Using it outside this range may result in improper operation or damage.
  • Q: Is the output voltage adjustable?

    • A: The EZ-SFX provides a fixed output voltage. For adjustable output, an external regulator or a different module with variable output should be used.
  • Q: How can I increase the output current capability?

    • A: To increase the current beyond the module's rating, you would need to use multiple modules in parallel, ensuring proper load sharing and thermal management.

Example Code for Arduino UNO

// This example demonstrates how to use the EZ-SFX module to power an Arduino UNO.

void setup() {
  // Initialize the digital pin as an output.
  pinMode(LED_BUILTIN, OUTPUT); // Most Arduinos have an on-board LED on pin 13
}

void loop() {
  digitalWrite(LED_BUILTIN, HIGH); // Turn the LED on
  delay(1000);                     // Wait for a second
  digitalWrite(LED_BUILTIN, LOW);  // Turn the LED off
  delay(1000);                     // Wait for a second
}

// Note: The EZ-SFX module powers the Arduino UNO through its 5V pin.
// Ensure that the current draw from the Arduino and connected peripherals
// does not exceed the EZ-SFX's maximum output current rating.

Remember to adhere to the EZ-SFX's specifications and safety guidelines when using it to power any device, including an Arduino UNO. The example code provided is a simple blink sketch that assumes the Arduino is properly powered by the EZ-SFX module.