How to Use HDMI splitter: Examples, Pinouts, and Specs

Introduction
An HDMI splitter is a device that takes a single HDMI input and splits it into multiple HDMI outputs, allowing the same video and audio signal to be sent to multiple displays simultaneously. It is commonly used in scenarios where the same content needs to be displayed on multiple screens, such as in home theaters, conference rooms, retail displays, or digital signage setups.
Explore Projects Built with HDMI splitter


Explore Projects Built with HDMI splitter
Common Applications and Use Cases
- Home Theaters: Distribute video from a single source (e.g., Blu-ray player, gaming console) to multiple TVs or projectors.
- Retail Displays: Show the same promotional content on multiple screens in a store.
- Conference Rooms: Share presentations or videos across multiple monitors.
- Digital Signage: Broadcast the same content to multiple displays in public spaces.
- Gaming Setups: Mirror gameplay on multiple screens for streaming or local multiplayer.
Technical Specifications
Below are the general technical specifications for a typical HDMI splitter. Note that specific models may vary slightly.
Key Technical Details
- Input: 1 HDMI input (HDMI 1.4, 2.0, or 2.1 depending on the model)
- Outputs: 2, 4, or more HDMI outputs
- Supported Resolutions: Up to 4K (3840x2160) at 60Hz, depending on the model
- Audio Support: Dolby TrueHD, DTS-HD Master Audio, and other HDMI-supported formats
- HDCP Compliance: HDCP 1.4 or 2.2 (for protected content)
- Power Supply: Typically 5V DC via an external adapter
- Operating Temperature: 0°C to 50°C
- Bandwidth: Up to 18 Gbps (for HDMI 2.0 models)
Pin Configuration and Descriptions
HDMI splitters typically do not have exposed pins for user interaction, as they rely on HDMI connectors. However, the following table describes the input and output ports:
| Port | Description |
|---|---|
| HDMI Input | Connects to the source device (e.g., Blu-ray player, gaming console, PC). |
| HDMI Outputs | Connects to the display devices (e.g., TVs, monitors, projectors). |
| Power Input (DC) | Connects to the external power adapter to supply power to the splitter. |
| LED Indicators | Show the status of power and active connections for input and output ports. |
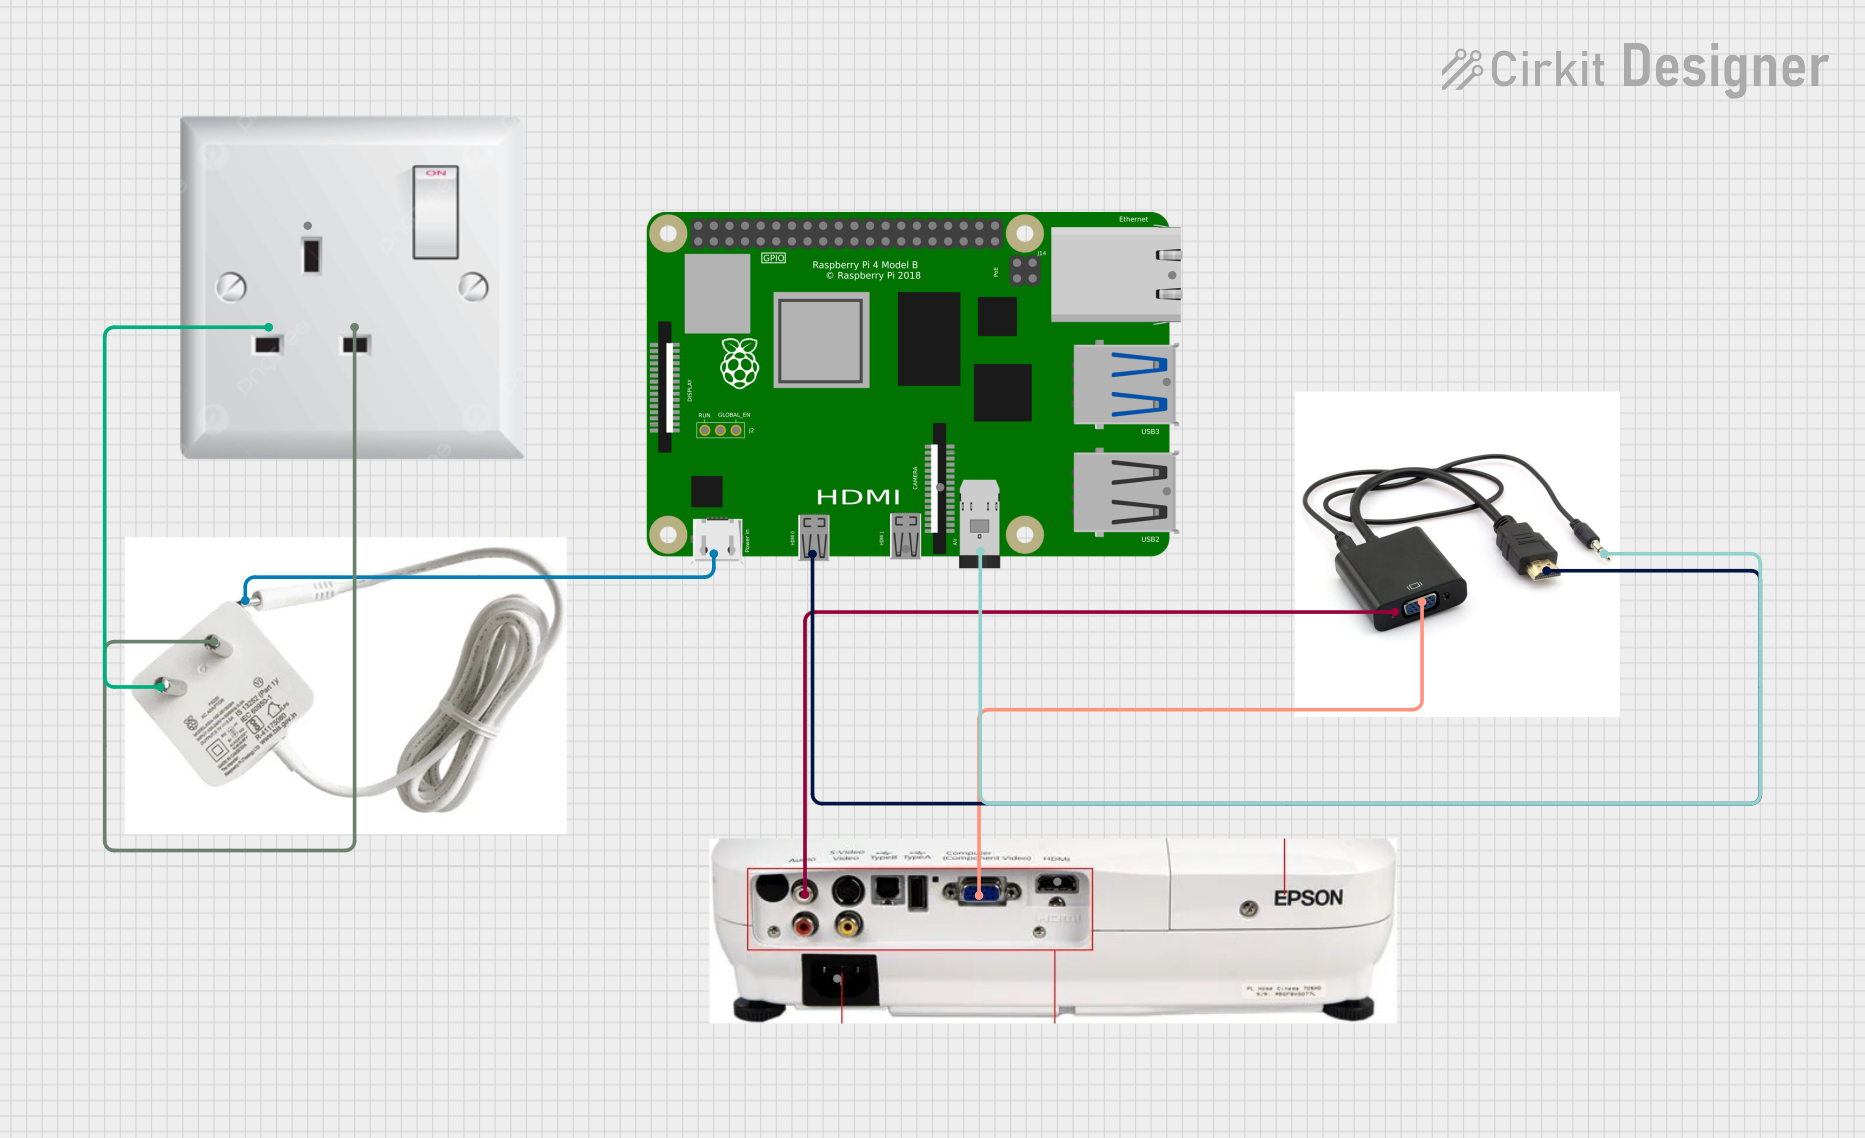
Usage Instructions
How to Use the HDMI Splitter in a Setup
Connect the Source Device:
- Plug one end of an HDMI cable into the HDMI output port of your source device (e.g., Blu-ray player, gaming console).
- Connect the other end of the cable to the HDMI input port on the splitter.
Connect the Display Devices:
- Use additional HDMI cables to connect the HDMI output ports of the splitter to the HDMI input ports of your display devices (e.g., TVs, monitors).
Power the Splitter:
- Plug the provided power adapter into the splitter's DC power input port.
- Connect the adapter to a power outlet and turn it on (if the splitter has a power switch).
Verify Connections:
- Ensure all cables are securely connected.
- Check the LED indicators on the splitter to confirm active connections.
Test the Setup:
- Power on the source device and the display devices.
- Verify that the same video and audio signal is displayed on all connected screens.
Important Considerations and Best Practices
- Cable Length: Use high-quality HDMI cables and keep cable lengths as short as possible to avoid signal degradation.
- Resolution Compatibility: Ensure all connected displays support the same resolution and refresh rate. The splitter will typically default to the lowest common resolution supported by all displays.
- Power Supply: Use the power adapter provided with the splitter to ensure proper operation.
- HDCP Compliance: If you are using protected content (e.g., streaming services), ensure the splitter and all connected devices are HDCP-compliant.
Example: Using an HDMI Splitter with an Arduino UNO
While HDMI splitters are not directly controlled by microcontrollers like the Arduino UNO, you can use an Arduino to automate power control for the splitter. Below is an example of how to use an Arduino to control a relay module that powers the splitter:
// Example: Controlling HDMI splitter power using Arduino and a relay module
// This code toggles the relay to turn the splitter on or off.

const int relayPin = 7; // Pin connected to the relay module

void setup() {
  pinMode(relayPin, OUTPUT); // Set the relay pin as an output
  digitalWrite(relayPin, LOW); // Ensure the relay is off at startup
}

void loop() {
  // Turn the splitter on
  digitalWrite(relayPin, HIGH); // Activate the relay
  delay(10000); // Keep the splitter on for 10 seconds

  // Turn the splitter off
  digitalWrite(relayPin, LOW); // Deactivate the relay
  delay(5000); // Keep the splitter off for 5 seconds
}
Note: Ensure the relay module is rated for the splitter's power requirements and that the Arduino is properly powered.
Troubleshooting and FAQs
Common Issues and Solutions
No Signal on Displays:
- Solution: Check all HDMI connections and ensure the source device is powered on. Verify that the splitter is receiving power (check the LED indicators).
Signal Degradation or Flickering:
- Solution: Use high-quality HDMI cables and ensure they are not excessively long. If the issue persists, consider using an HDMI signal booster.
One Display Not Working:
- Solution: Ensure the display supports the resolution and refresh rate of the source device. Try swapping HDMI cables to rule out a faulty cable.
HDCP Error:
- Solution: Ensure all devices (source, splitter, and displays) are HDCP-compliant. If not, the content may not play.
Splitter Overheating:
- Solution: Ensure the splitter is placed in a well-ventilated area and not stacked with other heat-generating devices.
FAQs
Can I use an HDMI splitter to extend displays instead of mirroring?
- No, HDMI splitters are designed to duplicate (mirror) the signal, not extend it. For extended displays, use an HDMI switch or a graphics card with multiple outputs.
Do HDMI splitters require external power?
- Most HDMI splitters require external power to function properly, especially for higher resolutions like 4K.
Can I connect more than one splitter in series?
- While possible, daisy-chaining splitters can lead to signal degradation. Use an HDMI signal booster if longer distances are required.
Will the splitter work with audio-only HDMI signals?
- Yes, HDMI splitters can handle both video and audio signals, including audio-only streams.
By following this documentation, you can effectively set up and troubleshoot an HDMI splitter for your specific needs.