How to Use A-Star 32U4 Mini SV: Examples, Pinouts, and Specs
Introduction
The A-Star 32U4 Mini SV is a compact and versatile microcontroller board designed and manufactured by Pololu. It is based on the ATmega32U4 microcontroller, which features built-in USB functionality, making it ideal for projects requiring USB communication. The board includes 32KB of flash memory, 2.5KB of SRAM, and 1KB of EEPROM, providing ample resources for a wide range of applications. Its small form factor and robust design make it suitable for embedded systems, robotics, and IoT projects.
Explore Projects Built with A-Star 32U4 Mini SV
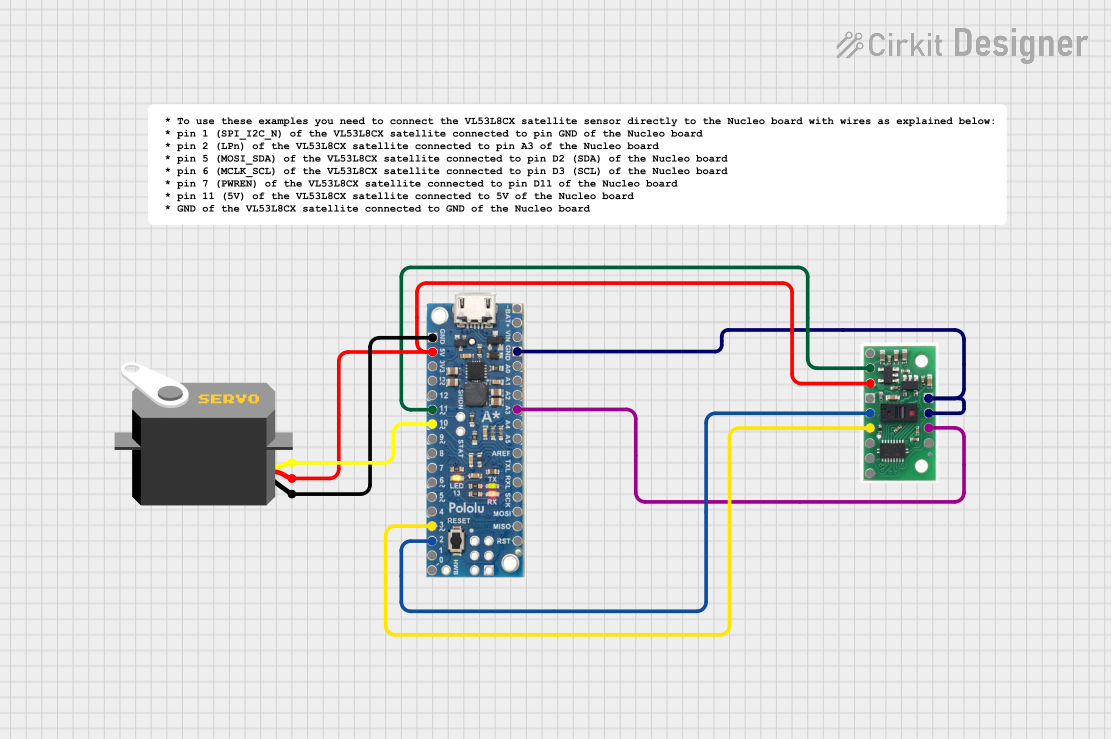

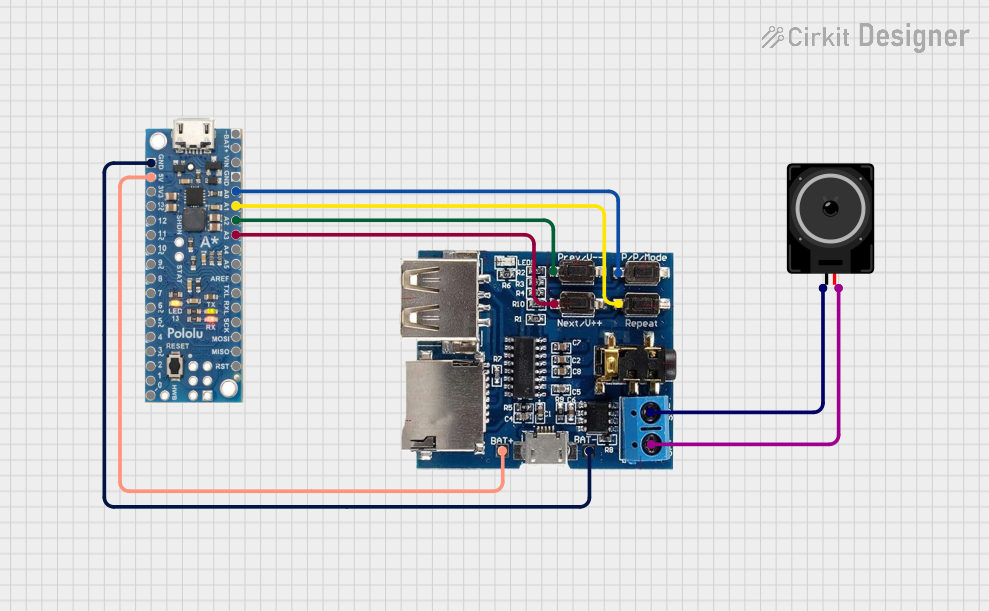

Explore Projects Built with A-Star 32U4 Mini SV
Common Applications and Use Cases
- Robotics and motor control
- Sensor interfacing and data acquisition
- USB-based projects (e.g., HID devices, serial communication)
- IoT devices and home automation
- Prototyping and educational projects
Technical Specifications
Key Technical Details
| Parameter | Specification |
|---|---|
| Microcontroller | ATmega32U4 |
| Operating Voltage | 5V |
| Input Voltage Range | 5.5V to 36V |
| Flash Memory | 32KB (4KB used by bootloader) |
| SRAM | 2.5KB |
| EEPROM | 1KB |
| Clock Speed | 16 MHz |
| USB Connectivity | Full-speed USB (12 Mbps) |
| Digital I/O Pins | 26 (7 can be used as PWM outputs) |
| Analog Input Pins | 12 |
| Current Draw (Idle) | ~30 mA |
| Dimensions | 1.9" × 0.7" (48 mm × 18 mm) |
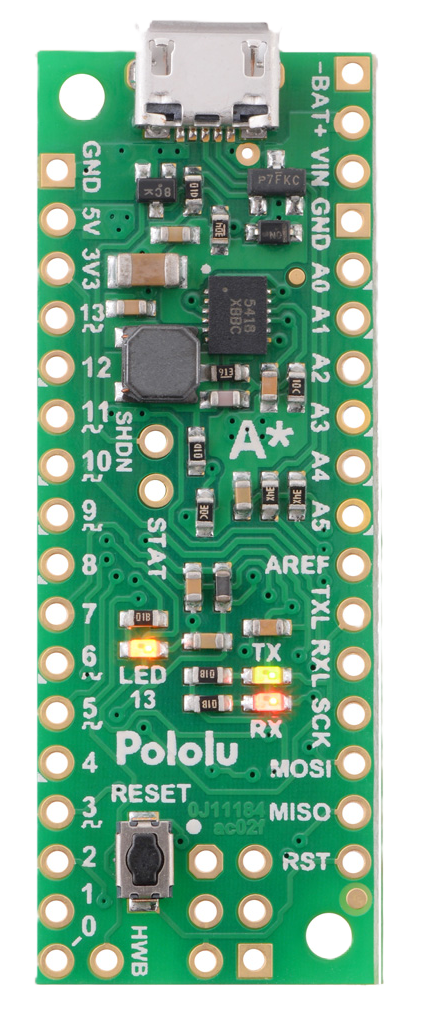
Pin Configuration and Descriptions
The A-Star 32U4 Mini SV features a total of 26 I/O pins, including digital, analog, and power pins. Below is a detailed pinout description:
| Pin Name | Type | Description |
|---|---|---|
| VIN | Power Input | Input voltage (5.5V to 36V). Powers the onboard regulator. |
| GND | Power | Ground connection. |
| 5V | Power Output | Regulated 5V output from the onboard regulator. |
| A0–A11 | Analog Input | 12 analog input pins (can also be used as digital I/O). |
| D0–D13 | Digital I/O | 14 digital I/O pins (7 support PWM output). |
| TX (D1) | Digital I/O | UART transmit pin. |
| RX (D0) | Digital I/O | UART receive pin. |
| SDA | Digital I/O | I²C data line. |
| SCL | Digital I/O | I²C clock line. |
| USB+ | USB | USB data positive line. |
| USB- | USB | USB data negative line. |
| RST | Reset | Reset pin. Resets the microcontroller when pulled low. |
Usage Instructions
How to Use the Component in a Circuit
Powering the Board:
- Connect a power source to the VIN pin (5.5V to 36V) or via the USB port. The onboard regulator will provide a stable 5V output.
- Ensure the input voltage does not exceed the specified range to avoid damaging the board.
Connecting I/O Devices:
- Use the digital pins (D0–D13) for interfacing with digital sensors, actuators, or LEDs.
- Use the analog pins (A0–A11) for reading analog signals from sensors.
- For I²C communication, connect your devices to the SDA and SCL pins.
Programming the Board:
- The A-Star 32U4 Mini SV is compatible with the Arduino IDE. Select "Arduino Leonardo" as the board type in the IDE, as both use the ATmega32U4 microcontroller.
- Connect the board to your computer via USB and upload your code.
USB Communication:
- The ATmega32U4 supports USB communication natively, allowing the board to act as a USB keyboard, mouse, or serial device.
Important Considerations and Best Practices
- Voltage Levels: Ensure that all connected devices operate at 5V logic levels to avoid damaging the board.
- Current Limitations: The onboard regulator can supply up to 1A. Ensure the total current draw of connected devices does not exceed this limit.
- Heat Dissipation: If operating at higher input voltages (e.g., 36V), the regulator may generate heat. Consider adding a heatsink or reducing the input voltage if necessary.
- Bootloader: The board comes preloaded with a bootloader, so no external programmer is required.
Example Code for Arduino UNO
Below is an example of how to blink an LED connected to pin D13:
// Blink an LED connected to pin D13
void setup() {
  pinMode(13, OUTPUT); // Set pin 13 as an output
}

void loop() {
  digitalWrite(13, HIGH); // Turn the LED on
  delay(1000);            // Wait for 1 second
  digitalWrite(13, LOW);  // Turn the LED off
  delay(1000);            // Wait for 1 second
}
Troubleshooting and FAQs
Common Issues and Solutions
The board is not recognized by the computer:
- Ensure the USB cable is functional and supports data transfer (not just charging).
- Check that the drivers for the ATmega32U4 are installed correctly.
Unable to upload code:
- Double-check that "Arduino Leonardo" is selected as the board type in the Arduino IDE.
- Press the reset button on the board just before uploading the code to enter the bootloader mode.
Overheating regulator:
- Verify that the input voltage is within the specified range (5.5V to 36V).
- Reduce the current draw of connected devices if the regulator is overheating.
I²C devices not working:
- Ensure pull-up resistors (typically 4.7kΩ) are connected to the SDA and SCL lines.
FAQs
Q: Can the A-Star 32U4 Mini SV be powered via USB?
A: Yes, the board can be powered via USB, which provides 5V directly to the microcontroller.
Q: What is the maximum current output of the 5V pin?
A: The 5V pin can supply up to 1A, depending on the input voltage and heat dissipation.
Q: Is the board compatible with Arduino libraries?
A: Yes, the A-Star 32U4 Mini SV is fully compatible with most Arduino libraries, as it uses the ATmega32U4 microcontroller.