How to Use ESP32 HIBISCUS SENSE: Examples, Pinouts, and Specs
Introduction
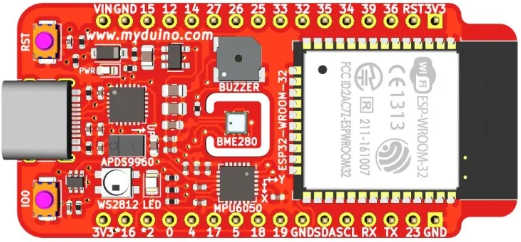
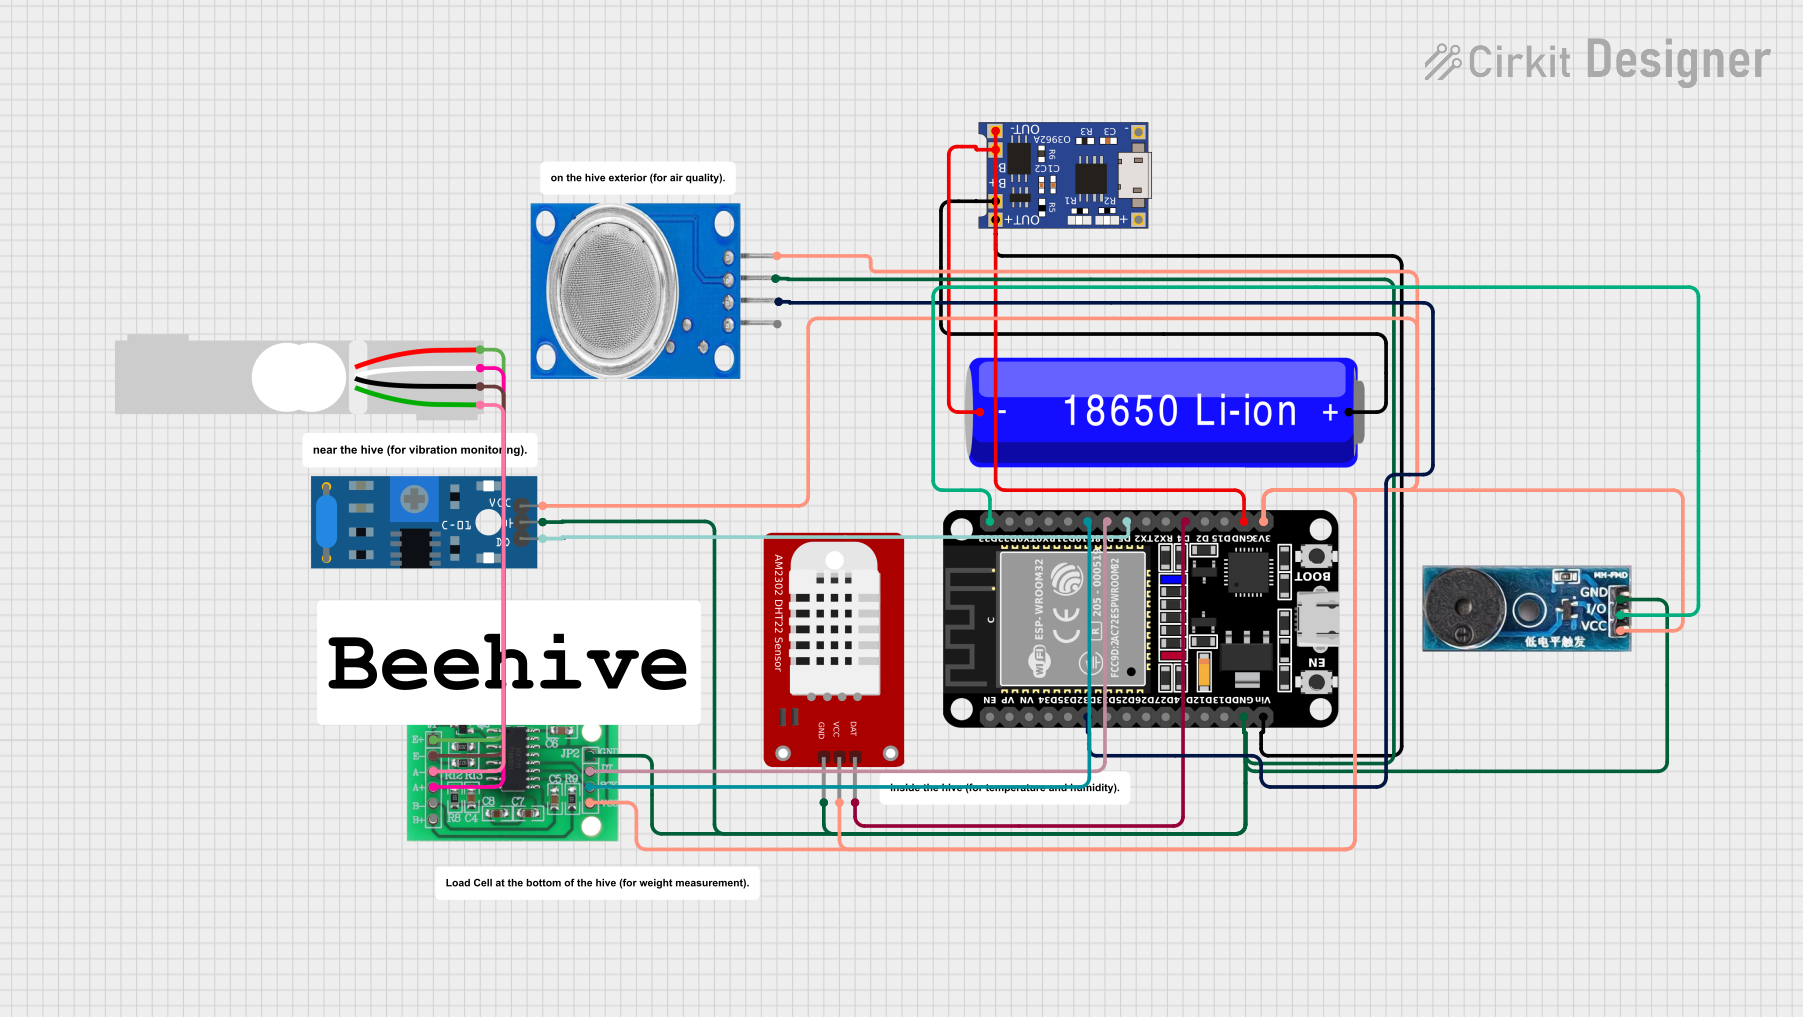
The ESP32 HIBISCUS SENSE is a versatile microcontroller board that combines powerful processing capabilities with integrated Wi-Fi and Bluetooth connectivity. Designed specifically for IoT (Internet of Things) applications, this board is equipped with a variety of onboard sensors for environmental monitoring and data collection. Its compact design and rich feature set make it an excellent choice for smart home systems, industrial automation, weather stations, and other IoT-based projects.
Explore Projects Built with ESP32 HIBISCUS SENSE
Explore Projects Built with ESP32 HIBISCUS SENSE
Common Applications and Use Cases
- Smart home automation (e.g., temperature and humidity monitoring)
- Environmental data logging and analysis
- Industrial IoT systems for real-time monitoring
- Wearable devices and portable IoT solutions
- Wireless sensor networks
- Educational projects and prototyping
Technical Specifications
The ESP32 HIBISCUS SENSE is built on the ESP32 platform, offering robust performance and connectivity. Below are the key technical details:
General Specifications
| Feature | Specification |
|---|---|
| Microcontroller | ESP32 dual-core processor |
| Clock Speed | Up to 240 MHz |
| Flash Memory | 4 MB |
| SRAM | 520 KB |
| Connectivity | Wi-Fi 802.11 b/g/n, Bluetooth 4.2 |
| Operating Voltage | 3.3V |
| Input Voltage Range | 5V (via USB) or 3.3V (via pins) |
| Power Consumption | Low-power modes available |
| Dimensions | 50mm x 25mm |
Onboard Sensors
| Sensor Type | Model/Specification |
|---|---|
| Temperature and Humidity | DHT11 (±2°C, ±5% RH accuracy) |
| Barometric Pressure | BMP280 (±1 hPa accuracy) |
| Ambient Light | BH1750 (1 - 65535 lux range) |
| Motion Detection | MPU6050 (6-axis accelerometer + gyro) |
Pin Configuration
The ESP32 HIBISCUS SENSE features a standard pinout for easy integration into projects. Below is the pin configuration:
| Pin Name | Function | Description |
|---|---|---|
| VIN | Power Input | Accepts 5V input via USB or external PSU |
| GND | Ground | Common ground for the circuit |
| 3V3 | 3.3V Output | Provides regulated 3.3V output |
| GPIO0 | General Purpose I/O | Configurable digital I/O pin |
| GPIO2 | General Purpose I/O | Configurable digital I/O pin |
| GPIO4 | General Purpose I/O | Configurable digital I/O pin |
| SDA | I2C Data Line | Used for I2C communication |
| SCL | I2C Clock Line | Used for I2C communication |
| TXD | UART Transmit | Serial communication (TX) |
| RXD | UART Receive | Serial communication (RX) |
| A0 | Analog Input | 12-bit ADC for analog signal input |
Usage Instructions
The ESP32 HIBISCUS SENSE is designed for ease of use in IoT projects. Below are the steps to get started and important considerations:
Getting Started
- Power the Board: Connect the board to your computer or power supply using a micro-USB cable. Ensure the input voltage is within the specified range.
- Install Drivers: If using a Windows PC, install the necessary USB-to-serial drivers for the ESP32.
- Set Up the IDE: Use the Arduino IDE or ESP-IDF (Espressif IoT Development Framework) to program the board. For Arduino IDE:
- Install the ESP32 board package via the Board Manager.
- Select "ESP32 Dev Module" as the board type.
- Connect Sensors: The onboard sensors are pre-wired to the ESP32. Use the provided libraries to access sensor data.
Example Code: Reading Temperature and Humidity
Below is an example of how to read data from the onboard DHT11 sensor using the Arduino IDE:
#include <DHT.h>

// Define the DHT sensor type and pin
#define DHTPIN GPIO4  // DHT11 is connected to GPIO4
#define DHTTYPE DHT11 // DHT11 sensor type

DHT dht(DHTPIN, DHTTYPE);

void setup() {
  Serial.begin(115200); // Initialize serial communication
  dht.begin();          // Initialize the DHT sensor
  Serial.println("DHT11 Sensor Initialized");
}

void loop() {
  delay(2000); // Wait 2 seconds between readings

  // Read temperature and humidity
  float humidity = dht.readHumidity();
  float temperature = dht.readTemperature();

  // Check if readings are valid
  if (isnan(humidity) || isnan(temperature)) {
    Serial.println("Failed to read from DHT sensor!");
    return;
  }

  // Print the readings to the Serial Monitor
  Serial.print("Humidity: ");
  Serial.print(humidity);
  Serial.print("%  Temperature: ");
  Serial.print(temperature);
  Serial.println("°C");
}
Important Considerations
- Power Supply: Ensure a stable 5V power source when using the USB input. For battery-powered applications, use a 3.3V regulator.
- Wi-Fi and Bluetooth: Avoid using both Wi-Fi and Bluetooth simultaneously in high-performance modes to reduce power consumption.
- Sensor Calibration: Some sensors (e.g., DHT11) may require a few seconds to stabilize after power-up.
Troubleshooting and FAQs
Common Issues
Board Not Detected by Computer
- Ensure the USB cable is functional and supports data transfer.
- Install the correct USB-to-serial drivers for the ESP32.
Failed to Upload Code
- Check that the correct COM port is selected in the Arduino IDE.
- Hold the "BOOT" button on the board while uploading the code.
Incorrect Sensor Readings
- Verify the sensor connections and ensure no loose wires.
- Allow the sensors to stabilize for a few seconds after powering up.
Wi-Fi Connection Issues
- Ensure the correct SSID and password are used in your code.
- Check for interference from other devices on the same frequency.
FAQs
Q: Can I use the ESP32 HIBISCUS SENSE with a 5V logic level?
A: No, the ESP32 operates at 3.3V logic levels. Use a level shifter if interfacing with 5V devices.
Q: How do I update the firmware?
A: Use the ESP-IDF or Arduino IDE to flash new firmware via the USB connection.
Q: Can I add external sensors to the board?
A: Yes, additional sensors can be connected via the GPIO, I2C, or UART pins.
Q: What is the maximum Wi-Fi range?
A: The Wi-Fi range depends on environmental factors but typically extends up to 50 meters indoors and 200 meters outdoors.