Cirkit Designer Logo
Cirkit Designer
Your all-in-one circuit design IDE
Home / 
Component Documentation

How to Use Сканер QR-кода: Examples, Pinouts, and Specs

Image of Сканер QR-кода
Cirkit Designer LogoDesign with Сканер QR-кода in Cirkit Designer

Introduction

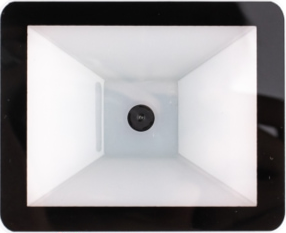
The Maikrt QR Code Scanner is a compact and efficient device designed to read and decode QR codes. These two-dimensional barcodes can store a variety of information, such as URLs, text, or other data. The scanner uses advanced optical technology to capture and interpret QR codes quickly and accurately.

Explore Projects Built with Сканер QR-кода

Use Cirkit Designer to design, explore, and prototype these projects online. Some projects support real-time simulation. Click "Open Project" to start designing instantly!
Arduino UNO GSM Communication Hub with QR Code Reader and LCD Interface
Image of park system: A project utilizing Сканер QR-кода in a practical application
This circuit is designed to function as a communication and control system with cellular capabilities, QR code scanning, and display output. It is built around an Arduino UNO microcontroller, interfaced with a SIM900A module, a QR code reader, and an I2C LCD screen, powered by a series of 18650 batteries through a boost converter. Tactile switches provide user interaction, and the Arduino's embedded code controls the operation of the circuit.
Cirkit Designer LogoOpen Project in Cirkit Designer
ESP32 and Arduino UNO QR Code Reader with LCD Display and Battery-Powered Operation
Image of park system (capstoneBINS): A project utilizing Сканер QR-кода in a practical application
This circuit integrates an ESP32 and an Arduino UNO to interface with a QR code reader and a 20x4 I2C LCD display. The ESP32 communicates with the Arduino UNO via serial connections, while the Arduino UNO handles the QR code reader and displays the scanned data on the LCD. Power is supplied through a 7.4V battery regulated by a buck converter.
Cirkit Designer LogoOpen Project in Cirkit Designer
ESP32-CAM Ultrasonic Distance Sensor with QR Code Reader and LED Indicator
Image of esp-cam: A project utilizing Сканер QR-кода in a practical application
This circuit features an ESP32-CAM module connected to an HC-SR04 ultrasonic distance sensor and a red LED, powered by a 3xAAA battery pack. The ESP32-CAM reads QR codes and controls the LED based on the distance measured by the ultrasonic sensor, turning the LED on if an object is detected within 10 cm.
Cirkit Designer LogoOpen Project in Cirkit Designer
4-Pin Connector Circuit for Edge Detection
Image of 4pin: A project utilizing Сканер QR-кода in a practical application
This circuit appears to be a simple interconnection of pins and points, with a 4-pin component serving as a central hub. The red and black pins of the 4-pin component are connected to various other pins and edge components, forming a basic network of connections without any active components or microcontroller logic.
Cirkit Designer LogoOpen Project in Cirkit Designer

Explore Projects Built with Сканер QR-кода

Use Cirkit Designer to design, explore, and prototype these projects online. Some projects support real-time simulation. Click "Open Project" to start designing instantly!
Image of park system: A project utilizing Сканер QR-кода in a practical application
Arduino UNO GSM Communication Hub with QR Code Reader and LCD Interface
This circuit is designed to function as a communication and control system with cellular capabilities, QR code scanning, and display output. It is built around an Arduino UNO microcontroller, interfaced with a SIM900A module, a QR code reader, and an I2C LCD screen, powered by a series of 18650 batteries through a boost converter. Tactile switches provide user interaction, and the Arduino's embedded code controls the operation of the circuit.
Cirkit Designer LogoOpen Project in Cirkit Designer
Image of park system (capstoneBINS): A project utilizing Сканер QR-кода in a practical application
ESP32 and Arduino UNO QR Code Reader with LCD Display and Battery-Powered Operation
This circuit integrates an ESP32 and an Arduino UNO to interface with a QR code reader and a 20x4 I2C LCD display. The ESP32 communicates with the Arduino UNO via serial connections, while the Arduino UNO handles the QR code reader and displays the scanned data on the LCD. Power is supplied through a 7.4V battery regulated by a buck converter.
Cirkit Designer LogoOpen Project in Cirkit Designer
Image of esp-cam: A project utilizing Сканер QR-кода in a practical application
ESP32-CAM Ultrasonic Distance Sensor with QR Code Reader and LED Indicator
This circuit features an ESP32-CAM module connected to an HC-SR04 ultrasonic distance sensor and a red LED, powered by a 3xAAA battery pack. The ESP32-CAM reads QR codes and controls the LED based on the distance measured by the ultrasonic sensor, turning the LED on if an object is detected within 10 cm.
Cirkit Designer LogoOpen Project in Cirkit Designer
Image of 4pin: A project utilizing Сканер QR-кода in a practical application
4-Pin Connector Circuit for Edge Detection
This circuit appears to be a simple interconnection of pins and points, with a 4-pin component serving as a central hub. The red and black pins of the 4-pin component are connected to various other pins and edge components, forming a basic network of connections without any active components or microcontroller logic.
Cirkit Designer LogoOpen Project in Cirkit Designer

Common Applications and Use Cases

  • Retail and Point-of-Sale (POS) systems for product scanning
  • Inventory management and logistics
  • Access control and ticket validation
  • Marketing campaigns with QR code-based promotions
  • Embedded systems for IoT applications

Technical Specifications

The Maikrt QR Code Scanner is designed for seamless integration into various systems. Below are its key technical details:

General Specifications

Parameter Value
Manufacturer Maikrt
Part ID Maikrt
Input Voltage 3.3V to 5V DC
Communication Interface UART (TTL)
Scan Speed Up to 300 scans per second
Supported QR Code Types QR Code, Data Matrix, PDF417
Operating Temperature -20°C to 60°C
Dimensions 25mm x 20mm x 15mm

Pin Configuration and Descriptions

The Maikrt QR Code Scanner has a 4-pin interface for easy connection to microcontrollers or other devices.

Pin Number Pin Name Description
1 VCC Power supply input (3.3V to 5V DC)
2 GND Ground
3 TX UART Transmit pin (data output)
4 RX UART Receive pin (data input)

Usage Instructions

How to Use the Component in a Circuit

  1. Power the Scanner: Connect the VCC pin to a 3.3V or 5V DC power source and the GND pin to ground.
  2. Connect to a Microcontroller: Use the TX and RX pins to establish a UART connection with a microcontroller, such as an Arduino UNO.
  3. Position the Scanner: Ensure the scanner is positioned to face the QR code for optimal reading.
  4. Read Data: The scanner will output decoded QR code data via the TX pin, which can be read by the microcontroller.

Important Considerations and Best Practices

  • Voltage Compatibility: Ensure the power supply voltage matches the scanner's requirements (3.3V to 5V DC).
  • UART Configuration: Set the UART baud rate to 9600 bps (default) unless specified otherwise in the datasheet.
  • Lighting Conditions: Avoid direct sunlight or overly bright environments, as they may interfere with scanning accuracy.
  • Distance and Angle: Maintain an appropriate distance (5-20 cm) and angle for optimal QR code detection.

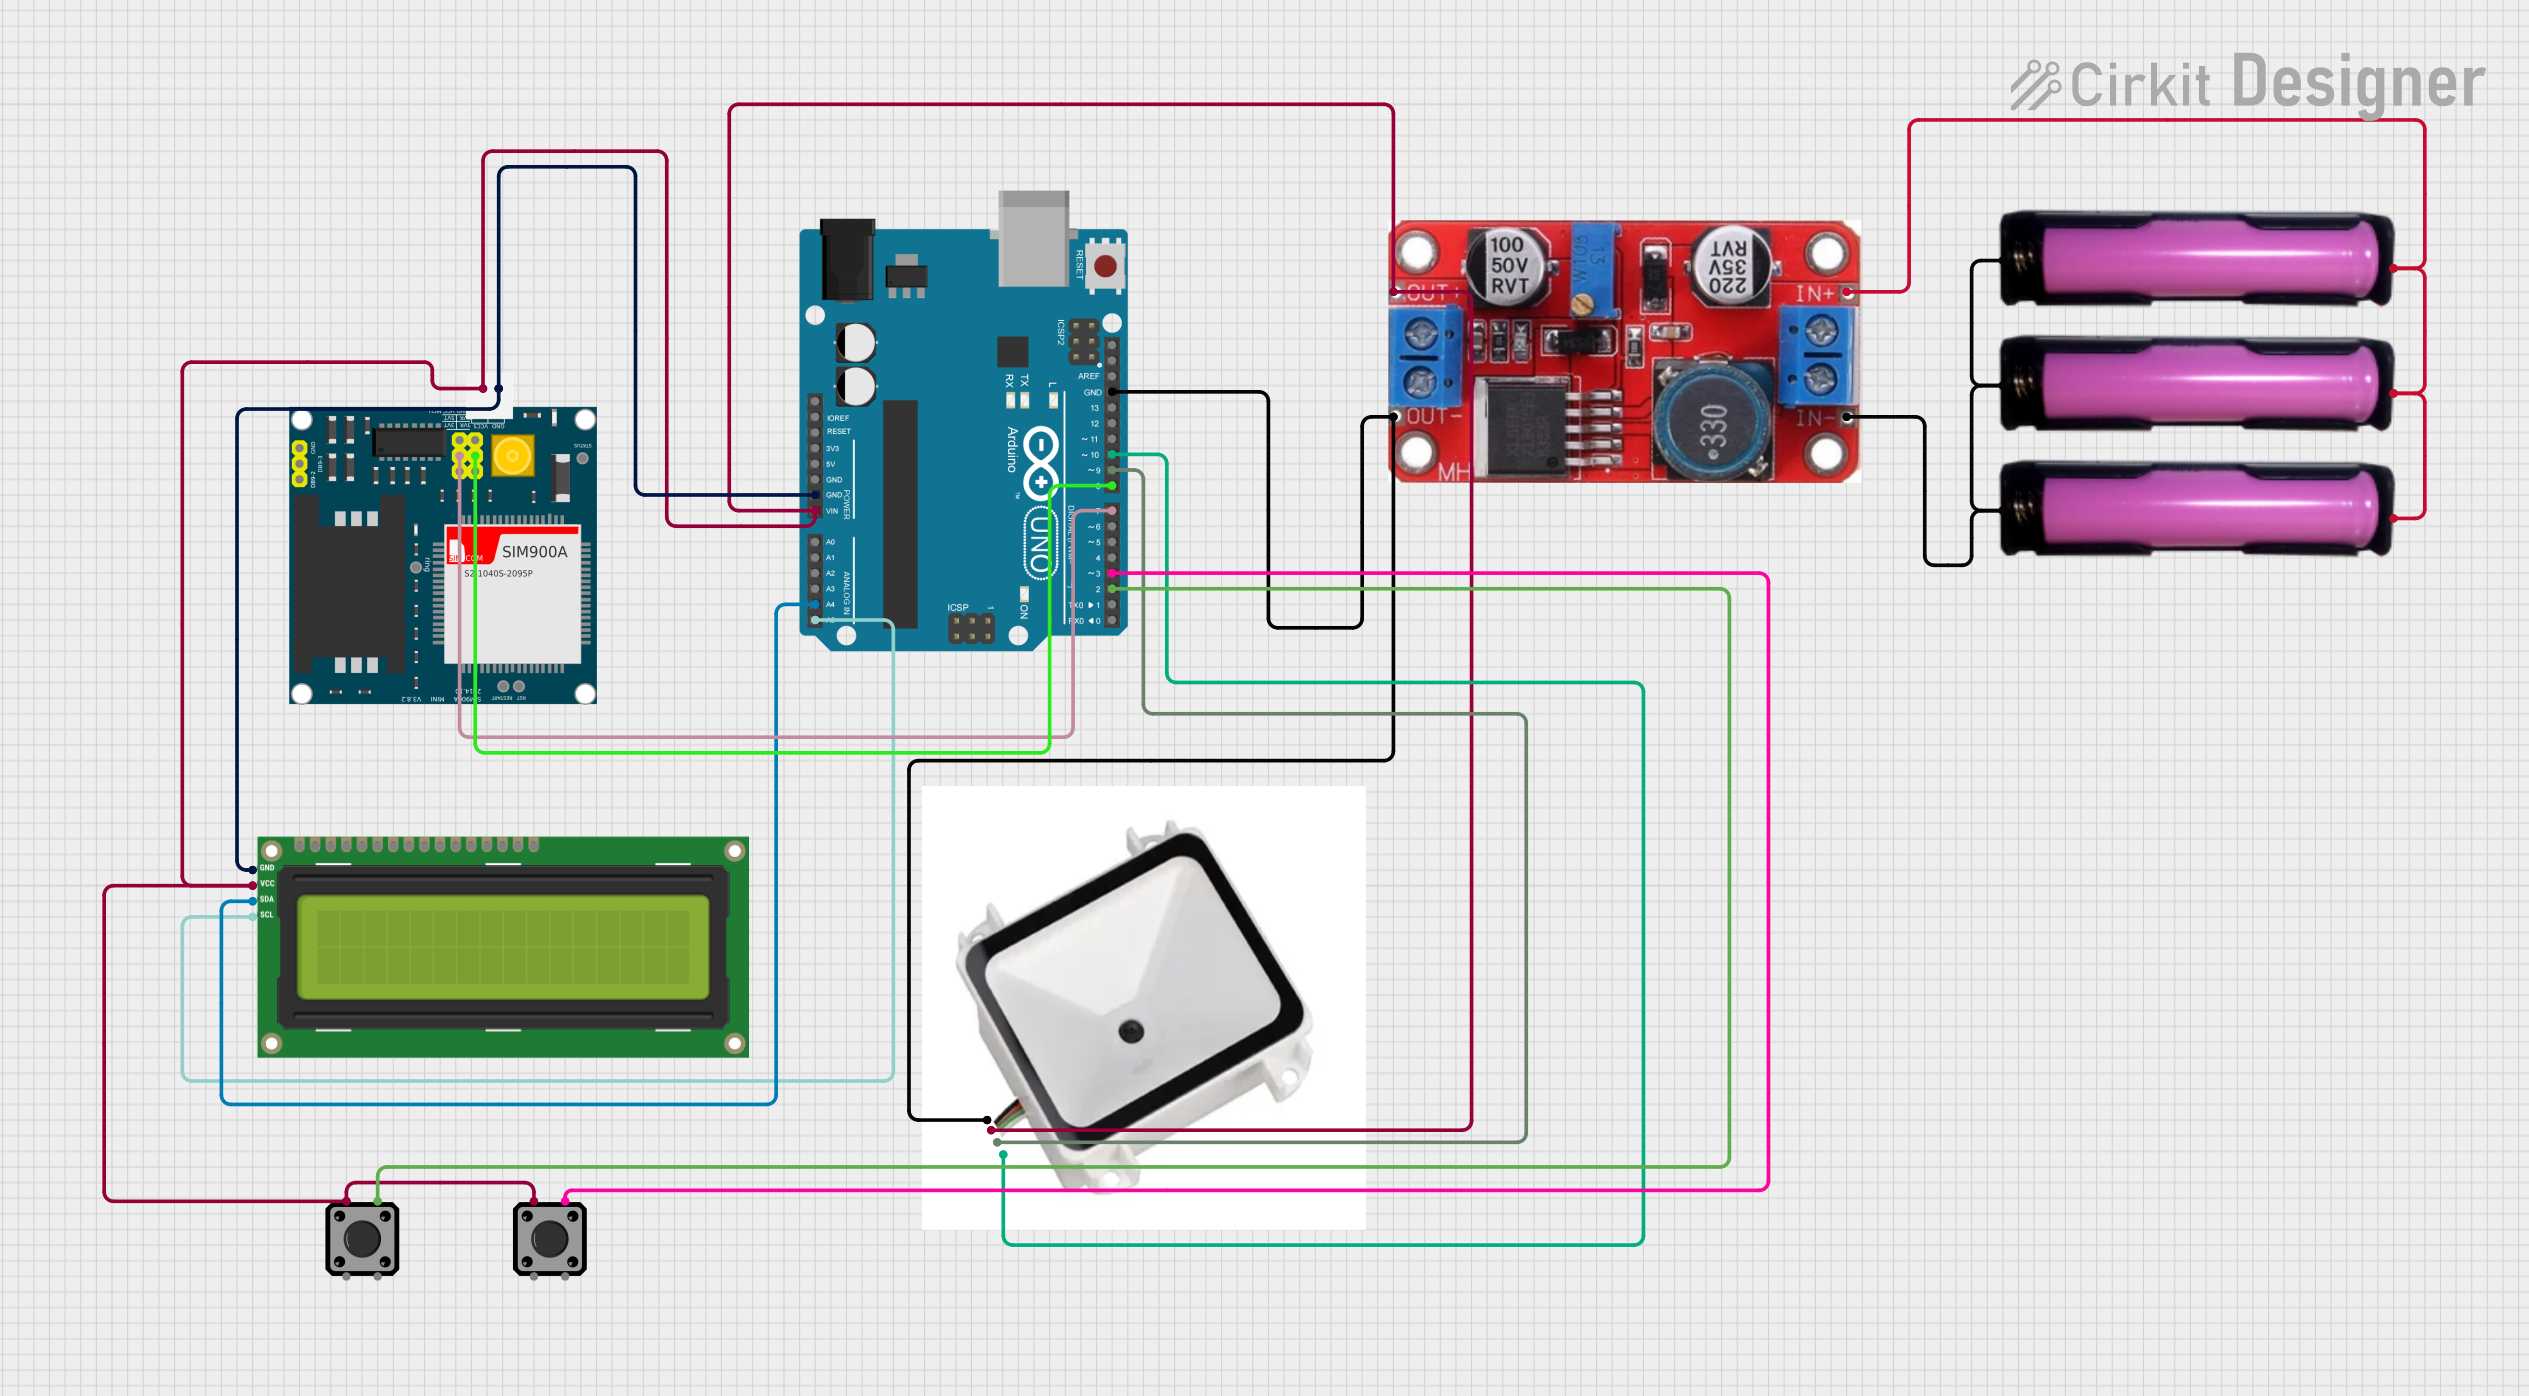
Example: Connecting to an Arduino UNO

Below is an example of how to connect and use the Maikrt QR Code Scanner with an Arduino UNO.

Circuit Diagram

  • Connect VCC to the Arduino's 5V pin.
  • Connect GND to the Arduino's GND pin.
  • Connect the scanner's TX pin to the Arduino's RX pin (digital pin 0).
  • Connect the scanner's RX pin to the Arduino's TX pin (digital pin 1).

Arduino Code

// Example code for interfacing the Maikrt QR Code Scanner with Arduino UNO
// Ensure the scanner is connected to the correct UART pins (TX and RX).

void setup() {
  Serial.begin(9600); // Initialize serial communication at 9600 bps
  Serial.println("QR Code Scanner Initialized");
}

void loop() {
  if (Serial.available() > 0) {
    // Read data from the scanner
    String qrData = Serial.readStringUntil('\n');
    
    // Print the decoded QR code data to the Serial Monitor
    Serial.print("QR Code Data: ");
    Serial.println(qrData);
  }
}

Troubleshooting and FAQs

Common Issues and Solutions

  1. No Data Output

    • Cause: Incorrect UART connection or baud rate mismatch.
    • Solution: Verify the TX and RX connections and ensure the baud rate is set to 9600 bps.
  2. Scanner Not Powering On

    • Cause: Insufficient or incorrect power supply.
    • Solution: Check the voltage and current ratings of the power source (3.3V to 5V DC).
  3. Poor Scanning Performance

    • Cause: Improper lighting or distance.
    • Solution: Adjust the lighting conditions and maintain a distance of 5-20 cm from the QR code.
  4. Data Corruption

    • Cause: Electrical noise or interference.
    • Solution: Use shorter wires and ensure proper grounding.

FAQs

  1. Can the scanner read barcodes other than QR codes?

    • Yes, it supports Data Matrix and PDF417 barcodes in addition to QR codes.
  2. What is the default baud rate of the scanner?

    • The default baud rate is 9600 bps.
  3. Can the scanner be used with a Raspberry Pi?

    • Yes, the scanner can be connected to a Raspberry Pi via its UART interface.
  4. What is the maximum scanning speed?

    • The scanner can perform up to 300 scans per second.

By following this documentation, users can effectively integrate and utilize the Maikrt QR Code Scanner in their projects.