How to Use Video Switch Flymod: Examples, Pinouts, and Specs
Introduction
The FlyMod Video Switch is a versatile electronic component designed to manage multiple video sources. It allows users to seamlessly switch between video inputs, making it ideal for applications such as presentations, live broadcasts, video conferencing, and multimedia systems. With its reliable performance and ease of integration, the FlyMod Video Switch is a valuable tool for professionals and hobbyists alike.
Explore Projects Built with Video Switch Flymod

Explore Projects Built with Video Switch Flymod
Common Applications and Use Cases
- Switching between multiple cameras during live broadcasts
- Managing video sources in multimedia presentations
- Video conferencing systems with multiple input devices
- Home theater setups for selecting between gaming consoles, media players, and more
- Educational or corporate environments requiring seamless video transitions
Technical Specifications
The FlyMod Video Switch is designed to handle a variety of video formats and offers robust performance. Below are the key technical details:
General Specifications
| Parameter | Value |
|---|---|
| Manufacturer | FlyMod |
| Part ID | Video Switch |
| Input Voltage Range | 5V DC |
| Power Consumption | 500 mW (typical) |
| Video Input Channels | 2 to 4 (depending on model) |
| Video Output Channels | 1 |
| Supported Video Formats | NTSC, PAL, HDMI (up to 1080p) |
| Switching Time | < 50 ms |
| Operating Temperature | -10°C to 60°C |
| Dimensions | 50 mm x 30 mm x 10 mm |
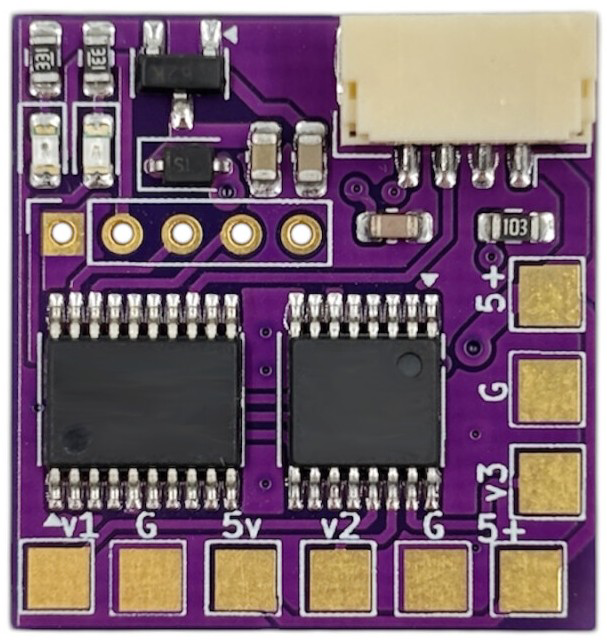
Pin Configuration and Descriptions
The FlyMod Video Switch features a simple pinout for easy integration into circuits. Below is the pin configuration:
| Pin Number | Pin Name | Description |
|---|---|---|
| 1 | VCC | Power supply input (5V DC) |
| 2 | GND | Ground connection |
| 3 | IN1 | Video input channel 1 |
| 4 | IN2 | Video input channel 2 |
| 5 | IN3 | Video input channel 3 (optional, model-specific) |
| 6 | IN4 | Video input channel 4 (optional, model-specific) |
| 7 | OUT | Video output |
| 8 | SEL | Input selection control (logic level signal) |
Usage Instructions
How to Use the Component in a Circuit
- Power the Component: Connect the
VCCpin to a 5V DC power source and theGNDpin to ground. - Connect Video Sources: Attach your video sources to the
IN1,IN2, and additional input pins (if available). - Connect the Output: Connect the
OUTpin to your display or video processing device. - Control Input Selection: Use the
SELpin to select the desired video input. This pin accepts a logic-level signal:- Logic LOW (0V): Selects
IN1 - Logic HIGH (5V): Selects
IN2 - For models with more inputs, additional logic levels or control methods may apply.
- Logic LOW (0V): Selects
Important Considerations and Best Practices
- Ensure the power supply is stable and within the specified voltage range to avoid damage.
- Use shielded cables for video connections to minimize interference and maintain signal quality.
- If using the component with an Arduino or microcontroller, ensure the control signal on the
SELpin matches the logic level requirements. - Avoid hot-swapping video inputs to prevent potential damage to the component or connected devices.
Example: Using with Arduino UNO
The FlyMod Video Switch can be easily controlled using an Arduino UNO. Below is an example code snippet to toggle between two video inputs:
// Define the SEL pin connected to the FlyMod Video Switch
const int selPin = 7;

void setup() {
  pinMode(selPin, OUTPUT); // Set SEL pin as an output
  digitalWrite(selPin, LOW); // Start with IN1 selected
}

void loop() {
  // Switch to IN2 after 5 seconds
  digitalWrite(selPin, HIGH); // Select IN2
  delay(5000); // Wait for 5 seconds

  // Switch back to IN1 after another 5 seconds
  digitalWrite(selPin, LOW); // Select IN1
  delay(5000); // Wait for 5 seconds
}
Note: Ensure the SEL pin on the FlyMod Video Switch is connected to pin 7 on the Arduino UNO.
Troubleshooting and FAQs
Common Issues and Solutions
No Video Output
- Cause: Incorrect wiring or power supply issues.
- Solution: Verify all connections, ensure the power supply is stable, and check the
OUTpin connection.
Video Signal Interference
- Cause: Poor-quality or unshielded cables.
- Solution: Use high-quality shielded cables for all video connections.
Input Selection Not Working
- Cause: Incorrect logic level on the
SELpin. - Solution: Verify the control signal voltage and ensure it matches the logic level requirements.
- Cause: Incorrect logic level on the
Component Overheating
- Cause: Exceeding the operating voltage or current limits.
- Solution: Ensure the input voltage is within the specified range (5V DC) and avoid overloading the component.
FAQs
Q1: Can the FlyMod Video Switch handle HDMI signals?
A1: Yes, the FlyMod Video Switch supports HDMI signals up to 1080p, as well as NTSC and PAL formats.
Q2: How many video inputs can I connect?
A2: The number of inputs depends on the specific model. Most models support 2 to 4 video inputs.
Q3: Can I use the FlyMod Video Switch with a Raspberry Pi?
A3: Yes, the FlyMod Video Switch can be controlled using GPIO pins on a Raspberry Pi. Ensure the GPIO voltage levels are compatible with the SEL pin.
Q4: Is it possible to cascade multiple FlyMod Video Switches?
A4: Yes, you can cascade multiple switches to handle more video inputs. However, ensure proper signal amplification if needed to maintain video quality.
This concludes the documentation for the FlyMod Video Switch. For further assistance, refer to the manufacturer's datasheet or contact FlyMod support.