How to Use FCHUB-12S V2: Examples, Pinouts, and Specs
Introduction
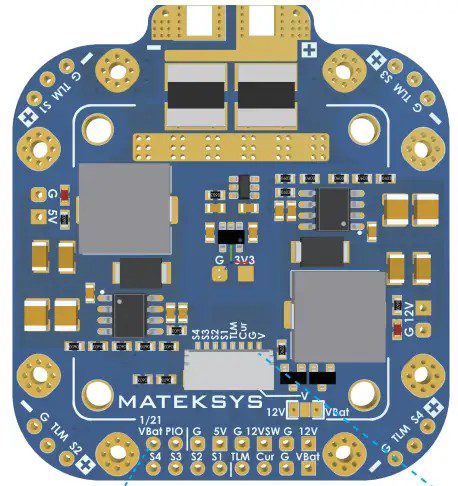
The FCHUB-12S V2 by MATEKSYS is a versatile flight controller hub designed specifically for multi-rotor drones. It serves as a central hub for connecting essential components such as Electronic Speed Controllers (ESCs), GPS modules, telemetry systems, and other peripherals. This component is engineered to streamline communication and power distribution, ensuring efficient and reliable drone operation.
Explore Projects Built with FCHUB-12S V2


Explore Projects Built with FCHUB-12S V2
Common Applications and Use Cases
- Multi-rotor drones (quadcopters, hexacopters, etc.)
- FPV (First-Person View) racing drones
- Aerial photography and videography platforms
- Autonomous drone systems with GPS and telemetry integration
- Custom drone builds requiring efficient power and signal management
Technical Specifications
The FCHUB-12S V2 is designed to handle high-performance drone systems with robust power and connectivity features. Below are the key technical details:
General Specifications
- Input Voltage Range: 3S–12S LiPo (9–60V)
- Maximum Current: 200A (continuous), 240A (burst for 10 seconds)
- BEC Output: 5V/2A and 10V/2A
- Dimensions: 36mm x 36mm (standard 30.5mm x 30.5mm mounting holes)
- Weight: 7g
- Connector Type: Solder pads and JST connectors
- Firmware Compatibility: Compatible with most flight controllers (e.g., Betaflight, INAV)
Pin Configuration and Descriptions
The FCHUB-12S V2 features multiple solder pads and connectors for seamless integration with other components. Below is the pin configuration:
| Pin Name | Description |
|---|---|
| VBAT+ | Main battery positive input (connect to LiPo battery positive terminal). |
| GND | Ground connection (connect to LiPo battery negative terminal). |
| ESC1-4 | ESC signal outputs for motor control (connect to ESC signal wires). |
| 5V | 5V BEC output for powering flight controllers or peripherals. |
| 10V | 10V BEC output for powering cameras, VTX, or other components. |
| CURR | Current sensor output (connect to flight controller for current monitoring). |
| GPS | GPS module connection (TX/RX for communication with flight controller). |
| TELEM | Telemetry connection for real-time data transmission to ground station. |
| LED | LED strip output for programmable lighting effects. |
Usage Instructions
How to Use the FCHUB-12S V2 in a Circuit
Power Connection:
- Connect the VBAT+ and GND pads to the positive and negative terminals of your LiPo battery, respectively.
- Ensure the battery voltage is within the supported range (3S–12S).
ESC Connections:
- Solder the signal wires of your ESCs to the ESC1-4 pads.
- Connect the ESC power wires directly to the battery or a power distribution board if required.
Flight Controller Integration:
- Use the 5V or 10V BEC outputs to power your flight controller.
- Connect the CURR pad to the current sensor input on your flight controller for real-time current monitoring.
Peripheral Connections:
- Attach a GPS module to the GPS pads (TX/RX).
- Connect telemetry modules to the TELEM pads for data transmission.
- Use the LED output to connect programmable LED strips for visual feedback.
Important Considerations and Best Practices
- Soldering: Use high-quality solder and ensure all connections are secure to prevent signal loss or power issues.
- Heat Management: Avoid overheating the board during soldering to prevent damage to components.
- Voltage Matching: Verify that all connected peripherals are compatible with the provided BEC output voltages (5V or 10V).
- Current Monitoring: Calibrate the current sensor in your flight controller software for accurate readings.
- Firmware Configuration: Configure your flight controller software (e.g., Betaflight) to recognize the connected peripherals and sensors.
Example Code for Arduino UNO (Telemetry Integration)
If you are using the FCHUB-12S V2 with an Arduino UNO for telemetry purposes, here is an example code snippet:
#include <SoftwareSerial.h>

// Define RX and TX pins for telemetry communication
#define RX_PIN 10
#define TX_PIN 11

// Initialize SoftwareSerial for telemetry
SoftwareSerial telemetrySerial(RX_PIN, TX_PIN);

void setup() {
  // Start the serial communication with the telemetry module
  telemetrySerial.begin(9600);
  Serial.begin(9600); // For debugging via Serial Monitor

  Serial.println("Telemetry communication initialized.");
}

void loop() {
  // Check if data is available from the telemetry module
  if (telemetrySerial.available()) {
    String telemetryData = telemetrySerial.readString();
    Serial.println("Telemetry Data: " + telemetryData);
  }

  // Send data to the telemetry module (example: "Hello, Drone!")
  telemetrySerial.println("Hello, Drone!");
  delay(1000); // Delay for 1 second
}
Troubleshooting and FAQs
Common Issues and Solutions
No Power to Flight Controller or Peripherals:
- Cause: Incorrect connection to the BEC outputs.
- Solution: Verify that the 5V or 10V outputs are properly connected to the flight controller or peripherals.
ESCs Not Responding:
- Cause: Signal wires not soldered correctly or misconfigured in the flight controller software.
- Solution: Check the solder joints on the ESC1-4 pads and ensure the ESCs are properly configured in the software.
Telemetry Data Not Transmitting:
- Cause: Incorrect wiring or baud rate mismatch.
- Solution: Verify the connections to the TELEM pads and ensure the baud rate matches the telemetry module's settings.
Overheating:
- Cause: Excessive current draw or poor ventilation.
- Solution: Ensure the current draw does not exceed the rated limits and provide adequate airflow around the board.
FAQs
Q: Can I use the FCHUB-12S V2 with a 6S LiPo battery?
- A: Yes, the FCHUB-12S V2 supports 3S–12S LiPo batteries, including 6S.
Q: Is the current sensor calibration necessary?
- A: Yes, calibrating the current sensor in your flight controller software ensures accurate current readings.
Q: Can I power both the flight controller and a camera using the BEC outputs?
- A: Yes, you can use the 5V and 10V outputs simultaneously, provided the total current draw does not exceed 2A per output.
Q: What is the maximum supported ESC current?
- A: The FCHUB-12S V2 supports up to 200A continuous current and 240A burst current for 10 seconds.
This concludes the documentation for the FCHUB-12S V2. For further assistance, refer to the official MATEKSYS support resources.