Cirkit Designer Logo
Cirkit Designer
Your all-in-one circuit design IDE
Home / 
Component Documentation

How to Use Adafruit 128x64 OLED FeatherWing: Examples, Pinouts, and Specs

Image of Adafruit 128x64 OLED FeatherWing
Cirkit Designer LogoDesign with Adafruit 128x64 OLED FeatherWing in Cirkit Designer

Introduction

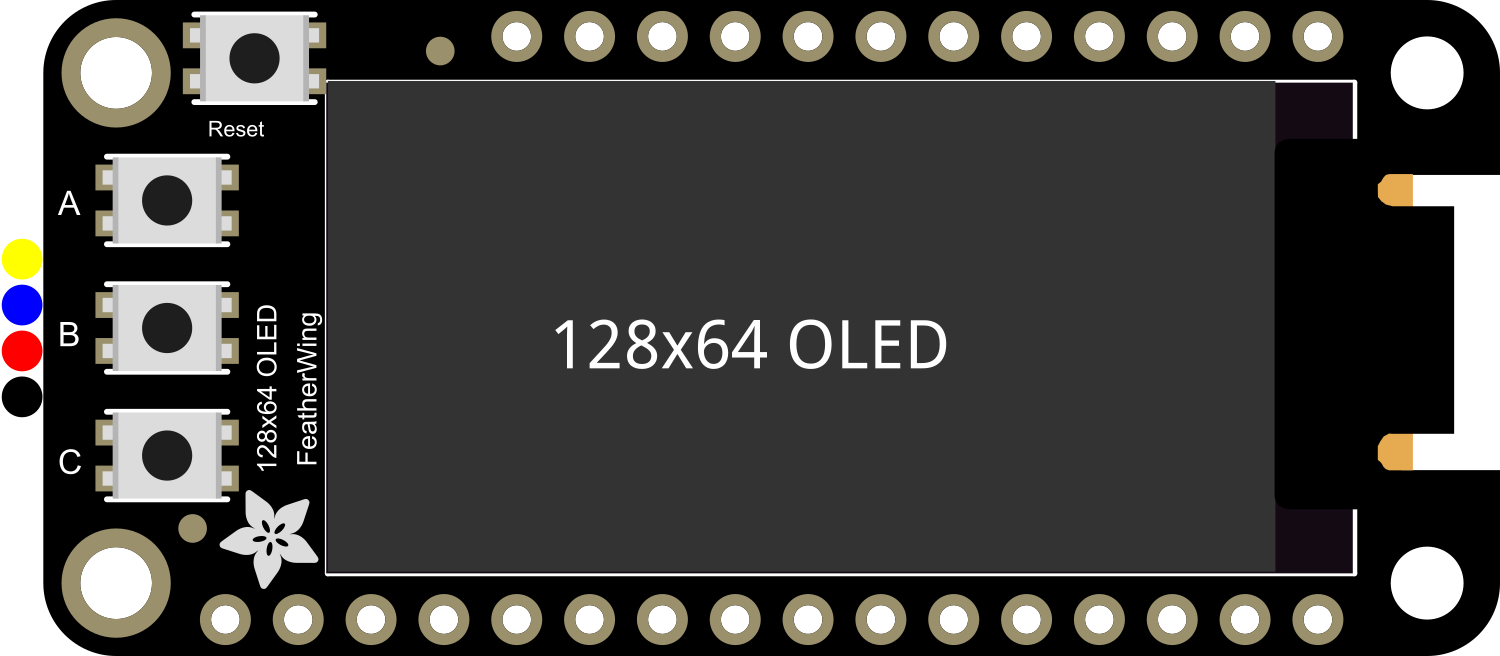
The Adafruit 128x64 OLED FeatherWing is a crisp and clear OLED display module with a resolution of 128x64 pixels. It is specifically designed to seamlessly integrate with the Adafruit Feather line of development boards, providing a compact and energy-efficient display option for your projects. This display is ideal for adding a small screen to display data, graphics, and text. Common applications include wearable tech, portable instruments, and any project where a small yet readable display is required.

Explore Projects Built with Adafruit 128x64 OLED FeatherWing

Use Cirkit Designer to design, explore, and prototype these projects online. Some projects support real-time simulation. Click "Open Project" to start designing instantly!
Arduino UNO and OLED FeatherWing Display: Battery-Powered Hello World Project
Image of ARDUINO_SSD1306: A project utilizing Adafruit 128x64 OLED FeatherWing in a practical application
This circuit consists of an Arduino UNO connected to an Adafruit OLED FeatherWing display via I2C communication (SDA and SCL lines). The Arduino is powered through a Vcc source and provides 3.3V and GND connections to the OLED display. The Arduino runs a program to display 'Hello, World!' on the OLED screen.
Cirkit Designer LogoOpen Project in Cirkit Designer
Arduino UNO-Based Motion Sensor with OLED Display
Image of Acelerometer(1): A project utilizing Adafruit 128x64 OLED FeatherWing in a practical application
This circuit uses an Arduino UNO to read data from an MPU-6050 accelerometer and gyroscope sensor and display the readings on an Adafruit 128x64 OLED FeatherWing. The Arduino communicates with both the sensor and the display via the I2C protocol, and the code initializes the devices, reads sensor data, and updates the display every 500 milliseconds.
Cirkit Designer LogoOpen Project in Cirkit Designer
Arduino UNO with I2C OLED Display Interface
Image of OLED_Display: A project utilizing Adafruit 128x64 OLED FeatherWing in a practical application
This circuit connects an Arduino UNO to a 128x64 OLED display using I2C communication protocol. The Arduino provides power to the display and communicates with it via the SDA and SCL lines connected to the A4 and A5 pins, respectively. The embedded code initializes the display and prints 'Hello, World!' on it.
Cirkit Designer LogoOpen Project in Cirkit Designer
Wi-Fi Controlled RGB LED and OLED Display with ESP8266
Image of ESP thermometer reciever: A project utilizing Adafruit 128x64 OLED FeatherWing in a practical application
This circuit features an ESP8266 microcontroller interfaced with a 128x64 OLED display via I2C for visual output and an RGB LED controlled through current-limiting resistors. The ESP8266 provides power and control signals to both the display and the LED, enabling visual feedback and status indication.
Cirkit Designer LogoOpen Project in Cirkit Designer

Explore Projects Built with Adafruit 128x64 OLED FeatherWing

Use Cirkit Designer to design, explore, and prototype these projects online. Some projects support real-time simulation. Click "Open Project" to start designing instantly!
Image of ARDUINO_SSD1306: A project utilizing Adafruit 128x64 OLED FeatherWing in a practical application
Arduino UNO and OLED FeatherWing Display: Battery-Powered Hello World Project
This circuit consists of an Arduino UNO connected to an Adafruit OLED FeatherWing display via I2C communication (SDA and SCL lines). The Arduino is powered through a Vcc source and provides 3.3V and GND connections to the OLED display. The Arduino runs a program to display 'Hello, World!' on the OLED screen.
Cirkit Designer LogoOpen Project in Cirkit Designer
Image of Acelerometer(1): A project utilizing Adafruit 128x64 OLED FeatherWing in a practical application
Arduino UNO-Based Motion Sensor with OLED Display
This circuit uses an Arduino UNO to read data from an MPU-6050 accelerometer and gyroscope sensor and display the readings on an Adafruit 128x64 OLED FeatherWing. The Arduino communicates with both the sensor and the display via the I2C protocol, and the code initializes the devices, reads sensor data, and updates the display every 500 milliseconds.
Cirkit Designer LogoOpen Project in Cirkit Designer
Image of OLED_Display: A project utilizing Adafruit 128x64 OLED FeatherWing in a practical application
Arduino UNO with I2C OLED Display Interface
This circuit connects an Arduino UNO to a 128x64 OLED display using I2C communication protocol. The Arduino provides power to the display and communicates with it via the SDA and SCL lines connected to the A4 and A5 pins, respectively. The embedded code initializes the display and prints 'Hello, World!' on it.
Cirkit Designer LogoOpen Project in Cirkit Designer
Image of ESP thermometer reciever: A project utilizing Adafruit 128x64 OLED FeatherWing in a practical application
Wi-Fi Controlled RGB LED and OLED Display with ESP8266
This circuit features an ESP8266 microcontroller interfaced with a 128x64 OLED display via I2C for visual output and an RGB LED controlled through current-limiting resistors. The ESP8266 provides power and control signals to both the display and the LED, enabling visual feedback and status indication.
Cirkit Designer LogoOpen Project in Cirkit Designer

Technical Specifications

Key Technical Details

  • Display Type: Monochrome OLED
  • Resolution: 128x64 pixels
  • Diagonal Screen Size: 1.3 inches
  • Interface: I2C (Inter-Integrated Circuit)
  • Operating Voltage: 3.3V to 5V
  • Driver IC: SSD1306

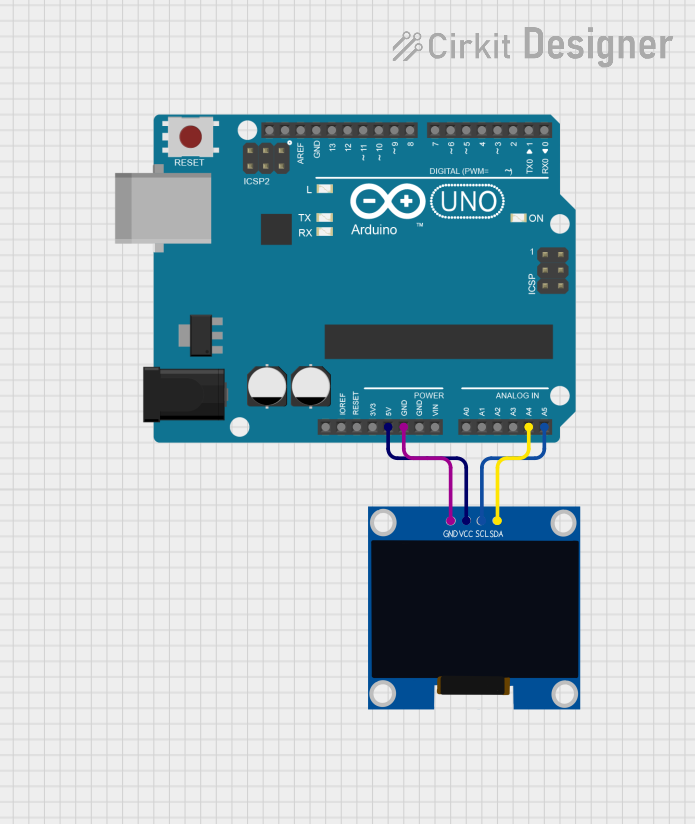
Pin Configuration and Descriptions

Pin Name Description
GND Ground pin, connected to system ground
3V 3.3V power supply pin
SCL Serial Clock for I2C communication
SDA Serial Data for I2C communication
RST Reset pin, active low

Usage Instructions

Integration with a Circuit

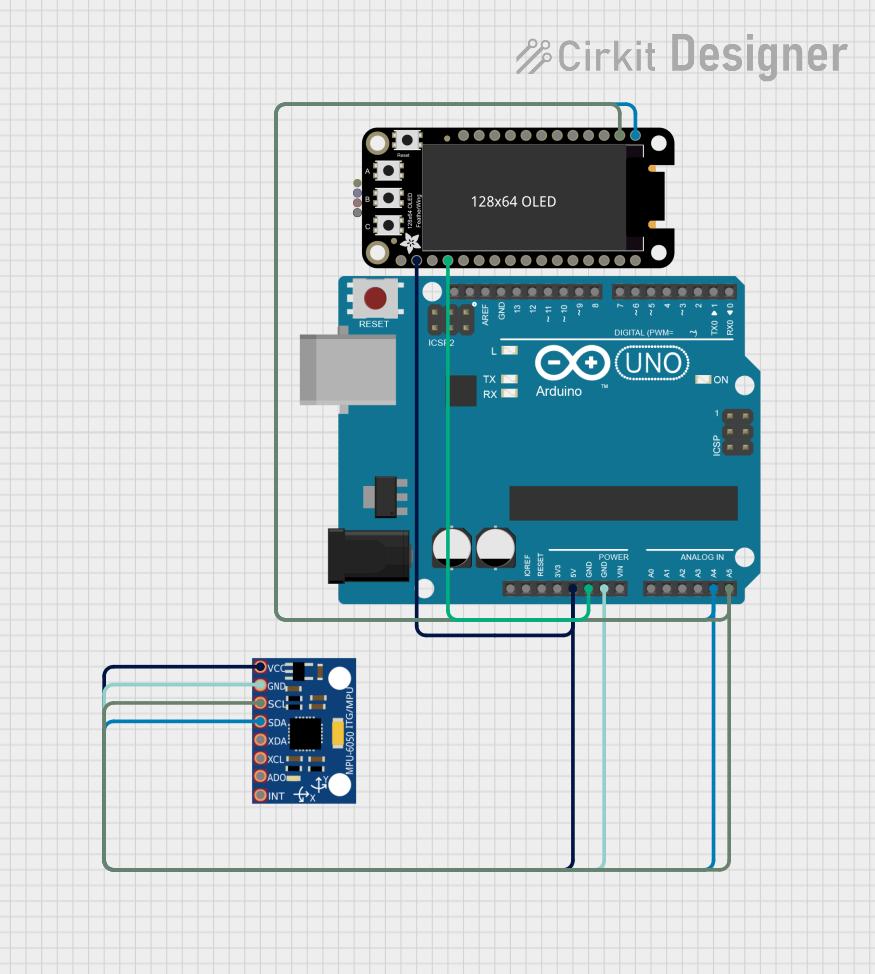
To use the Adafruit 128x64 OLED FeatherWing with a Feather board:

  1. Align the headers of the OLED FeatherWing with the corresponding pins on the Feather board.
  2. Solder the headers to establish a secure connection.
  3. Ensure that the Feather board is powered with a voltage appropriate for the OLED FeatherWing (3.3V to 5V).

Best Practices

  • Use a level shifter if you are interfacing with a 5V microcontroller to protect the OLED display.
  • Avoid exposing the display to direct sunlight or high temperatures to prevent damage.
  • When handling the display, be cautious of static discharge by grounding yourself.

Example Code for Arduino UNO

#include <Wire.h>
#include <Adafruit_GFX.h>
#include <Adafruit_SSD1306.h>

#define SCREEN_WIDTH 128 // OLED display width, in pixels
#define SCREEN_HEIGHT 64 // OLED display height, in pixels

// Declaration for an SSD1306 display connected to I2C (SDA, SCL pins)
Adafruit_SSD1306 display(SCREEN_WIDTH, SCREEN_HEIGHT, &Wire);

void setup() {
  // Initialize with the I2C addr 0x3C (for the 128x64)
  if(!display.begin(SSD1306_SWITCHCAPVCC, 0x3C)) {
    Serial.println(F("SSD1306 allocation failed"));
    for(;;); // Don't proceed, loop forever
  }

  // Clear the buffer
  display.clearDisplay();

  // Draw a single pixel in white
  display.drawPixel(10, 10, WHITE);

  // Display the drawing
  display.display();
}

void loop() {
  // You can add your own code here to update the display repeatedly
}

Ensure that the Adafruit GFX and SSD1306 libraries are installed in your Arduino IDE before uploading this code to your Arduino UNO. The code initializes the display and draws a single pixel.

Troubleshooting and FAQs

Common Issues

  • Display Not Turning On: Ensure that the display is correctly seated on the Feather board and that the power supply is within the specified range.
  • Garbled or No Display: Check the I2C connections and ensure that the correct I2C address is used in the code.
  • Dim Display: Adjust the contrast settings in the code or check for low power supply voltage.

Solutions and Tips

  • Always double-check wiring and solder joints for a secure and correct connection.
  • Use the display.display() function to refresh the screen after drawing or clearing the display.
  • If you encounter issues with the display, consult the Adafruit forums and the extensive community for support.

FAQs

Q: Can I use this display with other microcontrollers besides the Feather boards?

A: Yes, the display can be used with any microcontroller that supports I2C communication, but you may need to adjust the voltage levels and pin connections accordingly.

Q: How do I install the required libraries for the OLED display?

A: You can install the Adafruit GFX and SSD1306 libraries through the Arduino IDE's Library Manager or by downloading them from the Adafruit GitHub repository.

Q: Is it possible to display images on the OLED FeatherWing?

A: Yes, the Adafruit GFX library provides functions to display bitmap images on the screen. You will need to convert your images to the appropriate format and include them in your code.