How to Use Geiger counter: Examples, Pinouts, and Specs
Introduction
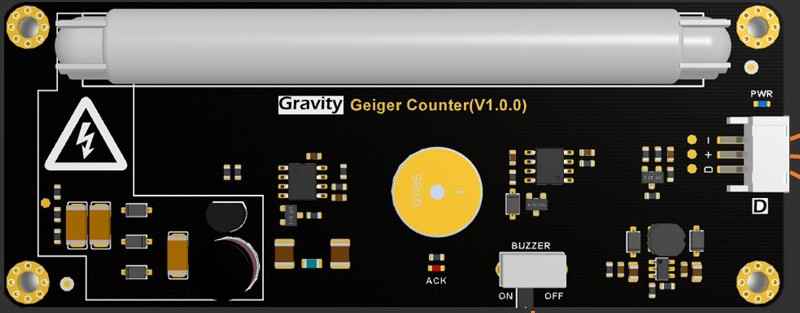
The Gravity Geiger Counter is a device designed to detect and measure ionizing radiation, including alpha particles, beta particles, and gamma rays. It operates using a Geiger-Müller (GM) tube, which generates an electrical pulse when radiation interacts with the gas inside the tube. These pulses are then processed to quantify radiation levels, making the Geiger counter an essential tool for applications in environmental monitoring, nuclear research, and personal safety.
Explore Projects Built with Geiger counter
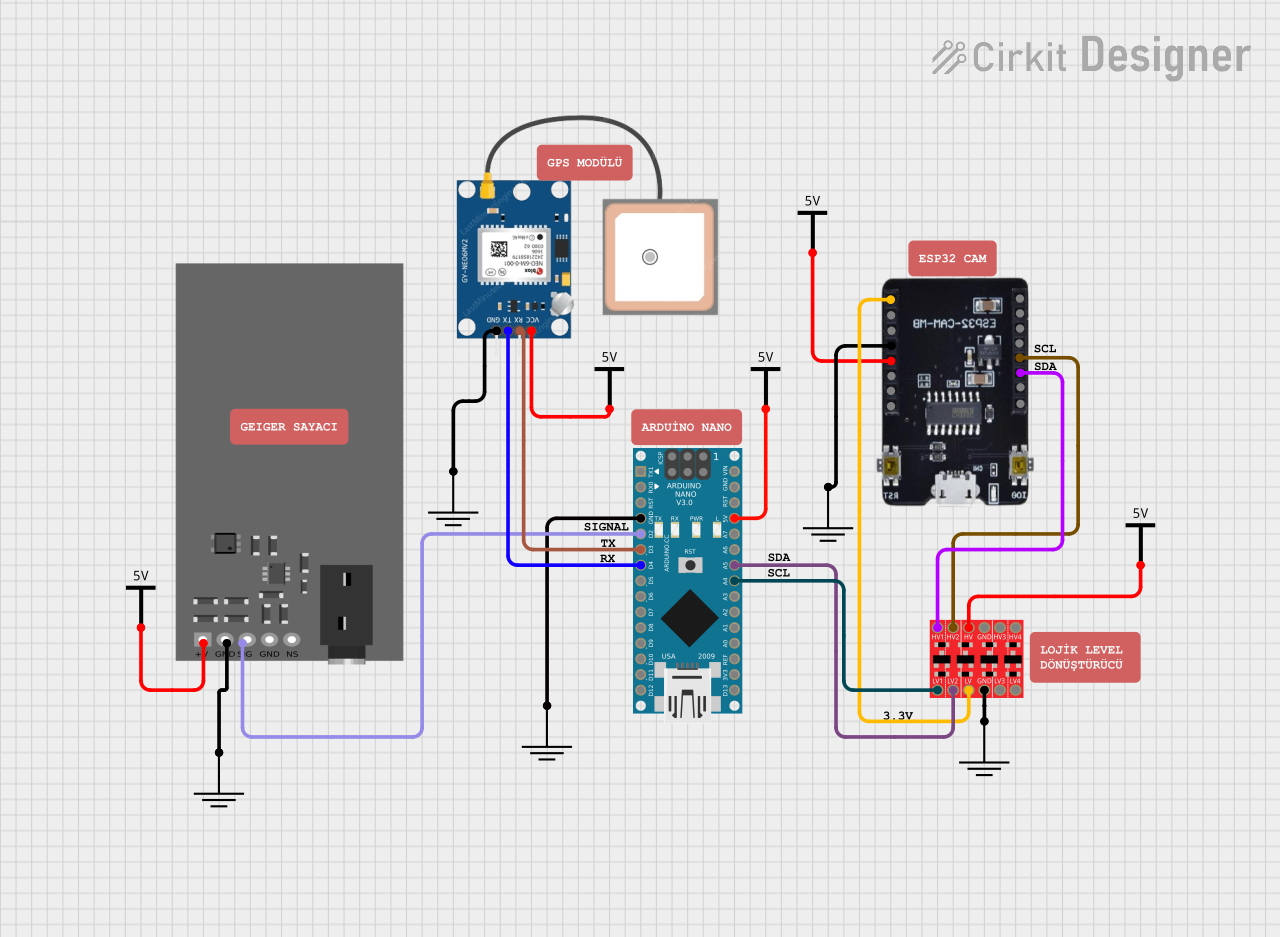
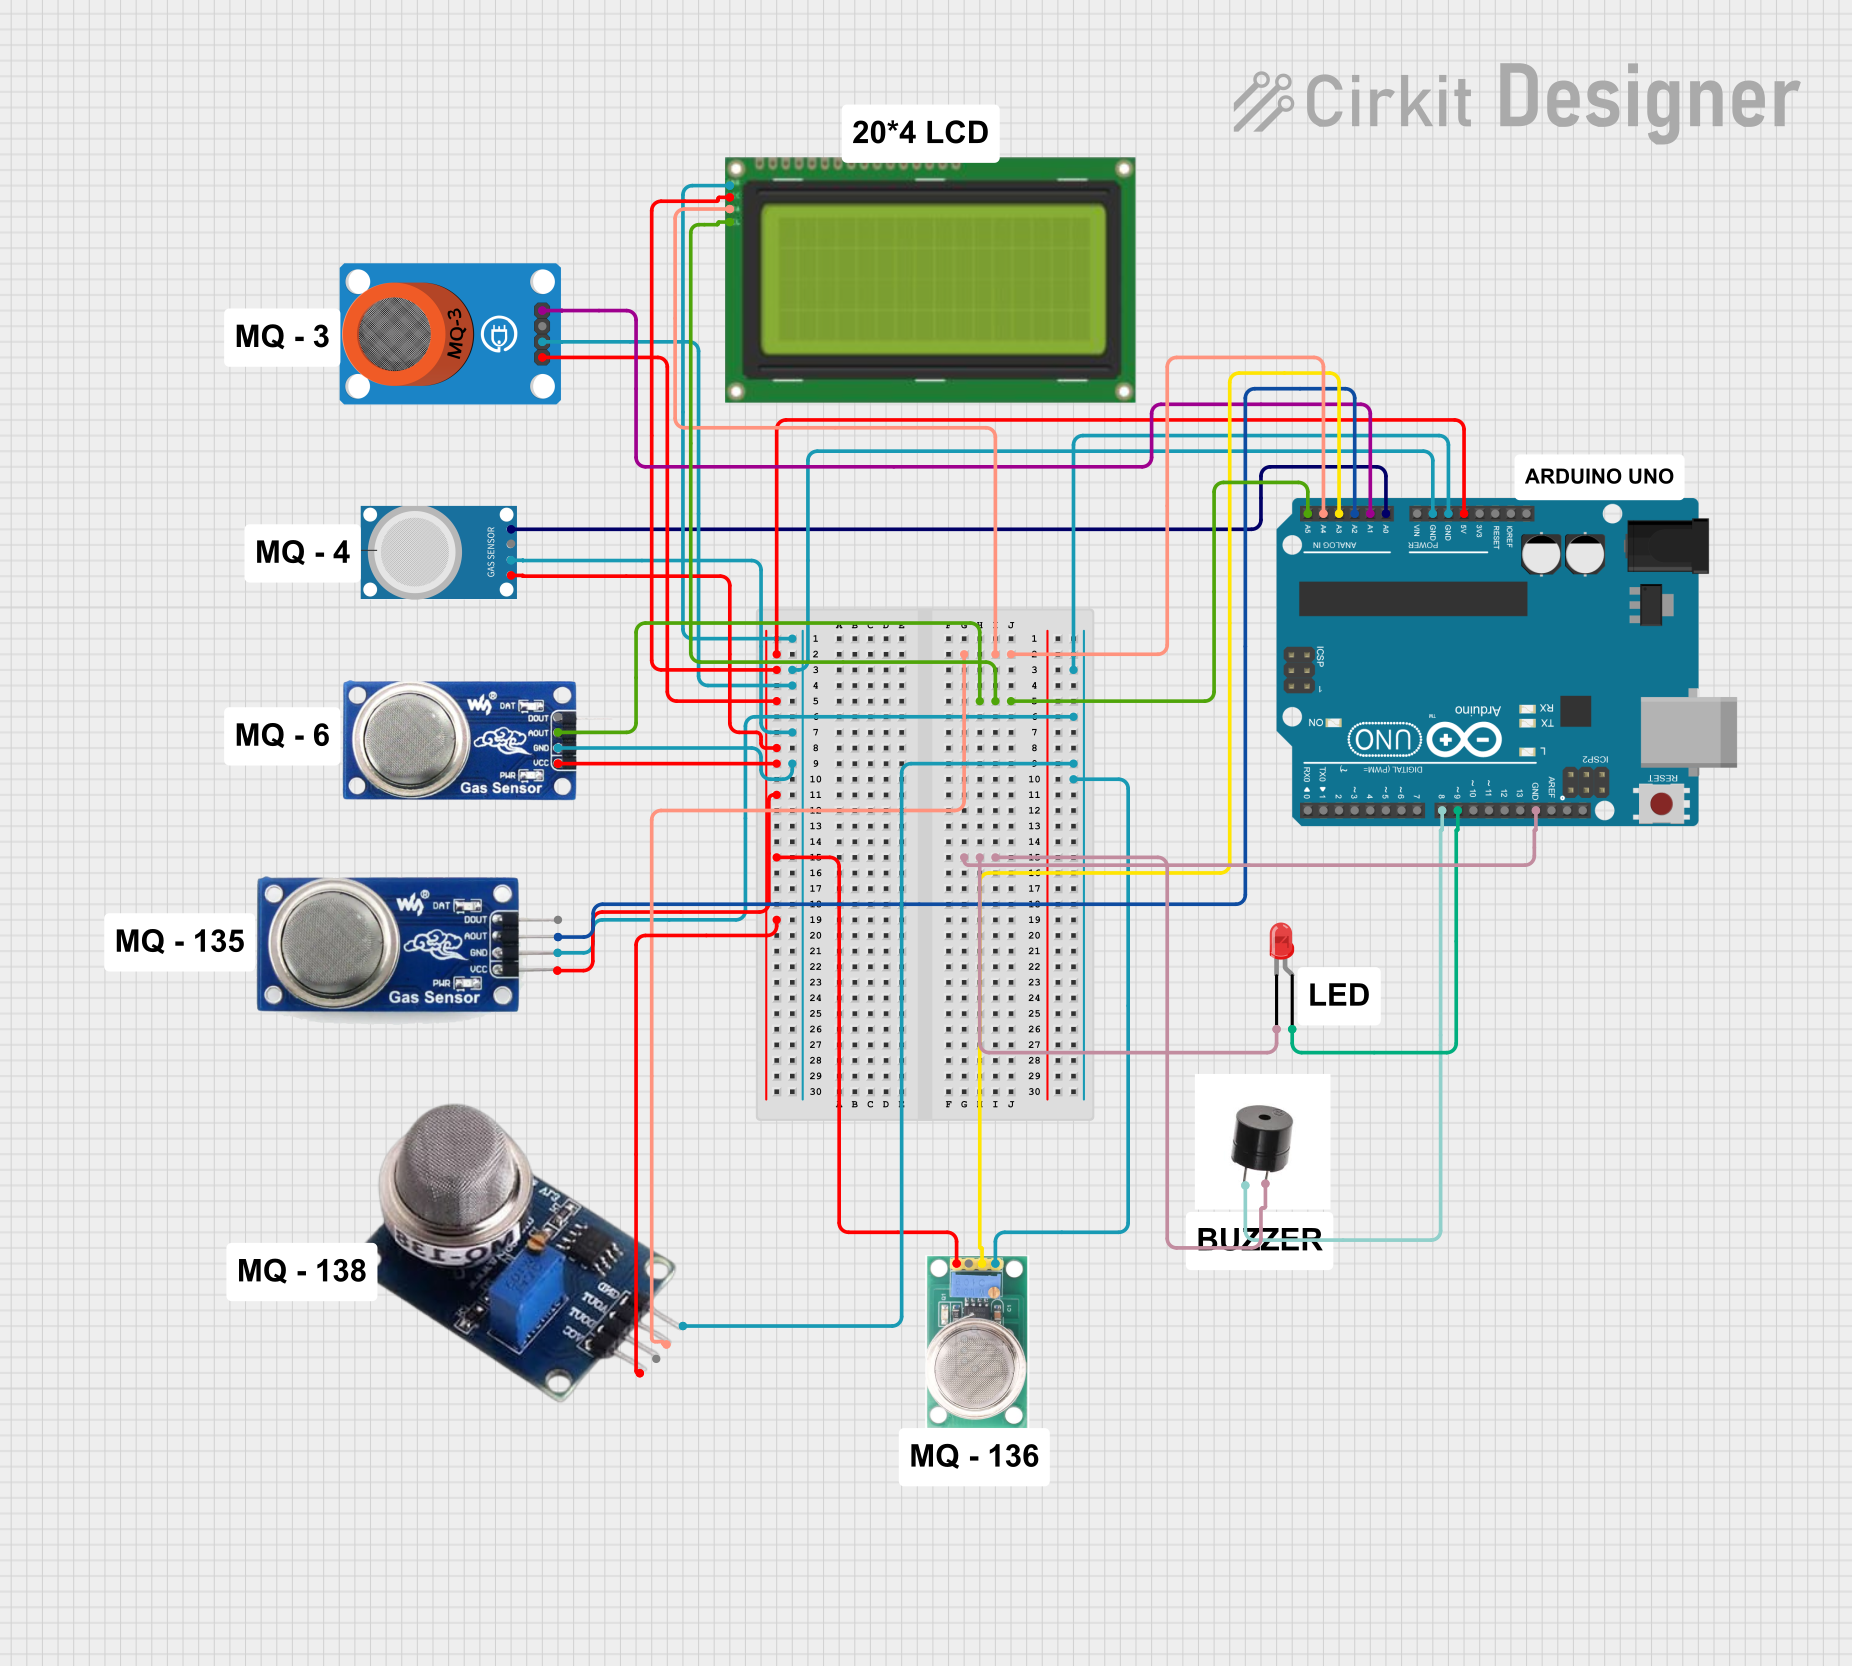
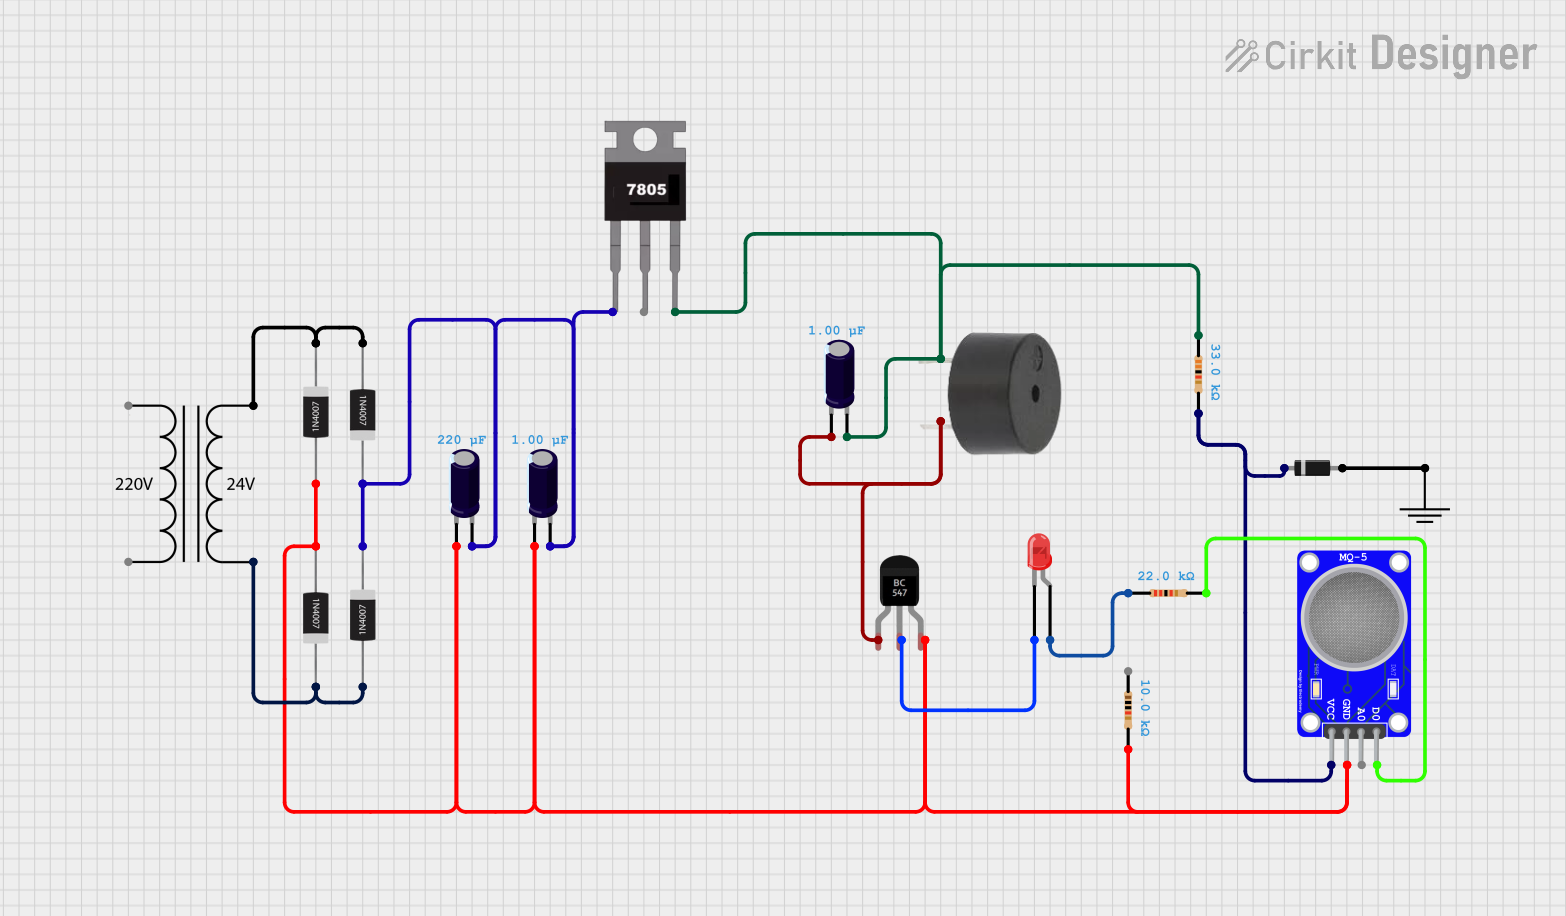
Explore Projects Built with Geiger counter
Common Applications and Use Cases
- Environmental Monitoring: Measuring background radiation levels in various environments.
- Nuclear Research: Detecting and quantifying radiation in laboratory experiments.
- Personal Safety: Monitoring radiation exposure for individuals working in hazardous environments.
- Educational Purposes: Teaching radiation principles in schools and universities.
- Industrial Applications: Ensuring safety in industries dealing with radioactive materials.
Technical Specifications
Key Technical Details
- Operating Voltage: 3.3V to 5V DC
- Current Consumption: ≤ 30mA
- Radiation Detection Range: 0.1 μSv/h to 1,000 μSv/h
- Pulse Output: Digital signal (high pulse for each radiation event)
- Supported GM Tubes: Compatible with J305, M4011, STS-5, SBM-20, and similar tubes
- Output Interface: 3-pin Gravity interface (Signal, VCC, GND)
- Dimensions: 42mm x 32mm x 18mm
- Weight: ~20g
Pin Configuration and Descriptions
The Gravity Geiger Counter uses a 3-pin interface for easy connection to microcontrollers like Arduino. Below is the pin configuration:
| Pin | Name | Description |
|---|---|---|
| 1 | Signal | Outputs a digital pulse (HIGH) for each radiation event detected by the GM tube. |
| 2 | VCC | Power input (3.3V to 5V DC). |
| 3 | GND | Ground connection. |
Usage Instructions
How to Use the Component in a Circuit
Connect the Geiger Counter to a Microcontroller:
- Use the 3-pin Gravity interface to connect the Geiger counter to your microcontroller (e.g., Arduino UNO).
- Connect the
Signalpin to a digital input pin on the microcontroller. - Connect the
VCCpin to a 3.3V or 5V power source. - Connect the
GNDpin to the ground of the microcontroller.
Write Code to Process Radiation Events:
- The Geiger counter outputs a digital pulse (HIGH) for each radiation event. Use an interrupt or polling method to count these pulses over time.
Calculate Radiation Levels:
- Use the pulse count to calculate the radiation dose rate in μSv/h. Refer to the GM tube's datasheet for the conversion factor (e.g., counts per minute to μSv/h).
Display or Log Data:
- Display the radiation levels on an LCD, serial monitor, or log them to an SD card for analysis.
Important Considerations and Best Practices
- Power Supply: Ensure a stable power supply to avoid noise or false readings.
- Radiation Safety: Handle radioactive sources with care and follow safety guidelines.
- Environmental Factors: Avoid using the Geiger counter in extreme temperatures or high humidity, as this may affect accuracy.
- Calibration: Periodically calibrate the Geiger counter using a known radiation source for accurate measurements.
Example Code for Arduino UNO
Below is an example Arduino sketch to read and display radiation levels using the Gravity Geiger Counter:
// Example code for Gravity Geiger Counter with Arduino UNO
// This code counts radiation pulses and calculates the dose rate in μSv/h.

const int signalPin = 2;  // Pin connected to the Signal output of the Geiger counter
volatile unsigned int pulseCount = 0;  // Variable to store pulse count
unsigned long previousMillis = 0;  // Timer for 1-second intervals
const unsigned long interval = 1000;  // Interval for pulse counting (1 second)

// Conversion factor: counts per minute (CPM) to μSv/h
// This value depends on the GM tube used. For M4011, use 153.8 CPM = 1 μSv/h.
const float conversionFactor = 153.8;

void setup() {
  pinMode(signalPin, INPUT);  // Set the signal pin as input
  attachInterrupt(digitalPinToInterrupt(signalPin), countPulse, RISING);
  Serial.begin(9600);  // Initialize serial communication
}

void loop() {
  unsigned long currentMillis = millis();

  // Check if 1 second has passed
  if (currentMillis - previousMillis >= interval) {
    previousMillis = currentMillis;

    // Calculate radiation dose rate in μSv/h
    float doseRate = (pulseCount / conversionFactor) * 60.0;

    // Print the results to the Serial Monitor
    Serial.print("Radiation Dose Rate: ");
    Serial.print(doseRate);
    Serial.println(" μSv/h");

    // Reset pulse count for the next interval
    pulseCount = 0;
  }
}

// Interrupt service routine to count pulses
void countPulse() {
  pulseCount++;
}
Troubleshooting and FAQs
Common Issues and Solutions
| Issue | Possible Cause | Solution |
|---|---|---|
| No pulses detected | Loose or incorrect wiring | Check all connections and ensure proper wiring. |
| High noise or false readings | Unstable power supply or electromagnetic interference | Use a stable power source and keep the Geiger counter away from noisy devices. |
| Inconsistent radiation readings | Environmental factors (e.g., temperature, humidity) | Avoid using the device in extreme conditions. |
| Incorrect dose rate calculation | Wrong conversion factor for the GM tube | Verify the GM tube's datasheet and use the correct conversion factor. |
FAQs
Can I use the Geiger counter with a 3.3V microcontroller?
- Yes, the Gravity Geiger Counter supports both 3.3V and 5V logic levels.
What is the maximum radiation level the Geiger counter can measure?
- The device can measure radiation levels up to 1,000 μSv/h.
How do I know if the Geiger counter is working?
- The Geiger counter outputs a digital pulse for each radiation event. You can monitor these pulses using an LED or a microcontroller.
Can I use this Geiger counter to detect specific types of radiation?
- The Geiger counter detects ionizing radiation (alpha, beta, and gamma), but it cannot differentiate between them.
This documentation provides a comprehensive guide to using the Gravity Geiger Counter effectively. For further assistance, refer to the manufacturer's datasheet or support resources.