How to Use Incubator Controller: Examples, Pinouts, and Specs
Introduction
The Incubator Controller (HM68 / XM18) is a versatile device designed to regulate and maintain critical environmental conditions such as temperature and humidity within an incubator. This component ensures optimal growth and development of biological samples or organisms by providing precise control over these parameters. It is widely used in applications such as poultry egg incubation, laboratory experiments, and other biological research requiring controlled environments.
Explore Projects Built with Incubator Controller

Explore Projects Built with Incubator Controller
Common Applications and Use Cases
- Poultry egg incubation for hatching
- Laboratory experiments requiring controlled temperature and humidity
- Biological research involving cell cultures or microorganisms
- Industrial applications for environmental simulation
Technical Specifications
The following table outlines the key technical details of the Incubator Controller:
| Parameter | Specification |
|---|---|
| Model Number | HM68 / XM18 |
| Input Voltage | AC 110V-220V |
| Temperature Range | 0°C to 99.9°C |
| Humidity Range | 0% to 99% RH |
| Temperature Accuracy | ±0.1°C |
| Humidity Accuracy | ±3% RH |
| Output Type | Relay (Heating, Cooling, Humidifying, Dehumidifying) |
| Maximum Load Current | 10A |
| Sensor Type | NTC Thermistor (Temperature), Capacitive Humidity Sensor |
| Display Type | Digital LED |
| Dimensions | 75mm x 34mm x 85mm |
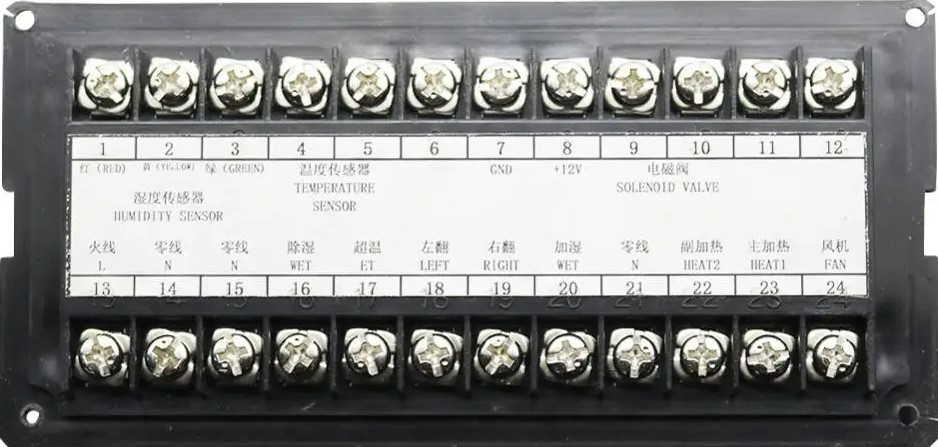
Pin Configuration and Descriptions
The Incubator Controller has a set of input and output terminals for connecting sensors, power, and controlled devices. The pin configuration is as follows:
| Pin Number | Label | Description |
|---|---|---|
| 1 | AC Input (L) | Live wire input for AC power (110V-220V). |
| 2 | AC Input (N) | Neutral wire input for AC power. |
| 3 | Heating Output | Relay output for connecting a heating element. |
| 4 | Cooling Output | Relay output for connecting a cooling device. |
| 5 | Humidifying Output | Relay output for connecting a humidifier. |
| 6 | Dehumidifying Output | Relay output for connecting a dehumidifier. |
| 7 | Temp Sensor | Input for the temperature sensor (NTC thermistor). |
| 8 | Humidity Sensor | Input for the humidity sensor (capacitive type). |
Usage Instructions
How to Use the Component in a Circuit
- Power Connection: Connect the AC power supply to the
AC Input (L)andAC Input (N)terminals. Ensure the voltage matches the controller's input range (110V-220V). - Sensor Connection: Attach the temperature sensor to the
Temp Sensorterminal and the humidity sensor to theHumidity Sensorterminal. - Load Connection: Connect the heating, cooling, humidifying, and dehumidifying devices to their respective output terminals.
- Configuration: Use the digital LED display and buttons to set the desired temperature and humidity levels. Refer to the user manual for detailed programming instructions.
- Operation: Once configured, the controller will automatically regulate the connected devices to maintain the set environmental conditions.
Important Considerations and Best Practices
- Ensure all connections are secure and insulated to prevent electrical hazards.
- Use devices with current ratings within the controller's maximum load capacity (10A).
- Place the sensors in appropriate locations within the incubator for accurate readings.
- Avoid exposing the controller to water or excessive moisture to prevent damage.
- Regularly calibrate the sensors for optimal performance.
Example: Connecting to an Arduino UNO
While the Incubator Controller is a standalone device, it can be interfaced with an Arduino UNO for advanced monitoring or control. Below is an example code snippet for reading temperature and humidity data from the controller's sensors:
#include <Wire.h>

// Define analog pins for temperature and humidity sensors
const int tempSensorPin = A0; // Connect Temp Sensor to A0
const int humiditySensorPin = A1; // Connect Humidity Sensor to A1

void setup() {
  Serial.begin(9600); // Initialize serial communication
  pinMode(tempSensorPin, INPUT); // Set temperature sensor pin as input
  pinMode(humiditySensorPin, INPUT); // Set humidity sensor pin as input
}

void loop() {
  // Read analog values from sensors
  int tempValue = analogRead(tempSensorPin);
  int humidityValue = analogRead(humiditySensorPin);

  // Convert sensor values to meaningful units (example conversion)
  float temperature = (tempValue / 1023.0) * 100.0; // Convert to °C
  float humidity = (humidityValue / 1023.0) * 100.0; // Convert to %RH

  // Print the readings to the Serial Monitor
  Serial.print("Temperature: ");
  Serial.print(temperature);
  Serial.println(" °C");

  Serial.print("Humidity: ");
  Serial.print(humidity);
  Serial.println(" %RH");

  delay(1000); // Wait for 1 second before next reading
}
Note: The above code assumes the sensors output analog signals. If the sensors are digital, refer to their datasheets for proper interfacing.
Troubleshooting and FAQs
Common Issues Users Might Face
Controller Not Powering On:
- Check the AC power supply and ensure proper voltage is supplied.
- Verify that the live and neutral wires are connected correctly.
Inaccurate Temperature or Humidity Readings:
- Ensure the sensors are properly connected and placed in the correct location.
- Calibrate the sensors if readings are consistently off.
Relay Outputs Not Activating:
- Verify that the connected devices are functional and within the controller's load capacity.
- Check the configuration settings to ensure the setpoints are correct.
Display Malfunctioning:
- Inspect for loose connections or damaged components.
- Restart the controller and check if the issue persists.
Solutions and Tips for Troubleshooting
- Always disconnect the power supply before inspecting or modifying connections.
- Use a multimeter to check for continuity and proper voltage levels at the terminals.
- Refer to the manufacturer's user manual for advanced troubleshooting steps.
- If the issue cannot be resolved, contact the supplier or manufacturer for support.
By following this documentation, users can effectively utilize the Incubator Controller (HM68 / XM18) to maintain precise environmental conditions for their applications.