Cirkit Designer Logo
Cirkit Designer
Your all-in-one circuit design IDE
Home / 
Component Documentation

How to Use xkc y26: Examples, Pinouts, and Specs

Image of xkc y26
Cirkit Designer LogoDesign with xkc y26 in Cirkit Designer

Introduction

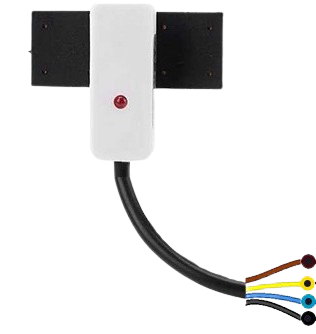
The XKC Y26 is a capacitive touch sensor module manufactured by Arduino. It is designed to detect touch input through capacitive sensing technology. This module is highly versatile and can be used in a wide range of applications, including touch switches, user interfaces, and interactive projects. Its compact design and ease of integration make it a popular choice for hobbyists and professionals alike.

Explore Projects Built with xkc y26

Use Cirkit Designer to design, explore, and prototype these projects online. Some projects support real-time simulation. Click "Open Project" to start designing instantly!
Mega2560-Controlled Automation System with Non-Contact Liquid Level Sensing and Motor Control
Image of Project_AutomaticBartender: A project utilizing xkc y26 in a practical application
This circuit appears to be a complex control system centered around an Arduino Mega2560 R3 Pro microcontroller, which interfaces with multiple sensors (XKC-Y26-V non-contact liquid level sensors and an LM35 temperature sensor), servo motors, a touch display, and an IBT-2 H-Bridge motor driver for controlling a planetary gearbox motor. The system also includes a UART TTL to RS485 converter for communication, likely with the touch display, and a power management subsystem with a switching power supply, fuses, and circuit breakers for safety and voltage regulation (XL4016). The absence of embedded code suggests that the functionality of the microcontroller is not defined within the provided data.
Cirkit Designer LogoOpen Project in Cirkit Designer
FTDI to UART Adapter with J26 Connector
Image of J26 CLOSEUP: A project utilizing xkc y26 in a practical application
This circuit connects an FTDI USB-to-serial converter to a standard serial interface via a J26 connector. It facilitates serial communication by linking the ground, transmit, receive, data terminal ready, and request to send signals between the FTDI chip and the J26 connector.
Cirkit Designer LogoOpen Project in Cirkit Designer
Wireless Joystick-Controlled Interface with Arduino Nano and NRF24L01
Image of Transmitter 11: A project utilizing xkc y26 in a practical application
This circuit features an Arduino Nano interfaced with a KY-023 Dual Axis Joystick Module for analog input, and an NRF24L01 module for wireless communication. The joystick provides x and y-axis control signals to the Arduino's analog inputs and a switch signal to a digital input, while the NRF24L01 enables the Arduino to communicate with other devices wirelessly. The 2x 18650 batteries supply power to the Arduino, which in turn powers the joystick and the NRF24L01 module.
Cirkit Designer LogoOpen Project in Cirkit Designer
18650 Li-ion Battery Pack with 4S40A BMS and XL4016 Voltage Regulator for Battery-Powered Applications
Image of Power Bank: A project utilizing xkc y26 in a practical application
This circuit is a battery management and charging system for a 4S Li-ion battery pack. It includes multiple 18650 Li-ion batteries connected to a 4S40A BMS for balancing and protection, a battery indicator for monitoring charge status, and an XL4016 module for voltage regulation. The system is designed to be charged via a 20V input from a charger.
Cirkit Designer LogoOpen Project in Cirkit Designer

Explore Projects Built with xkc y26

Use Cirkit Designer to design, explore, and prototype these projects online. Some projects support real-time simulation. Click "Open Project" to start designing instantly!
Image of Project_AutomaticBartender: A project utilizing xkc y26 in a practical application
Mega2560-Controlled Automation System with Non-Contact Liquid Level Sensing and Motor Control
This circuit appears to be a complex control system centered around an Arduino Mega2560 R3 Pro microcontroller, which interfaces with multiple sensors (XKC-Y26-V non-contact liquid level sensors and an LM35 temperature sensor), servo motors, a touch display, and an IBT-2 H-Bridge motor driver for controlling a planetary gearbox motor. The system also includes a UART TTL to RS485 converter for communication, likely with the touch display, and a power management subsystem with a switching power supply, fuses, and circuit breakers for safety and voltage regulation (XL4016). The absence of embedded code suggests that the functionality of the microcontroller is not defined within the provided data.
Cirkit Designer LogoOpen Project in Cirkit Designer
Image of J26 CLOSEUP: A project utilizing xkc y26 in a practical application
FTDI to UART Adapter with J26 Connector
This circuit connects an FTDI USB-to-serial converter to a standard serial interface via a J26 connector. It facilitates serial communication by linking the ground, transmit, receive, data terminal ready, and request to send signals between the FTDI chip and the J26 connector.
Cirkit Designer LogoOpen Project in Cirkit Designer
Image of Transmitter 11: A project utilizing xkc y26 in a practical application
Wireless Joystick-Controlled Interface with Arduino Nano and NRF24L01
This circuit features an Arduino Nano interfaced with a KY-023 Dual Axis Joystick Module for analog input, and an NRF24L01 module for wireless communication. The joystick provides x and y-axis control signals to the Arduino's analog inputs and a switch signal to a digital input, while the NRF24L01 enables the Arduino to communicate with other devices wirelessly. The 2x 18650 batteries supply power to the Arduino, which in turn powers the joystick and the NRF24L01 module.
Cirkit Designer LogoOpen Project in Cirkit Designer
Image of Power Bank: A project utilizing xkc y26 in a practical application
18650 Li-ion Battery Pack with 4S40A BMS and XL4016 Voltage Regulator for Battery-Powered Applications
This circuit is a battery management and charging system for a 4S Li-ion battery pack. It includes multiple 18650 Li-ion batteries connected to a 4S40A BMS for balancing and protection, a battery indicator for monitoring charge status, and an XL4016 module for voltage regulation. The system is designed to be charged via a 20V input from a charger.
Cirkit Designer LogoOpen Project in Cirkit Designer

Common Applications

  • Touch-sensitive switches for home automation
  • Interactive user interfaces for electronic devices
  • Proximity detection in embedded systems
  • Capacitive touch panels for DIY projects

Technical Specifications

The XKC Y26 module is designed to operate efficiently in low-power environments while providing reliable touch detection. Below are its key technical specifications:

Parameter Value
Operating Voltage 2.7V to 6V
Operating Current < 10 µA (standby mode)
Response Time < 60 ms
Output Type Digital (High/Low)
Touch Sensitivity Adjustable via onboard potentiometer
Operating Temperature -20°C to 70°C
Dimensions 25mm x 20mm x 5mm

Pin Configuration and Descriptions

The XKC Y26 module has a simple pinout, making it easy to integrate into various circuits. Below is the pin configuration:

Pin Name Description
1 VCC Power supply input (2.7V to 6V)
2 GND Ground connection
3 OUT Digital output pin (High when touch is detected)

Usage Instructions

The XKC Y26 is straightforward to use in a circuit. Follow the steps below to integrate it into your project:

Connecting the XKC Y26

  1. Power Supply: Connect the VCC pin to a 3.3V or 5V power source, depending on your system's voltage.
  2. Ground: Connect the GND pin to the ground of your circuit.
  3. Output: Connect the OUT pin to a digital input pin of your microcontroller or directly to an LED for testing purposes.

Important Considerations

  • Sensitivity Adjustment: Use the onboard potentiometer to adjust the touch sensitivity. Turn clockwise to increase sensitivity and counterclockwise to decrease it.
  • Avoid Noise: Ensure proper grounding and avoid placing the module near high-frequency noise sources to maintain accurate touch detection.
  • Touch Surface: The module can detect touch through non-conductive materials like glass or plastic. Ensure the material is thin enough for reliable detection.

Example Code for Arduino UNO

Below is an example of how to use the XKC Y26 with an Arduino UNO to detect touch input and control an LED:

// Define the pin connected to the XKC Y26 output
const int touchPin = 2;  // Digital pin 2
const int ledPin = 13;   // Built-in LED pin

void setup() {
  pinMode(touchPin, INPUT);  // Set touchPin as input
  pinMode(ledPin, OUTPUT);   // Set ledPin as output
  Serial.begin(9600);        // Initialize serial communication
}

void loop() {
  int touchState = digitalRead(touchPin);  // Read the touch sensor state

  if (touchState == HIGH) {
    // If touch is detected, turn on the LED
    digitalWrite(ledPin, HIGH);
    Serial.println("Touch detected!");
  } else {
    // If no touch is detected, turn off the LED
    digitalWrite(ledPin, LOW);
    Serial.println("No touch detected.");
  }

  delay(100);  // Small delay for stability
}

Best Practices

  • Use a decoupling capacitor (e.g., 0.1 µF) between VCC and GND to reduce power supply noise.
  • Test the module's sensitivity in your specific application environment and adjust as needed.
  • Avoid exposing the module to extreme temperatures or humidity to ensure long-term reliability.

Troubleshooting and FAQs

Common Issues and Solutions

  1. No Output Detected:

    • Ensure the module is powered correctly (check VCC and GND connections).
    • Verify that the sensitivity is adjusted appropriately using the potentiometer.
    • Check for loose or faulty wiring.
  2. False Touch Detection:

    • Reduce sensitivity using the potentiometer.
    • Ensure the module is not placed near high-frequency noise sources or strong electromagnetic fields.
  3. Intermittent Operation:

    • Check the power supply for stability. Use a decoupling capacitor if necessary.
    • Verify that the touch surface is clean and free of debris.

Frequently Asked Questions

Q: Can the XKC Y26 detect touch through thick materials?
A: The module can detect touch through non-conductive materials like glass or plastic, but the thickness should not exceed 3-5mm for reliable detection. Adjust the sensitivity as needed.

Q: Is the XKC Y26 compatible with 3.3V systems?
A: Yes, the module operates within a voltage range of 2.7V to 6V, making it compatible with both 3.3V and 5V systems.

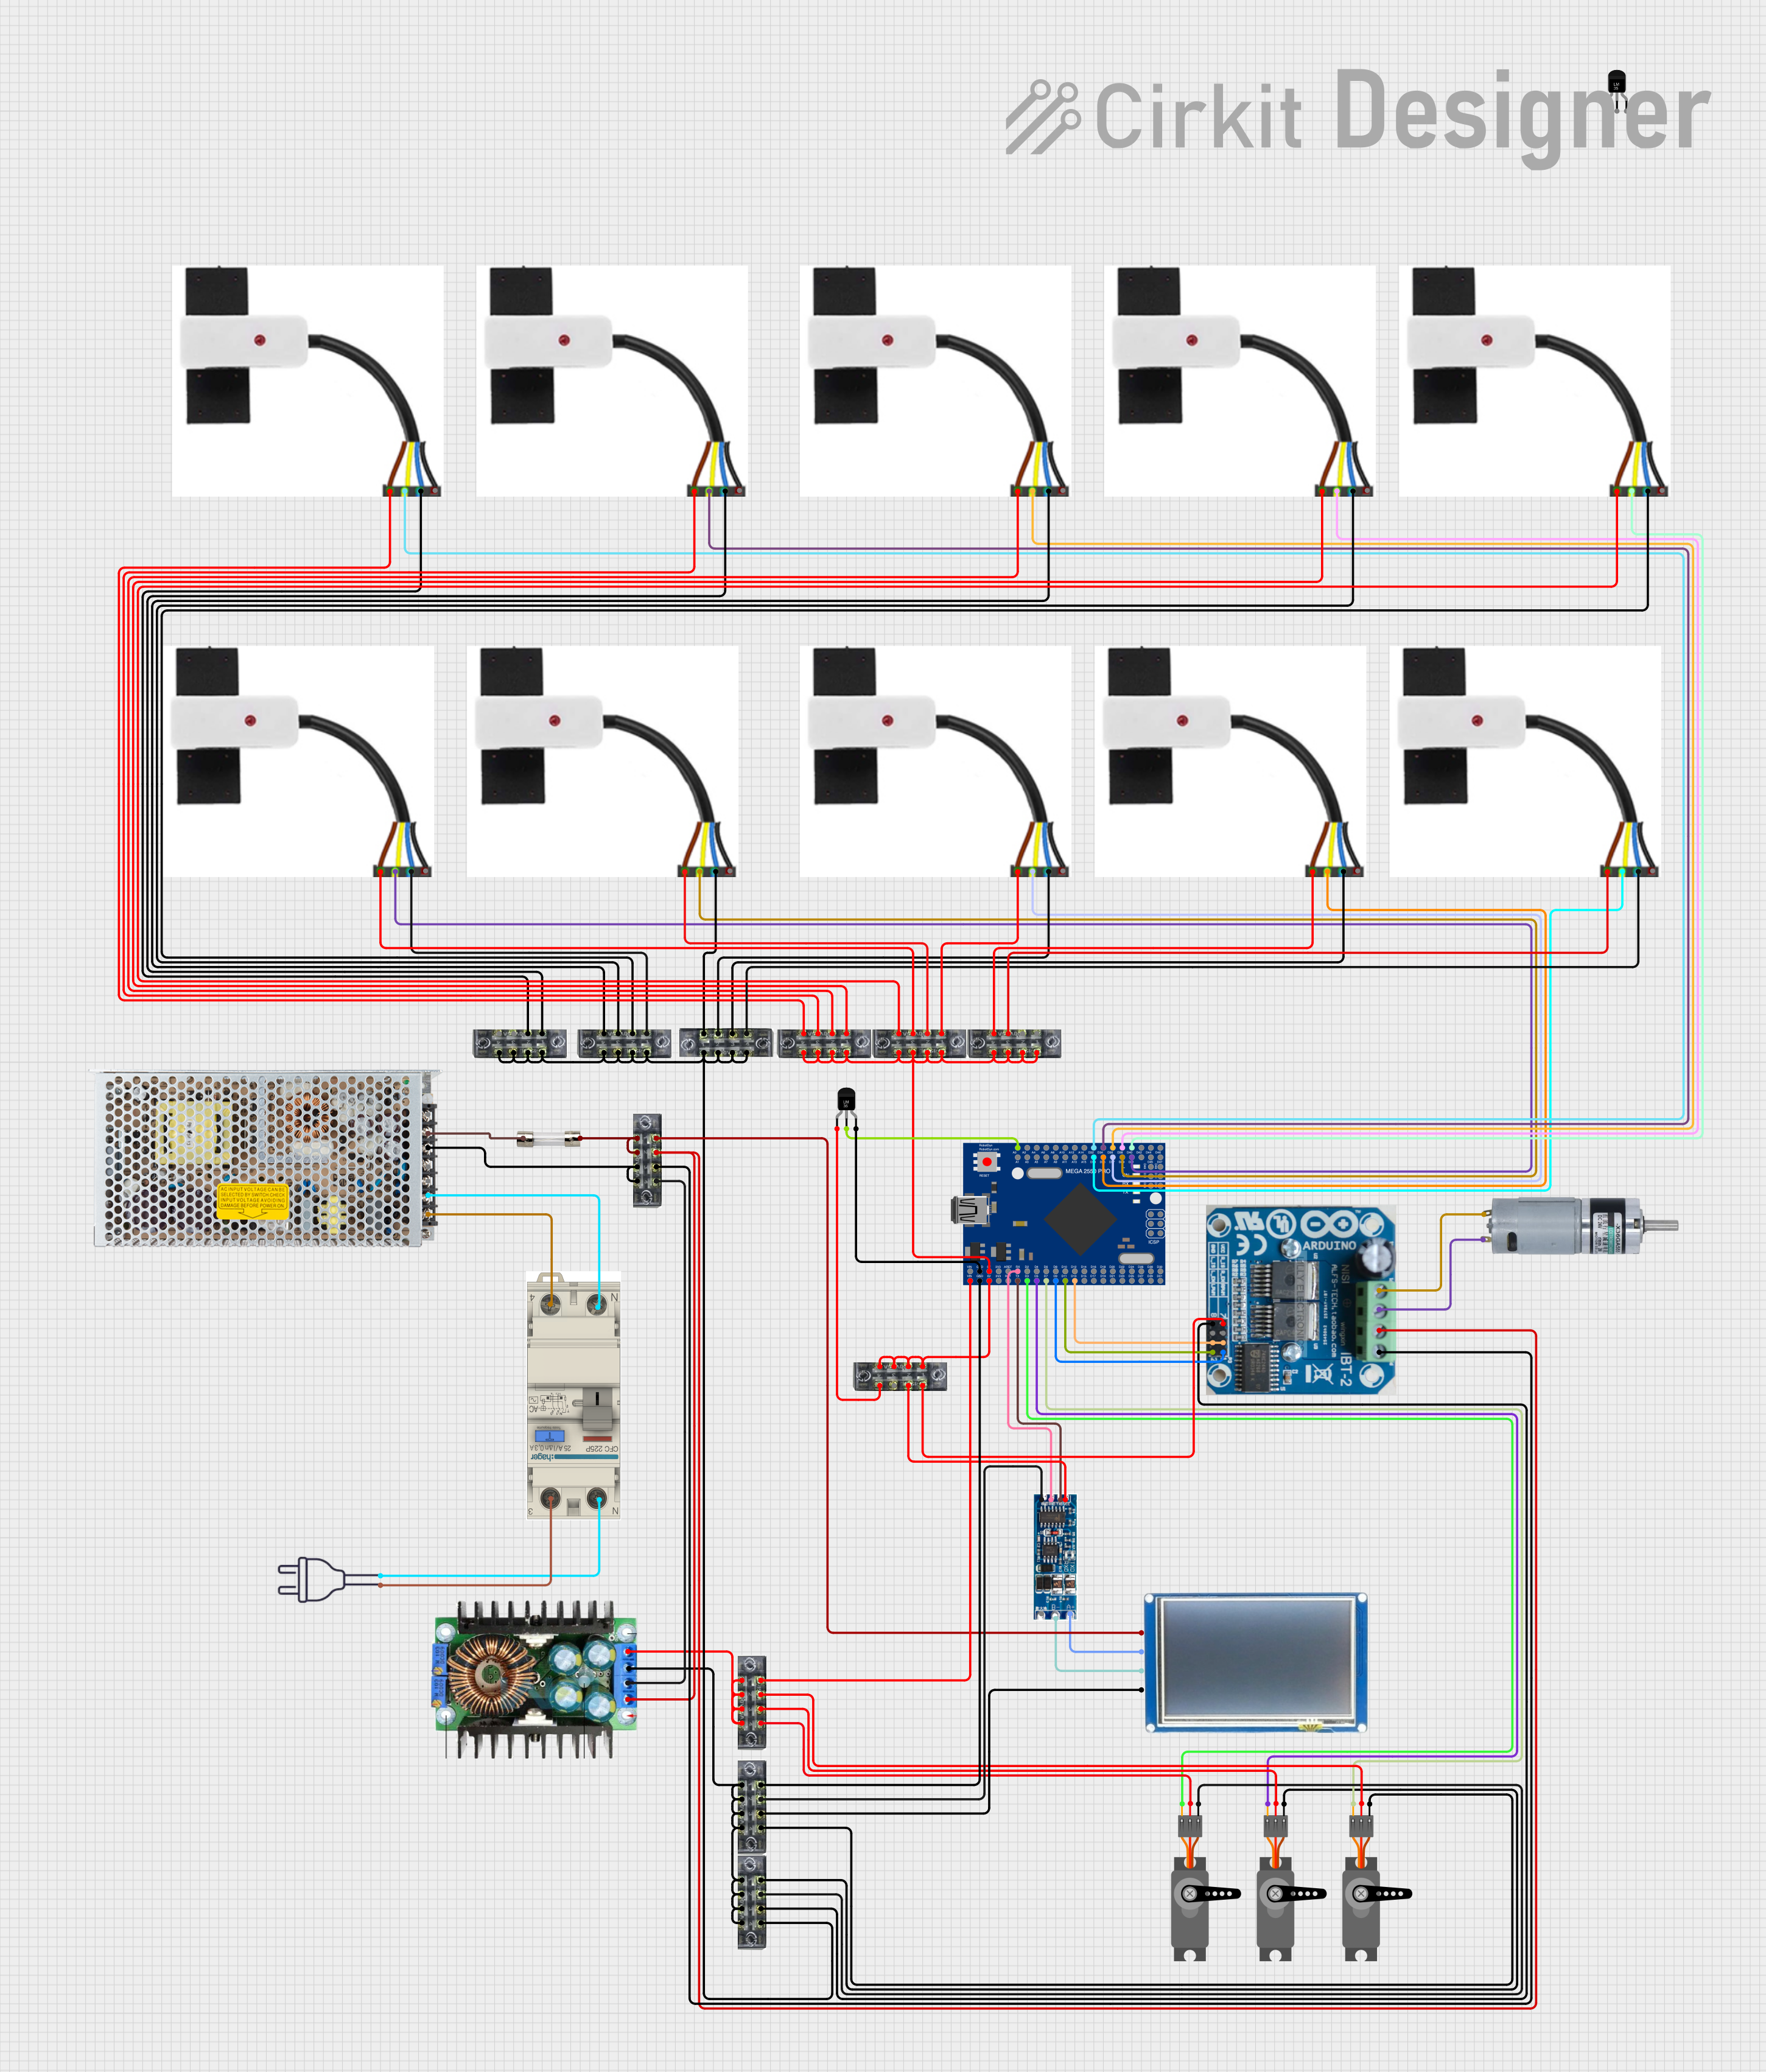
Q: Can I use multiple XKC Y26 modules in the same project?
A: Yes, you can use multiple modules, but ensure proper grounding and avoid placing them too close to each other to prevent interference.

Q: How do I clean the module if it gets dirty?
A: Use a soft, dry cloth to clean the module. Avoid using liquids or abrasive materials.

By following this documentation, you can effectively integrate and troubleshoot the XKC Y26 capacitive touch sensor module in your projects.