
How to Use Adafruit BME680: Examples, Pinouts, and Specs
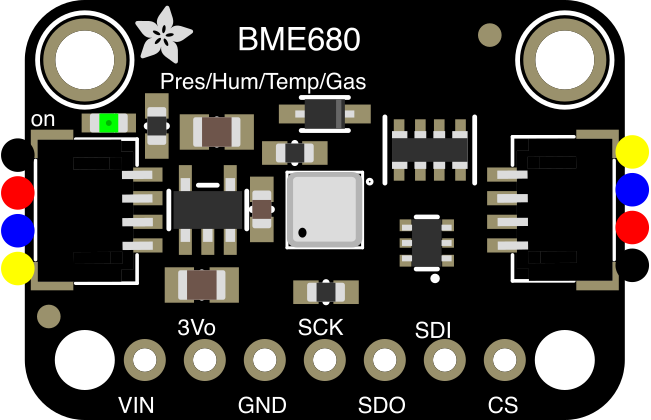
 Design with Adafruit BME680 in Cirkit Designer
Introduction
The Adafruit BME680 (Part ID: 3660) is a versatile environmental sensor capable of measuring gas, temperature, humidity, and pressure. This sensor is ideal for applications requiring precise environmental data, such as air quality monitoring, weather stations, and IoT devices. Its compact design and I2C/SPI communication interfaces make it easy to integrate into a wide range of projects.
Explore Projects Built with Adafruit BME680
 Open Project in Cirkit Designer
 Open Project in Cirkit Designer
 Open Project in Cirkit Designer
 Open Project in Cirkit Designer
Explore Projects Built with Adafruit BME680
Open Project in Cirkit DesignerOpen Project in Cirkit DesignerOpen Project in Cirkit DesignerOpen Project in Cirkit DesignerCommon Applications
- Air quality monitoring systems
- Weather stations
- Smart home automation
- IoT devices for environmental sensing
- HVAC systems for indoor air quality control
Technical Specifications
The Adafruit BME680 is a high-performance sensor with the following key specifications:
| Parameter | Value |
|---|---|
| Operating Voltage | 3.3V or 5V (logic level compatible) |
| Communication Protocol | I2C (default address: 0x77 or 0x76) and SPI |
| Temperature Range | -40°C to +85°C |
| Humidity Range | 0% to 100% relative humidity |
| Pressure Range | 300 hPa to 1100 hPa |
| Gas Measurement | VOCs (Volatile Organic Compounds) in the range of 0 to 500 ppm |
| Power Consumption | 0.15mA (typical in low-power mode) |
| Dimensions | 18mm x 18mm x 3mm |
Pin Configuration
The Adafruit BME680 breakout board has the following pin layout:
| Pin Name | Description |
|---|---|
| VIN | Power input (3.3V or 5V) |
| GND | Ground connection |
| SCL | I2C clock line (or SPI clock line in SPI mode) |
| SDA | I2C data line (or SPI MOSI line in SPI mode) |
| CS | Chip select for SPI communication (connect to GND for I2C mode) |
| SDO | I2C address selection (connect to GND for 0x76 or leave floating for 0x77) |
Usage Instructions
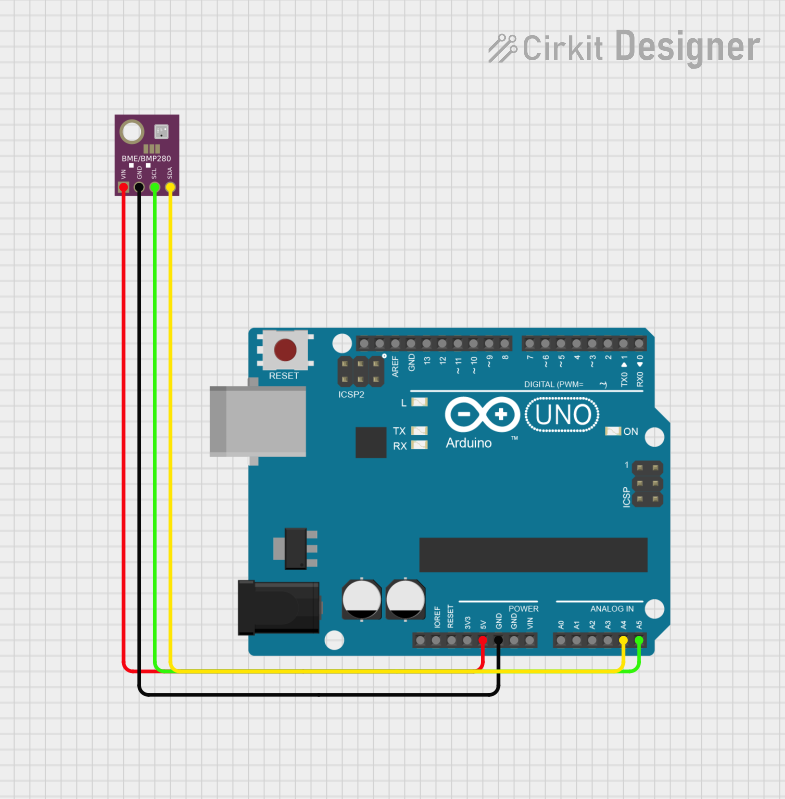
Connecting the BME680 to an Arduino UNO
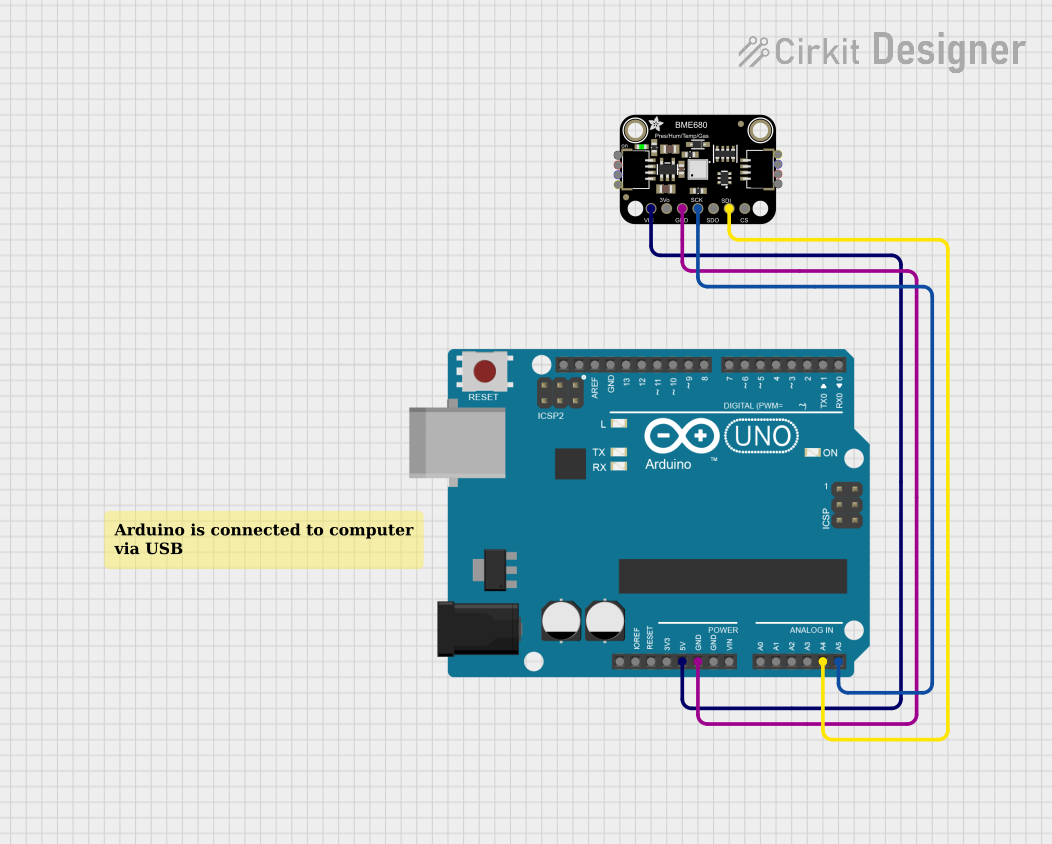
To use the Adafruit BME680 with an Arduino UNO, follow these steps:
Wiring:
- Connect the
VINpin to the 5V pin on the Arduino. - Connect the
GNDpin to the GND pin on the Arduino. - Connect the
SCLpin to the A5 pin (I2C clock line) on the Arduino. - Connect the
SDApin to the A4 pin (I2C data line) on the Arduino. - Leave the
CSpin unconnected (default I2C mode). - Optionally, connect the
SDOpin to GND to set the I2C address to 0x76.
- Connect the
Install the Adafruit BME680 Library:
- Open the Arduino IDE.
- Go to Sketch > Include Library > Manage Libraries.
- Search for "Adafruit BME680" and install the library.
Example Code: Use the following example code to read temperature, humidity, pressure, and gas data:
#include <Wire.h>
#include <Adafruit_Sensor.h>
#include "Adafruit_BME680.h"

// Create an instance of the BME680 sensor
Adafruit_BME680 bme;

void setup() {
  Serial.begin(9600);
  while (!Serial); // Wait for serial monitor to open

  // Initialize the BME680 sensor
  if (!bme.begin()) {
    Serial.println("Could not find a valid BME680 sensor, check wiring!");
    while (1);
  }

  // Set up sensor settings
  bme.setTemperatureOversampling(BME680_OS_8X);
  bme.setHumidityOversampling(BME680_OS_2X);
  bme.setPressureOversampling(BME680_OS_4X);
  bme.setIIRFilterSize(BME680_FILTER_SIZE_3);
  bme.setGasHeater(320, 150); // 320°C for 150 ms
}

void loop() {
  // Perform a measurement
  if (!bme.performReading()) {
    Serial.println("Failed to perform reading!");
    return;
  }

  // Print sensor data to the serial monitor
  Serial.print("Temperature = ");
  Serial.print(bme.temperature);
  Serial.println(" °C");

  Serial.print("Humidity = ");
  Serial.print(bme.humidity);
  Serial.println(" %");

  Serial.print("Pressure = ");
  Serial.print(bme.pressure / 100.0);
  Serial.println(" hPa");

  Serial.print("Gas = ");
  Serial.print(bme.gas_resistance / 1000.0);
  Serial.println(" KOhms");

  Serial.println();
  delay(2000); // Wait 2 seconds before the next reading
}
Important Considerations
- Ensure proper power supply (3.3V or 5V) to avoid damaging the sensor.
- Use pull-up resistors (typically 4.7kΩ) on the I2C lines if not already included on the breakout board.
- Avoid exposing the sensor to extreme conditions (e.g., high humidity or temperature) for prolonged periods.
Troubleshooting and FAQs
Common Issues
Sensor Not Detected:
- Cause: Incorrect wiring or I2C address mismatch.
- Solution: Double-check the wiring and ensure the correct I2C address is used (0x76 or 0x77).
Inaccurate Readings:
- Cause: Insufficient warm-up time or improper calibration.
- Solution: Allow the sensor to stabilize for a few minutes after powering on. Use the Adafruit library for proper calibration.
Gas Resistance Always Zero:
- Cause: Gas heater not configured correctly.
- Solution: Ensure the
setGasHeater()function is called with appropriate parameters.
FAQs
Q: Can the BME680 measure CO2 levels?
A: No, the BME680 measures VOCs, which can be used as an indicator of air quality but does not directly measure CO2.
Q: Can I use the BME680 with a Raspberry Pi?
A: Yes, the BME680 is compatible with Raspberry Pi. Use the Adafruit Python library for integration.
Q: How do I switch between I2C and SPI modes?
A: For I2C mode, leave the CS pin unconnected. For SPI mode, connect the CS pin to a GPIO pin and configure the SPI interface in your code.
Q: What is the typical warm-up time for gas measurements?
A: The sensor requires a warm-up time of approximately 5 minutes for accurate gas readings.